Apple Cream Pie

Apple Cream Pie

I love this time of year! The weather, color, gatherings with friends and family,Braeburn and golden delicious apples in a bowl. and the food! Thanksgiving in the US is just a few weeks out and menu planning at White House Red Door is well underway. Truth be told, the planning is not too difficult, as the menu has pretty much remained unchanged since my childhood. It’s not that my parents, siblings, or my own family don’t like to try new foods, or experiment; Christmas dinners, Easter brunches, and other traditional meals vary from year to year, but Thanksgiving has always remained the same, well at least the main dish and sides. There would be a “coup de cuisine” if candied yams weren’t on the table. That said, desserts are an entirely different story. We are far more flexible in our after dinner fare thinking. Friends often join us for dessert, bringing their favorite treats, creating a beautiful cornucopia of desserts.

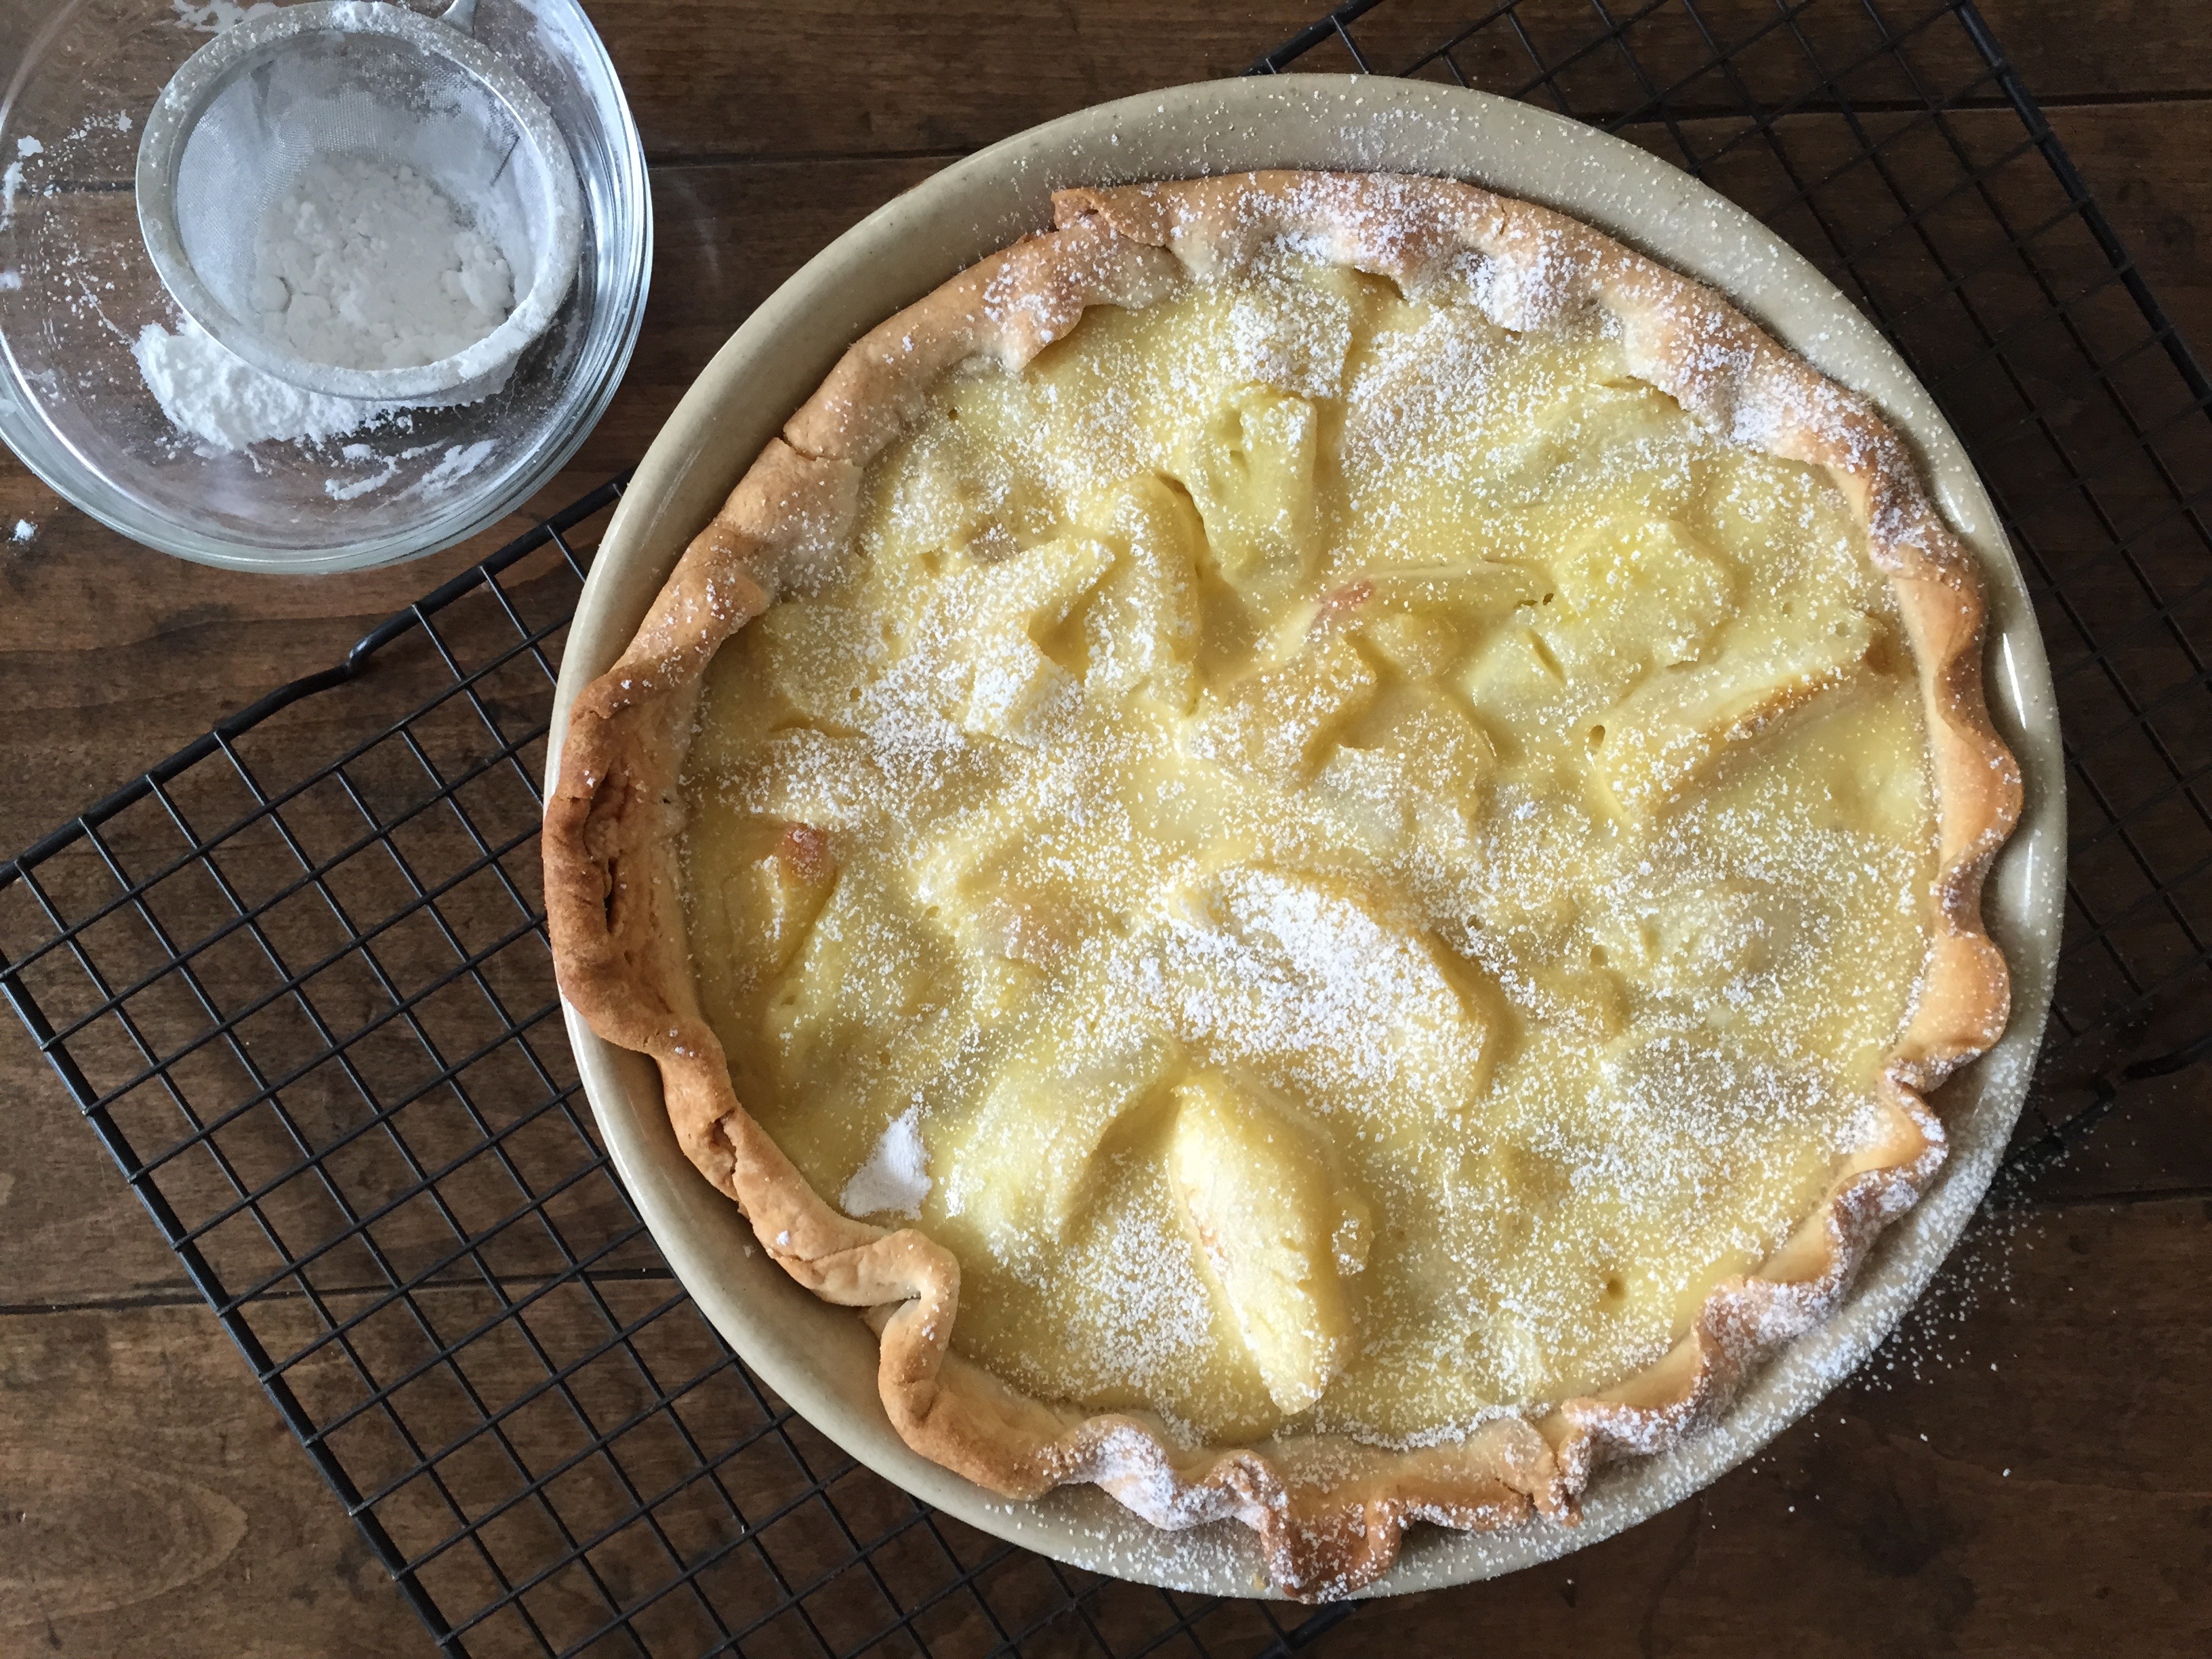
One pie that has made appearances off and on through the years is my mom’s Apple Cream Pie. Quite unlike a traditional double crust apple pie, Tarte Tatin, or apple crisp, which have all shown up to the party over the years, this pie features tender slices of apples nestled in a bed of creamy custard. Traditional enough for the purists but outside the box enough for those wanting something new or different. For reasons unknown, this pie has not been in attendance for some time, and I’ve never made it myself. Curious to give it a go, I wanted to see if it was as good as I remembered and should be included on the menu this year. Without a doubt, it was and will be.

Women's Day Encyclopedia of CookeryConversations with mom revealed that the original recipe came from a long out of print encyclopedia like set of cookbooks from Women’s Day, actually called Encyclopedia of Cookery. My mom still has her set and found an identical set at a tag sale years ago that she gave to me as a gift. It turns out the recipe for this wonderful pie has been sitting in the vintage set of cookbooks, in my own house, for years.

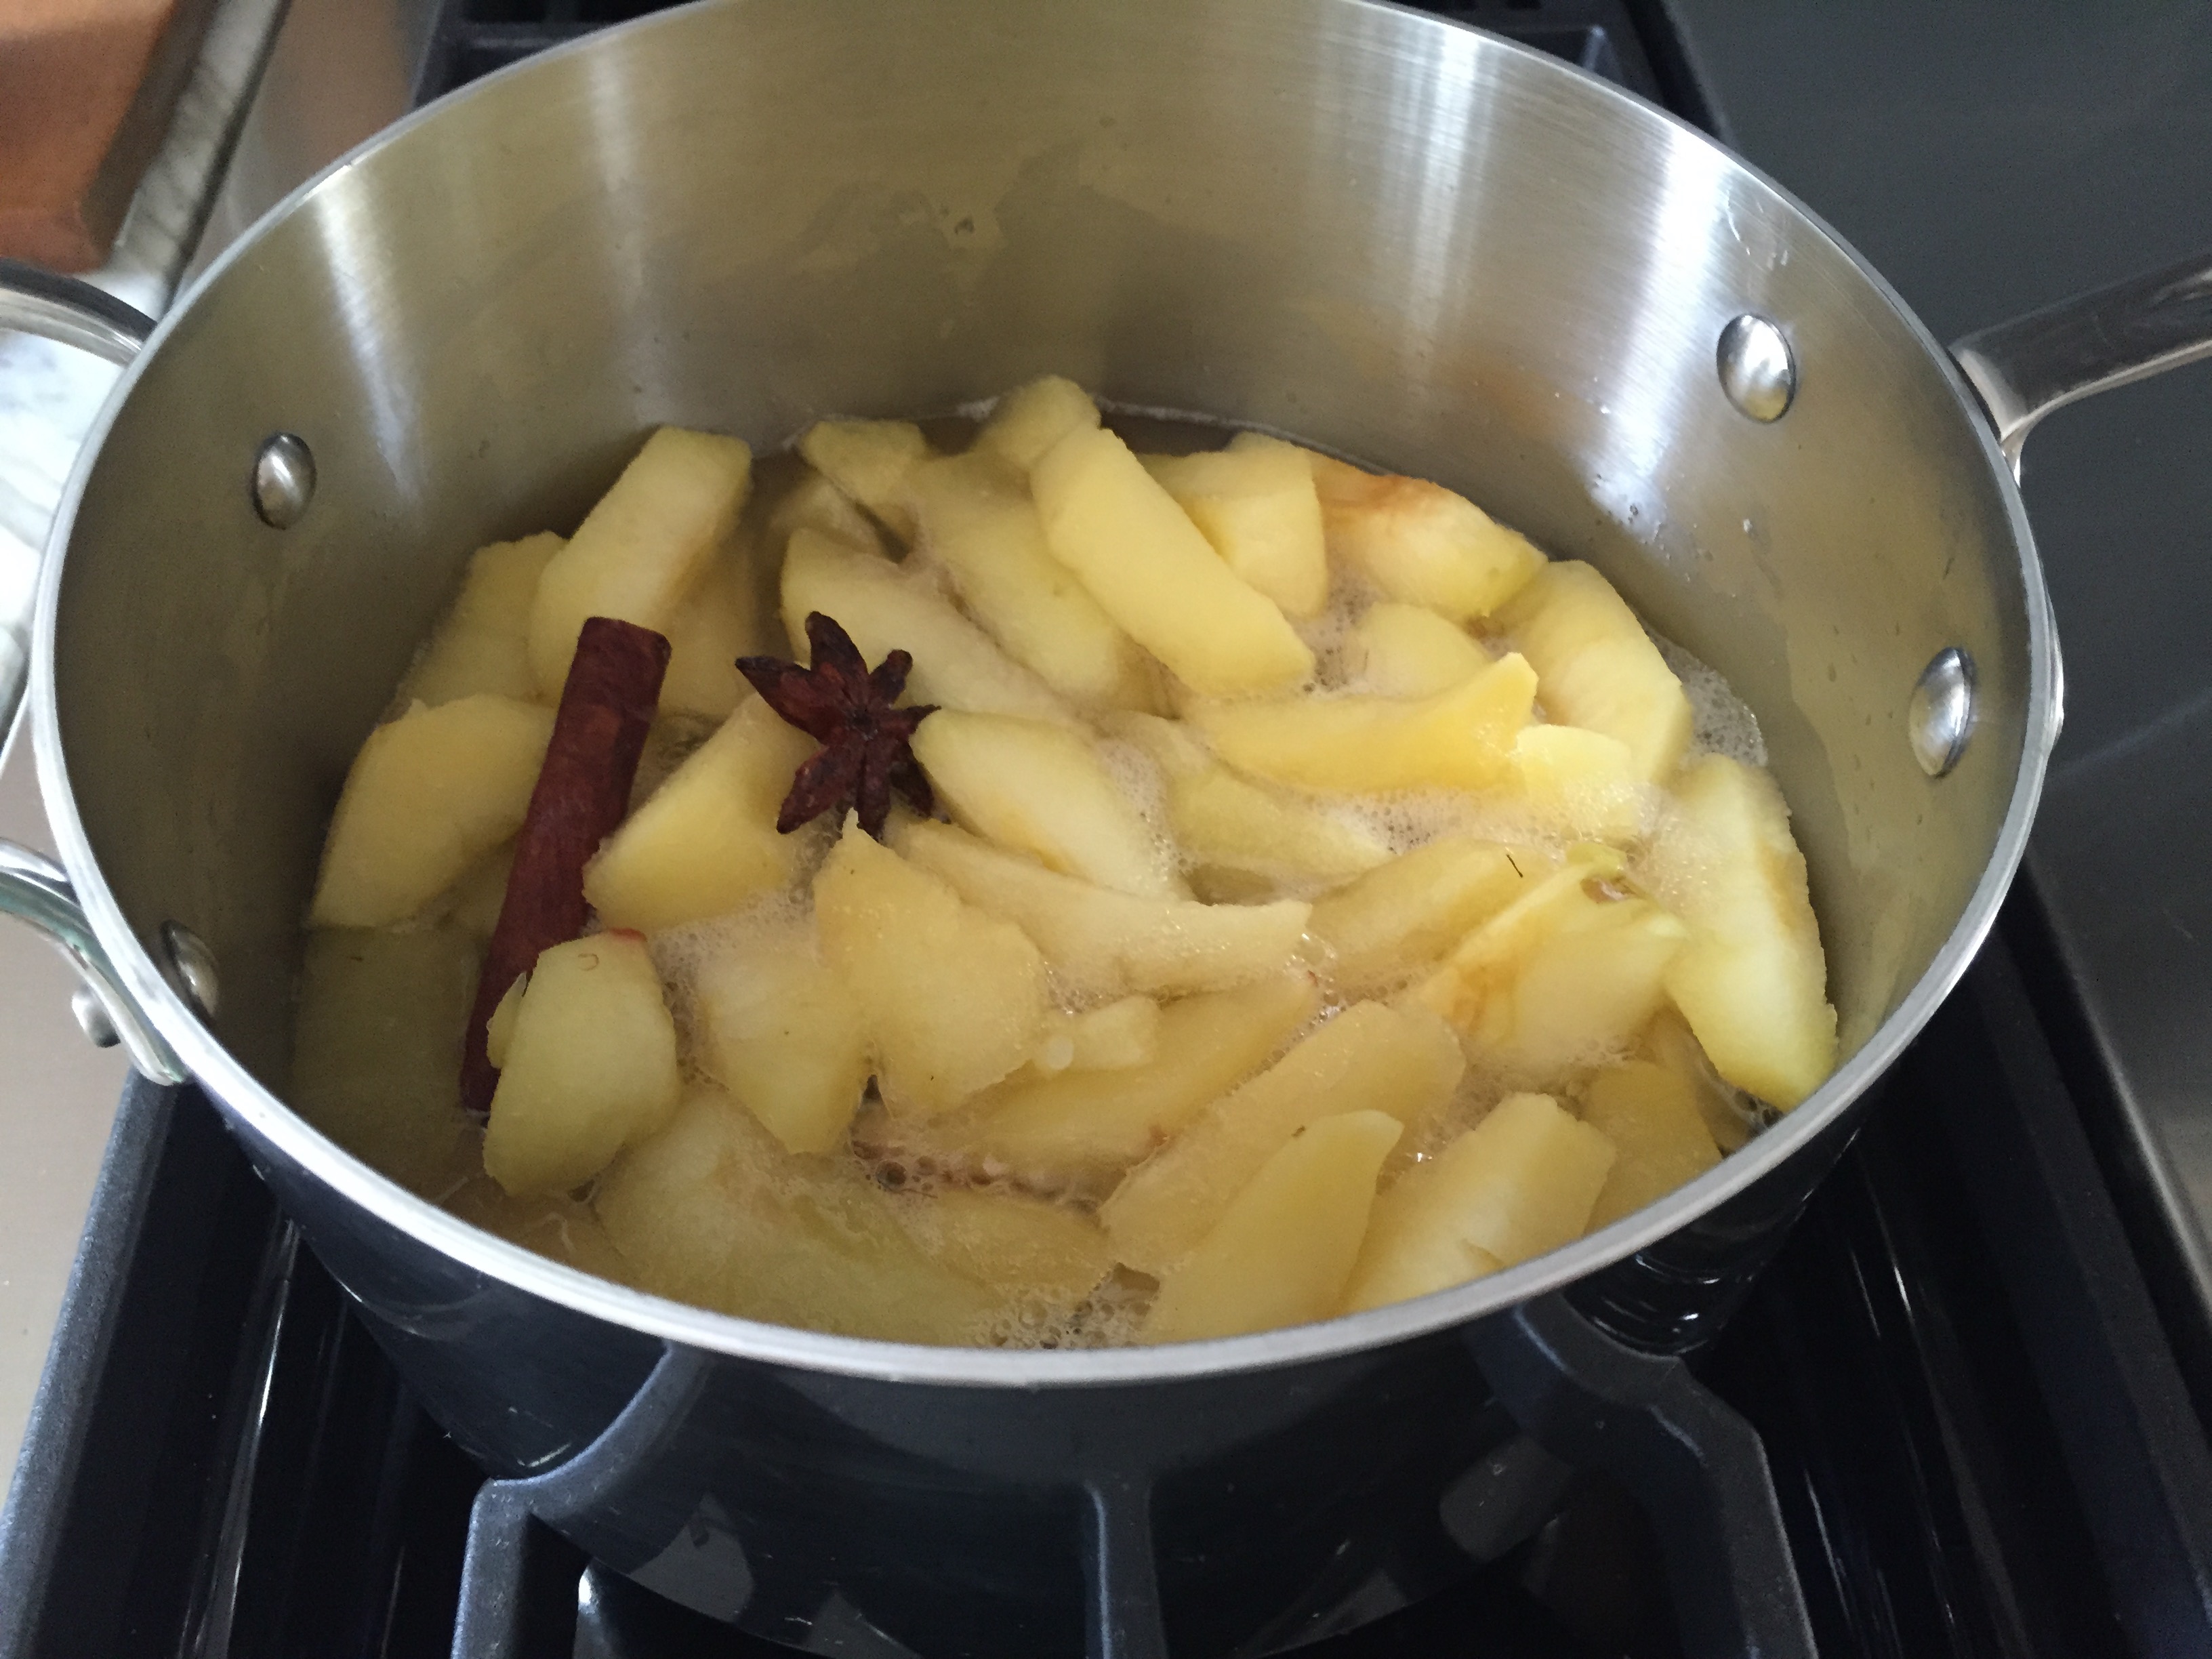
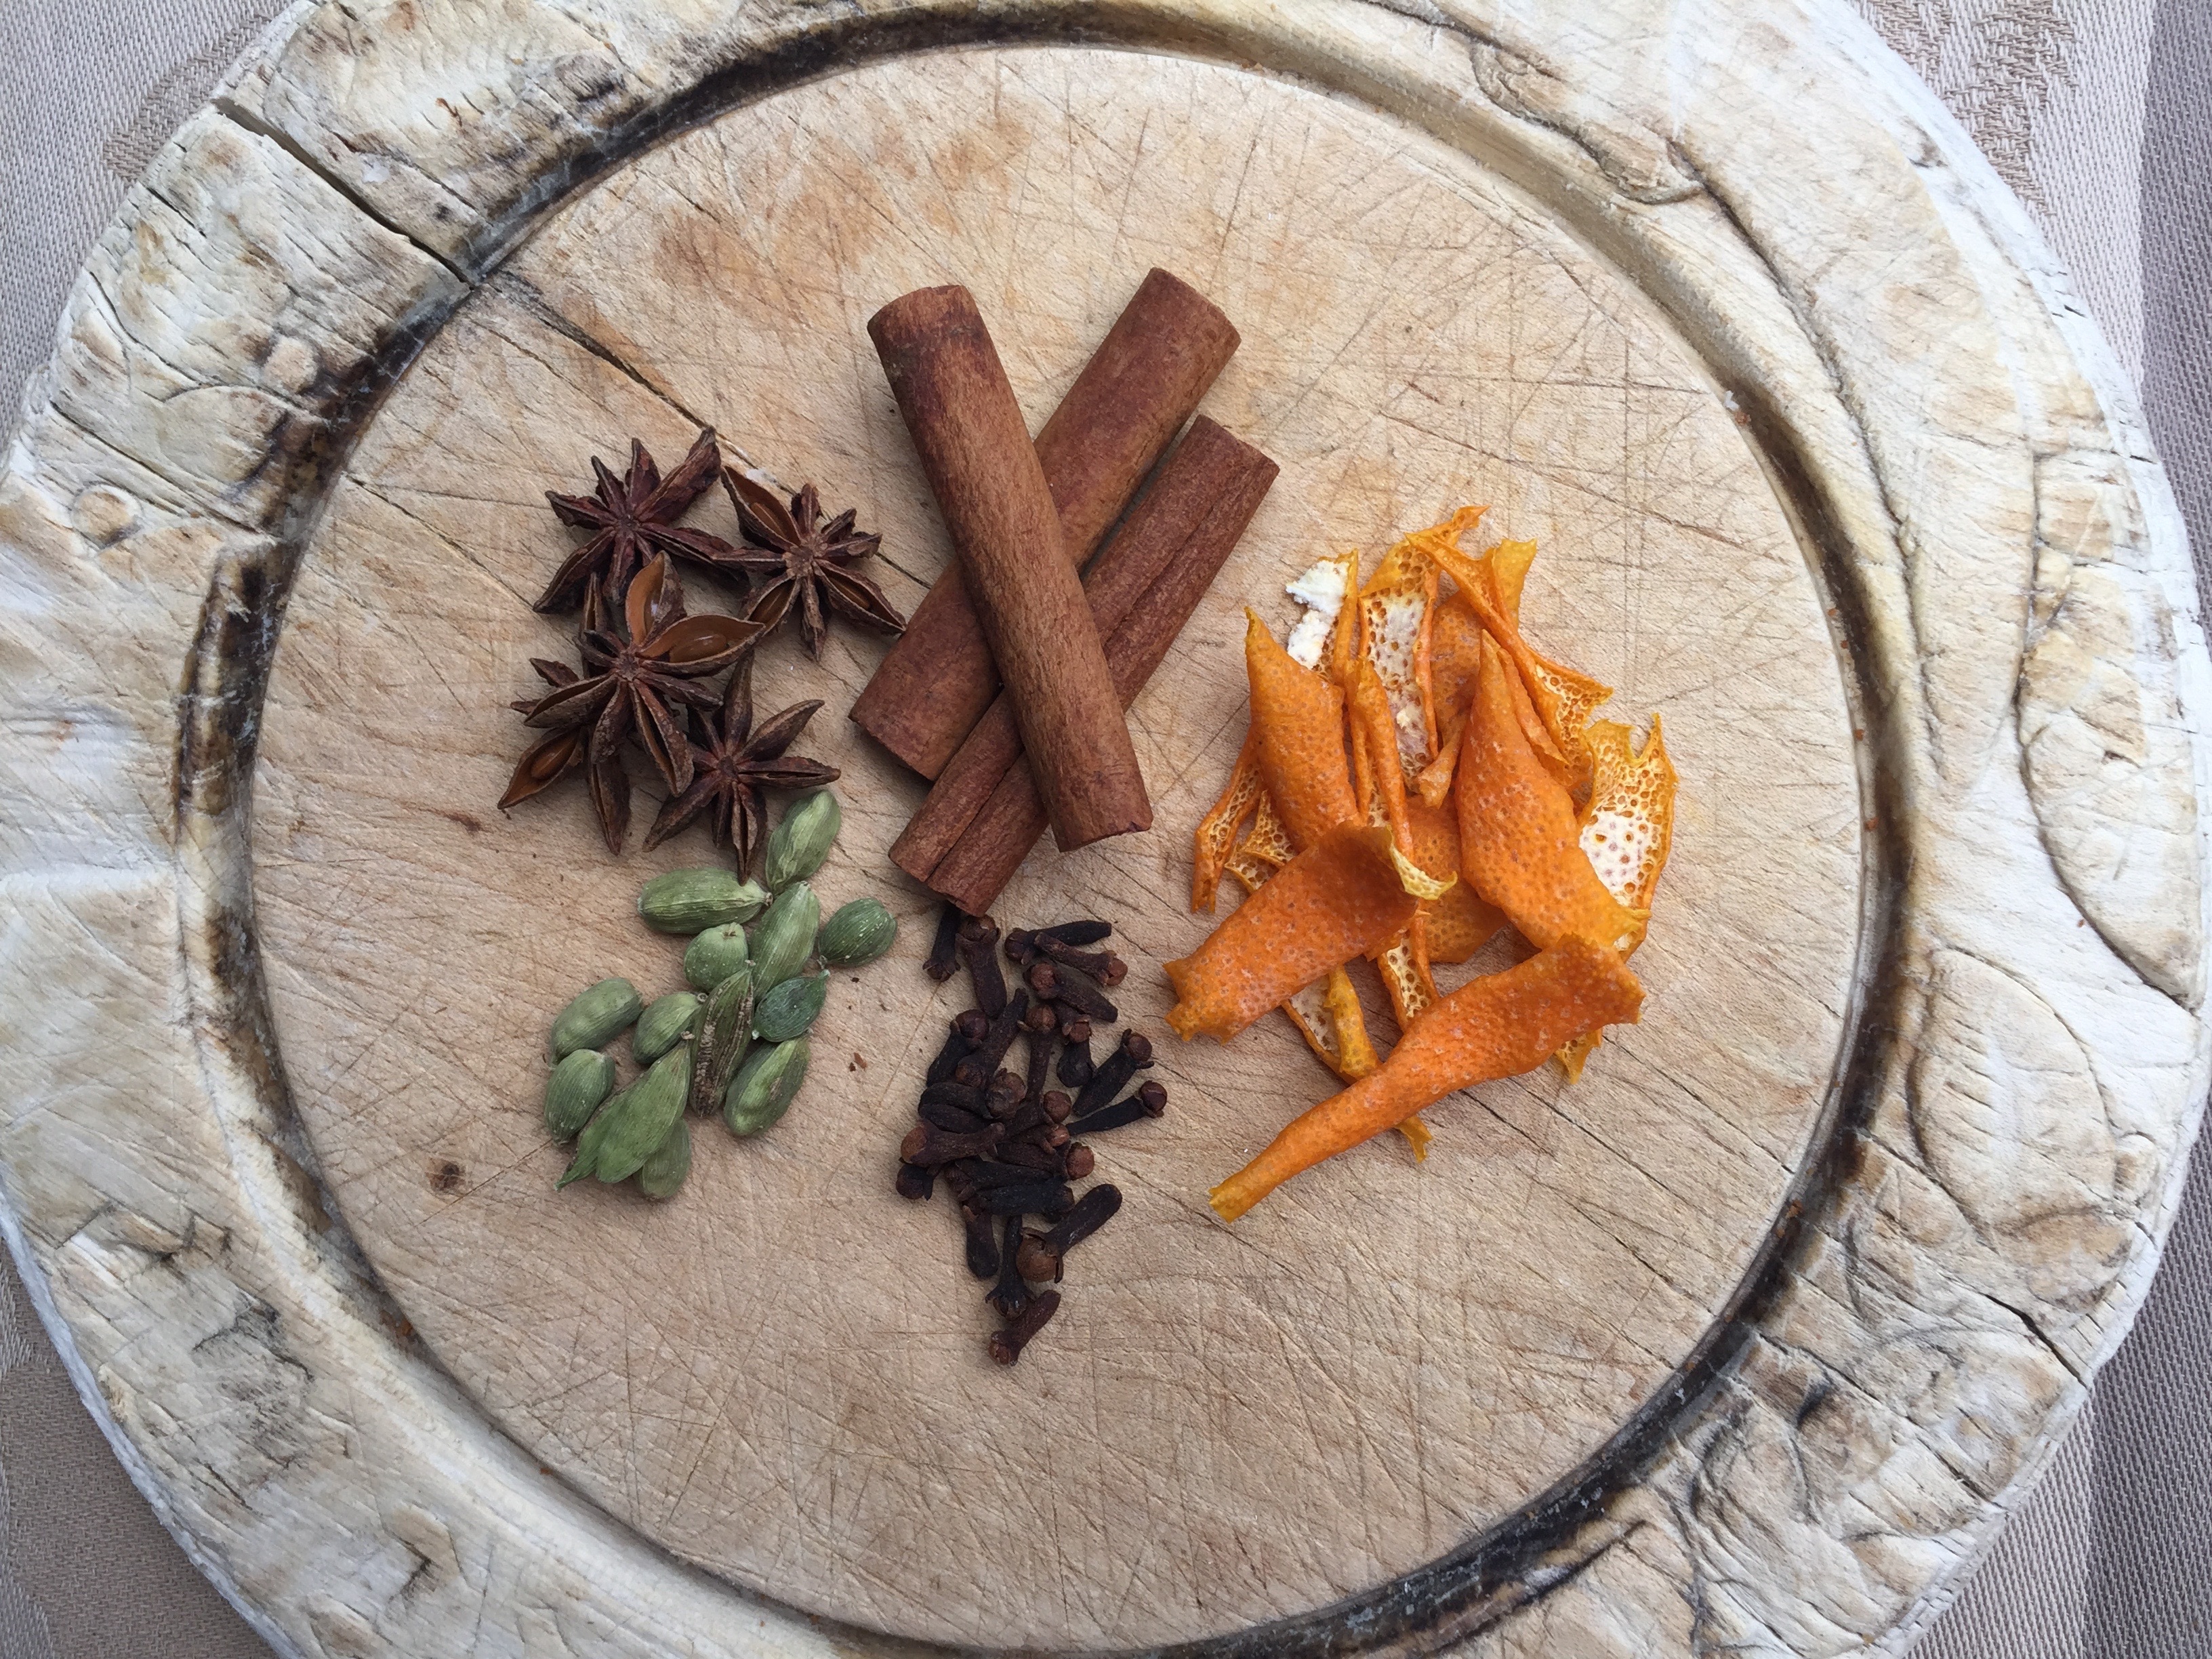
The pie is simply elegant, with few ingredients, quite light and perfect after a heavy meal. I’ve taken the original recipe and updated it somewhat by adding a cinnamon stick, star anise, and cardamom pod to the stewing liquid. These additions infuse the simple syrup, and eventually the cream, with classic flavors and aromas that pair well with the apples. After making the cream pie for dessert this week and receiving all round approval, it will now regularly appear not only on our holiday tables, but throughout the fall and winter.

What desserts will show up on your table this year? Are you a traditionalist serving the same menu each year, or do you like to mix it up?

Apple Cream Pie

Apple Cream Pie

  • Servings: 8
  • Print

Ingredients:
5 cooking apples, peeled and sliced into eighths
½ cup granulated sugar
½ cup water
1 cinnamon stick
1 anise star
1 cardamom pod
Pastry for one 9” pie crust, unbaked
1 egg
½ cup heavy cream

Instructions:
Preheat oven to 350°F.

Put apples in a saucepan with sugar, water, cinnamon stick, anise star, and cardamom pod. Bring to a boil, cover, and simmer until apples are tender, about 10 minutes. While apples are simmering, line a 9” pie plate with crust, decoratively crimping edges and place in freezer until needed.

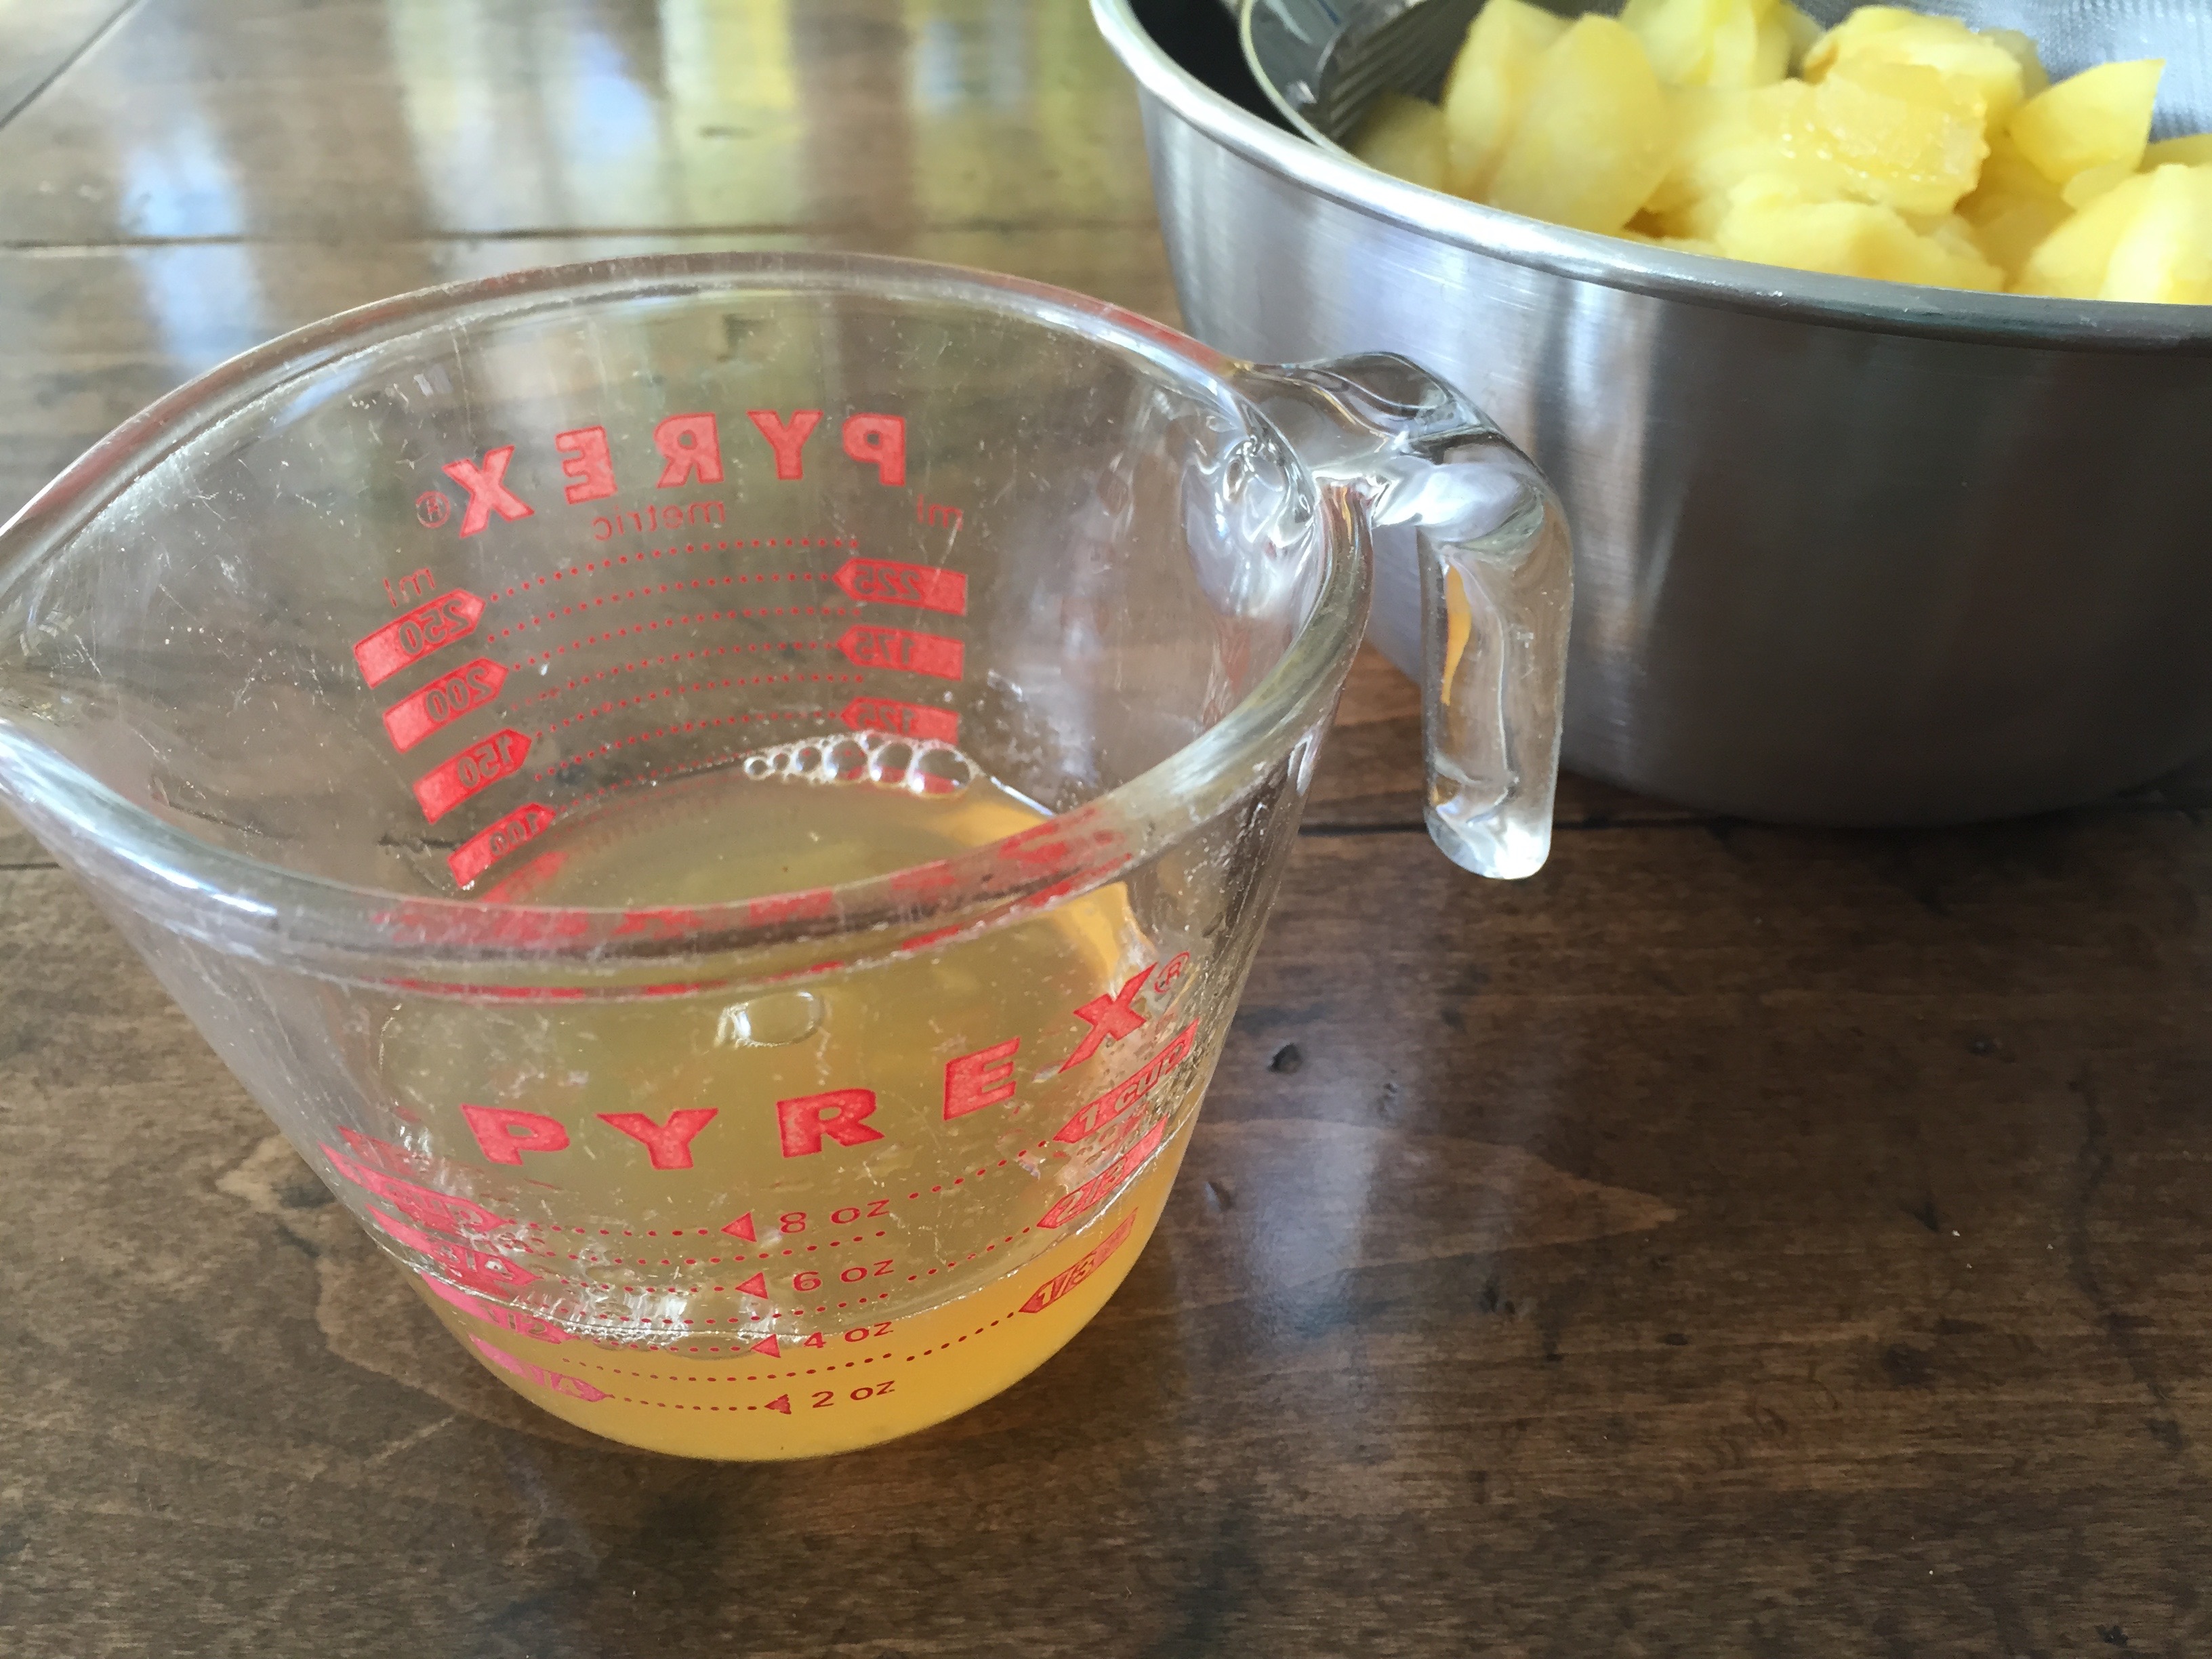
When apples are tender, remove and place them in a strainer set over a bowl to catch any juices. Continue to simmer syrup left in saucepan until reduced to approximately ½ cup. To that add any syrup caught from draining apples.

After apples have cooled slightly, place in the pie pan lined with pastry. Beat egg and cream together and stir in reserved syrup. Pour over apples. Transfer to oven and bake for 30-40 minutes, or until custard is set- the center will be slightly jiggly, but will continue to firm up as it cools. Allow to cool completely before serving.

Peeled apples, cut into eighths.
Peel the apples and cut them into eighths.
Apples with sugar, water, cinnamon stick, anise star, and cardamom pod in a saucepan.
Add sugar, water, cinnamon stick, anise star, and cardamom pod.
Simmering apples in sugar syrup with cinnamon stick, anise star, and cardamom pod.
Simmer apples until tender, about 10 minutes.
Apple syrup in measuring cup, with apples draining in sieve.
Drain apples, reserving any syrup, you should have about 1/2 cup of apple syrup.
Apples placed in the bottom of a pie plate lined with pastry.
After apples have cooled slightly, place them in the bottom of a pie plate line with pastry.
Egg, cream and syrup mixture poured over the apples.
Egg, cream, and syrup mixture is poured over the apples. Bake for 30-45 minutes in a 350°F oven until custard is set.
Apple Cream Pie cooling on a wire rack.
When the custard is set, remove the pie and place on a wire rack for cooling.
Apple Cream Pie dusted with powdered sugar.
If desired, dust the Apple Cream Pie with powdered sugar before serving.

Italian Wedding Soup

Italian Wedding Soup with meatballs, spinach and orzo

Italian Wedding Soup with meatballs, spinach, and orzoThis fragrant and nourishing soup quickly comes together with ingredients you probably already have on hand. Besides the meat for the meatballs and dill for the soup, the other elements are pretty standard pantry and fridge items.

The humble, but delicious broth begins with a “holy trinity” of carrots, celery, and onions; the addition of white wine and dill brings about a brightness and freshness. I especially love the meatballs, “pre-seasoned” by using Italian sausage mixed with ground turkey. And, instead of standing over a stove cooking them in hot oil, inevitably developing tiny blisters over your hands and wrists from splattering grease (clearly, I am speaking from experience), the balls are measured with a small ice-cream scoop, laid in neat little rows, and baked in the oven. I often double the meatball recipe and freeze half for future soups, pasta nights, or meatball subs. These bite sized gems are incredibly handy to have tucked away in the freezer for last minute snacks, appetizers, or meals.

The original recipe appears in Ina Garten’s Back to Basics. I’ve tweaked it a bit for my tastes (and you can, too). For example, while the original calls for ground chicken and chicken sausage, I use ground turkey and regular Italian pork sausage, one sweet and one spicy. Ina uses a tiny pasta, such as tubetini or stars, which I can’t always find. Instead I use orzo, a staple in my pantry. I cook the orzo separately and add it to the broth right before serving, otherwise the pasta soaks up too much liquid. Not that that’s the end of the world; it will happen if you have leftovers. Simply thin the soup with a bit of water or stock. Speaking of stock, you will need 10 cups- homemade or store bought. Though I love homemade stock, I’ll be completely honest, I don’t always have some stashed in the freezer. Good quality store bought stock is smart to have on hand and I do, though I am very picky about the brand. I only use low sodium Swanson’s Organic Chicken Stock (Swanson’s did NOT pay me to write that!).

On another note, while no one in my family suffers from celiac disease, one of my best friends does. Whenever I can, I reach for a recipe that with just a little tinkering, can be one everyone at the table enjoys. This Italian Wedding Soup is one of those easily adjusted recipes. Simply use gluten free breadcrumbs, and a small gluten free pasta to replace the orzo, or if that isn’t available, rice would be a fine substitute.

As always, I encourage you to “play with your food!” If your CSA pick up included lots of kale, chard, or other greens use them instead of spinach.  Do you love carrots?  Add more.  Are there other veggies lingering in your vegetable drawer… turnips, leeks, or even a handful of cherry or grape tomatoes would be savory additions to this lovely soup.  Most importantly, have fun and enjoy gathering your friends and family around the table to share a meal.

Italian Wedding Soup with meatballs, spinach and orzo

Italian Wedding Soup

  • Servings: 8
  • Print

*adapted from Back to Basics, by Ina Garten

Ingredients:
For the meatballs
½ lb ground turkey (white meat)
½ lb ground turkey (dark meat)
2 Italian sausages, casings removed
2/3 cup fresh breadcrumbs (gluten free, if needed)
2 teaspoons minced garlic (2 cloves)
3 Tablespoons chopped fresh parsley
¼ cup freshly grated Pecorino Romano cheese
¼ cup freshly grated Parmesan cheese, plus more for serving
3 Tablespoons milk
1 extra-large egg, slightly beaten
salt and fresh ground pepper

For the soup
2 Tablespoons good olive oil
1 cup minced yellow onion
1 cup diced carrots (3 carrots)
1 cup diced celery (3 stalks)
10 cups chicken stock
½ cup dry white wine
1 cup small pasta, such as orzo (gluten free, if needed or use rice)
¼ cup minced fresh dill
10 ounces baby spinach

Instructions:
Preheat the oven to 350°F.

For the meatballs, place the ground turkey, sausage, bread crumbs, garlic, parsley, Pecorino, Parmesan, milk, egg, 1 teaspoon salt, and ½ teaspoon pepper in a bowl and combine gently with a fork. Using a tablespoon or small ice-cream scoop, drop 1 to 1 ¼-inch meatballs onto a parchment lined sheet pan. You will have about 40 meatballs. Bake for 30 minutes, until cooked through and lightly browned. Set aside.

In the meantime, for the soup, cook orzo (or rice) according to package directions, removing a minute or two before it’s done. Rinse and drain, toss with a little extra virgin olive oil to prevent sticking and set aside.

Heat the olive oil over medium low heat in a large, heavy bottomed soup pot. Add the onion, carrots, and celery and sauté until softened, 5-6 minutes, stirring occasionally. Add the chicken stock and wine and bring to a boil. Add the fresh dill and then the meatballs and cooked orzo to the soup and simmer for 1 minute. Taste for salt and pepper. Stir in the fresh spinach and cook for 1 minute, just until the spinach is wilted. Ladle into soup bowls and sprinkle each serving with extra grated Parmesan cheese.

Meatball ingredients on a cutting board- ground turkey, hot italian sausage, sweet italian sausage, pecorino romano cheese, parmesan cheese, milk, egg, parsley, breadcrumbs, and salt

Raw Meatball Mix
Using a fork, gently combine all of the meatball ingredients.
Scooping meatballs onto parchment lined baking sheet.
Using a tablespoon or small ice cream scoop, measure out the meatballs.
Raw meatballs laid out on a sheet pan, ready for the oven
Bake the meatballs in a 350°F oven for 30 minutes, or until lightly browned and cooked through.
Cooked meatballs on a sheet pan.
The meatballs are done and ready for the soup (or freezer).
Carrots, celery, and onions are the base of the broth.
Adding wine and chicken stock to carrots, celery, and onions.
Add wine and chicken stock.
Meatballs, orzo, and dill are added.
Raw spinach is added to the soup.
Spinach is the last ingredient to be added and only takes a minute to wilt.
Wilted spinach in Italian Wedding Soup
Soup is ready! Serve with a warm crusty loaf of bread and parmesan for passing at the table.

Italian Wedding Soup with meatballs, spinach, and orzo

Chili con Carne and Buttermilk Cornbread

Chili con carne with tortilla chips, cheese, and sour cream.

Fall and winter suppers beg for chili.  Hearty, warming, and versatile, chili is a one pot wonder perfect for brisk nights that begin to get dark as early as 4:30pm, casual get togethers with friends and family to watch a game in front of a roaring fire, or coming in from the cold after time spent raking leaves or shoveling snow.  Of all evenings, Halloween is the ideal night for chili, shoring up your stamina (as well as that of any goblins or ghouls spooking you) for a night of trick or treating. Whether you are out in the neighborhood or manning the candy bowl at home, a warm bowl of chili before or after a night of haunts will keep you going and be an excellent antidote to all the sugar consumed.

Depending on your preferences chili can suit a wide variety of eaters… vegetarians or vegans at your table? Skip the meat and add more vegetables or beans. Offer an interesting assortment of toppings and sides like cheeses, cornbread, tortilla chips, avocado, and sour cream (I use greek yogurt) and let your family and friends build a complete meal around your chili base.  And, like most stews and soups, making chili ahead of time allows it to become even more delicious.  Chili only gets tastier as it “ages.”

Chili powder, cumin, coriander, cayenne, cinnamon, chipotle, and dijon mustardThis recipe is my own. Most of the ingredients are typical, but there are a few surprises. Dijon mustard adds a wonderful brightness and tang; the chipotle peppers in adobe sauce add a subtle smokiness, while the cinnamon delivers a hint of sweet warmth. It is also very easy to play with this recipe. Please experiment to suit your taste. Love bell peppers? Add more. Need more spice? Add a chopped jalapeño. Can’t stand onions? Eliminate or reduce the amount. Don’t like beans in your chili (I’m talking to you, dear husband!), then don’t add them. Play with your food and have fun!

The buttermilk cornbread is adapted from Kathleen’s Bake Shop Cookbook. Kathleen King owned Kathleen’s Bake Shop in Southhampton, NY in the 80s and 90s. One summer, I was fortunate enough to visit the bakery and in addition to the cookies I bought (which were quickly consumed), I also purchased a copy of her cookbook, a lasting souvenir. It was a wise purchase. My copy of the small spiral bound book is splattered, tattered, and torn- all signs of an excellent cookbook. The book practically opens itself to certain recipes, like the Devil’s Food Cake I use for birthdays, in addition to the recipe that inspired this cornbread.

CornbreadIn Kathleen’s intro to the original recipe, which was for corn muffins, she explains how the recipe has changed since she first received it. Her baker altered the formula by adding half-and-half instead of milk; I’ve tweaked it again by using buttermilk, instead of half-and-half or milk. In any case, the choice is yours… buttermilk, half-and-half, and regular milk all work just fine. The buttermilk lends a wonderful tanginess that seems a natural counterpart to the sweetness of the bread; the half-and-half produces a really rich cornbread, while using regular milk leaves you with a lovely straightforward cornbread. Another occasional adjustment I make is to add frozen corn kernels to the batter, maybe a handful or two. The kernels contribute a wonderful texture to the cornbread and add pops of sweetness too.

What are your favorite sides and toppings for chili?  Do you have a go to dinner for Halloween night?

Chili con carne with tortilla chips, cheese, and sour cream.

Chili con Carne

  • Servings: 6-8
  • Print

Ingredients:
1lb ground beef or turkey
2 medium onions, coarsely chopped
2 bell peppers, coarsely chopped
3 cloves of garlic, finely chopped
1 Tablespoon of extra virgin olive oil
1 Tablespoon chili powder
1 chipotle chili in adobe sauce, finely chopped
1 ½ teaspoons Dijon mustard
1 teaspoon cumin
½ teaspoon coriander
¼ teaspoon cayenne
1/8 teaspoon cinnamon
1 28oz can of whole tomatoes, with juice
1 16 oz can kidney beans or black beans, rinsed and drained
salt and pepper to taste

Instructions:
In a large pot or dutch oven, heat olive over medium heat. Add onions and sauté until beginning to turn golden brown, approximately 5 minutes. Add bell peppers and sauté an additional 5 minutes. Add finely chopped garlic and cook for 30 seconds or until fragrant. Add ground meat, and cook over medium high heat, stirring often, until cooked through.

Reduce the heat to medium low and stir in chili powder, chipotle chili, mustard, cumin, coriander, cayenne, and cinnamon and cook for 30 seconds or so.

Add beans and tomatoes with juice, breaking up the tomatoes with a spoon. Stir well, and simmer for 15 minutes. Add salt and pepper to taste. Serve hot with accompaniments such as rice, tortilla chips, cornbread, shredded cheddar or Monterey jack, sour cream and chopped avocado.

*This is the perfect dish to make ahead. Like most soups and stew, the longer it sits the better it gets. Just reheat when needed.

Cornbread

Cornbread

  • Servings: 16 squares
  • Print

*adapted from Kathleen’s Bake Shop Cookbook

Ingredients:
1 cup all-purpose flour
1 cup cornmeal or corn flour
½ cup granulated sugar
1 Tablespoon baking powder
½ teaspoon salt
½ cup unsalted butter, softened
1 cup buttermilk
1 egg, lightly beaten

Instructions:
Preheat oven to 400°F. Grease a 9×9 inch baking pan.

In a large bowl, stir together flour, cornmeal, sugar, baking powder, and salt. Using a pastry blender, cut in butter and mix until crumbly. If you don’t have a pastry blender, use two knives, a fork, or even your fingers.

In a separate bowl, mix buttermilk and egg. Fold liquid ingredients into flour mixture, folding just until combined. Transfer batter to prepared baking pan.

Bake for 25 minutes, or until a toothpick inserted in the center comes out clean.

Whisking flours, sugar, baking powder, and salt together.
Whisk dry ingredients together.
Pastry blender cuts butter into flour.
Cut softened butter into flour mixture.
Rubber spatula folds buttermilk and egg mixture into dry ingredients.
Fold buttermilk and egg mixture into dry ingredients until just combined.
Cornbread batter in greased baking dish
Pour batter into prepared baking dish and bake at 400°F for 25 minutes or until cake tester inserted in center comes out clean.
Cornbread just out of the oven.
Enjoy!

Pretzel Rolls

Homemade pretzel roll

Oktoberfest has officially passed… I actually just discovered that. For years I thought Oktoberfest was celebrated all month long, but a quick google search revealed that Munich has already moved on and begun planning Oktoberfest 2016.

IMG_7709Well, I’m not telling. Either way, it’s still October and my culinary wanderlust is craving soft pretzels, bratwurst, sauerkraut, and mustard to go with it all. Every fall, brats and sauerkraut enter the dinner rotation at White House Red Door. One year around this time, probably for Halloween, I made “witches fingers” with homemade pretzel dough. The fingers- or pretzels seemed a natural accompaniment to the brats, so I thought instead of a “finger” or traditionally shaped pretzel, why not a roll?

Have you ever had a pretzel rolls? They turn humble fillings into something special. From burgers to cold cuts to peanut butter and jelly (which my middle guy makes himself for lunch everyday), they all taste better on a pretzel rolls.  They arePretzel bun with mustard terrific for a snack on their own or with some spicy brown mustard for dipping. White flakes of crunchy sea salt contrast beautifully with the deep golden brown chewy texture.

This recipe makes pretzel dough and while I’ve made rolls, the final form is entirely up to you.  This same dough can easily be transformed into traditional pretzels, “witches fingers,” or even letters for the pre-school set.  It’s entirely up to you.  Remember, have fun and play with your food!Homemade pretzel bun

  • Servings: ”8-10
  • Print

*adapted from Alton Brown

Ingredients:
1 ½ cups warm (110°-115° F) water
1 Tablespoon sugar
2 teaspoons kosher salt
1 package (2 ¼ teaspoons) active dry yeast
22 ounces all-purpose flour, approximately 4 ½ cups
2 ounces unsalted butter, melted
vegetable oil, for pan
10 cups water
2/3 cup baking soda
1 large egg yolk beaten with 1 Tablespoon water
coarse or flaked sea salt

Instructions:
Combine water, sugar, and salt in the bowl of a standing mixer fitted with a dough hook and sprinkle the yeast on top. Allow to sit for 5 minutes or until the mixture begins to foam.

Add the flour and butter and, using the dough hook, mix on low speed until well combined. Change to medium speed and knead until the dough is smooth and pulls away from the side of the bowl, approximately 4-5 minutes. Remove the dough from the bowl, clean the bowl and oil it well with vegetable oil. Return the dough to the bowl, rolling it around so it is lightly coated in the oil used to grease the bowl. Cover with a slightly damp dish towel or plastic wrap and place in a warm spot for 50-55 minutes, or until the dough has doubled in size.

After the dough has risen, preheat the oven to 450°F. Line 2 half sheet pans with silicone mats, or parchment paper lightly brushed with vegetable oil. Set aside.

Bring 10 cups of water and the baking soda to a rolling boil in a large saucepan or stockpot.

Turn the dough out onto a lightly oiled surface (I did not do this, just a regular wooden cutting board worked for me- not oiled). Divide the dough into 8-10 equal pieces. Form dough into balls- by rolling and shaping with your hands. Using a very sharp knife or pair of scissors cut an X in the top of each roll. Place each roll onto a lined sheet pan.

Place the pretzel rolls into the boiling water, one by one, for 60 seconds, flipping them at the 30 second mark. Remove them from the water using a slotted spoon or similar tool. Return to the half sheet pan, 4-5 rolls per pan. Repeat until remaining rolls are done.

Brush the top of each pretzel roll with the beaten egg yolk and water mixture and sprinkle with coarse or flaked sea salt. Bake one batch at a time until deep golden brown in color, approximately 15 minutes, or the bottom of the bun sounds hollow when rapped with your knuckles. Transfer to a cooling rack for at least 5 minutes before serving.

Yeast is foaming.
It’s alive! The yeast is working when it starts to foam.
Adding flour and melted butter to yeast mixture
Add the flour and melted butter to yeast mixture.
Using a dough hook attachment to knead the dough.
Using the dough hook attachment, knead the dough until it pulls away from the sides of the bowl.
Pretzel dough in a well oiled bowl.
Put the dough into a well oiled bowl, turning to coat several times. Cover and place in a warm draft free spot until doubled in bulk.
Risen Pretzel Dough
After 50-55 minutes the pretzel dough has doubled in bulk.
Pretzel dough on a cutting board.
Turn the dough out onto a cutting board or parchment paper.
Pretzel dough divided into 8 equal pieces.
Divide the dough into 8-10 equal pieces.
Raw pretzel buns on silicone lined sheet pan.
Roll and shape dough into rolls and place on silicone or parchment lined sheet pan.
Use a sharp knife to cut an 'x' on the top of each bun.
Using a sharp knife or pair of scissors, cut an ‘x’ on the top of each roll.
Dropping the pretzel bun into boiling water/baking soda mixture
One by one, use a slotted spoon or similar utensil to drop each roll into boiling water/baking soda mixture for 1 minute. Flip after 30 seconds so that top and bottom are evenly cooked.  Transfer to lined sheet pan. Repeat process with each roll.
Egg washed buns sprinkled with flaked sea salt.
Brush the rolls with egg wash and sprinkle with coarse or flaked sea salt. Bake 15 minutes in a 450°F oven or until deep golden brown.
Deep golden brown homemade pretzel buns.
Rolls are done when they are a deep golden brown and sound hollow when rapped on the bottom with your knuckles. Allow to cool at least 5 minutes before digging in.

Pumpkin Bread

Pumpkin bread sliced on cutting board.

Fall Container The sounds and smells of fall are predictably familiar and comforting. I’ve known them all my life, hearing the chorus of geese honking to one another as they head south, smelling the smoke from a pile of leaves drifting from a backyard, and feeling the crispness in the air as a child trick or treating or walking to school. Even as an adult the pattern continues, the leaves still crunch underfoot, rustling and swirling in the breeze stirred up as I walk my own children to the bus stop each morning. We often talk about taste memories, but it is the echoes, scents, and displays of fall that bring me right back to childhood each year.

That is not to say that the tastes of autumn go by the wayside. Flavors are warmer, spicier, and richer, adding life to both sweet and savory dishes. On these cool days I crave baking- wanting to fill the kitchen with the colors, flavors, and aromas of fall.

This pumpkin bread recipe fits the bill. Many pumpkin bread recipes call for oil as the fat of choice while this recipe uses butter, which I prefer. The original calls for water or orange juice as the liquid, but I swap in cider, as it seems a better complement to the pumpkin. Another addition is nutmeg, to partner with the cinnamon and cloves. I’ve reduced the sugar, which hasn’t done any harm (and no one notices). Finally, the raisins are completely eliminated instead I occasionally add walnuts.

This makes two large loaves of pumpkin bread, one to enjoy now, one to freeze for another day down the road as we march towards winter.

Pumpkin bread slices on cutting board

Pumpkin Bread

  • Servings: 2 large loaves
  • Print

*adapted from The Martha Stewart Cookbook, Collected Recipes for Everyday

Ingredients:
12 Tablespoons unsalted butter (1 ½ sticks), at room temperature
3 Tablespoons molasses
1 ½ cups sugar
4 eggs
2/3 cup cider
2 cups pumpkin puree, homemade or canned
3 1/3 cups all-purpose flour
2 teaspoons baking soda
1 teaspoon salt
½ teaspoon baking powder
1 teaspoon cinnamon
1 teaspoon ground cloves
1 teaspoon ginger
1 cup coarsely chopped walnuts (optional)

Instructions:
Preheat oven to 350° F. Butter two 9 x 5 x 3-inch loaf pans.

With an electric mixer, cream butter, molasses, and sugar until light and fluffy. Beat in the eggs, one at a time. Beat until light. Add cider and pumpkin purée and mix well.

Sift dry ingredients together into a large bowl, and add the pumpkin mixture, stirring well with a wooden spoon to thoroughly combine. If using the nuts, add them now, folding them carefully into the batter.

Divide evenly into prepared pans. Bake for 1 hour, or until a toothpick inserted comes out clean. Cool in pans for 10 minutes, then turn out onto racks to cool.

*This recipe is easily multiplied and freezes well.

Creaming butter, molasses, and sugar until light and fluffy.
Cream butter, molasses, and sugar until light and fluffy.
Add the eggs one at time to the creamed butter and sugar, beating well before adding the next.
Add the eggs one at time, beating well before adding the next.
Butter, sugar, molasses, and egg mixture is light.
Butter, sugar, molasses, and egg mixture is light and creamy.
Adding the pumpkin purée and cider to butter, sugar, and egg mixture.
Add the pumpkin purée and cider and mix well.
Curdled looking mixture... not to worry.
Don’t worry! It looks terrible, but it will be ok!
Combining the wet and dry ingredients well with a wooden spoon.
Add the sifted dry ingredients, combining well with a wooden spoon.
Batter in greased loaf pan.
Divide batter evenly into greased loaf pans.
Pumpkin bread in loaf pan
Pumpkin bread is done when a toothpick inserted comes out clean.

IMG_7458


Pumpkin Pancakes

Pumpkin pancakes served with warm maple syrup and toasted walnuts.

Pumpkin PancakeI was going to post about Pumpkin Bread, and tie it together with the Roasted Pumpkin Puree (and I will) but I was seriously sidetracked by some Pumpkin Pancakes. And it was all quite by chance.

My husband is a wonderful cook. Weekend mornings he can be found whipping up the fluffiest pancakes; his chicken parmigiana is unbelievable and he can smoke a Boston butt or deep fry a turkey with the best of them.

This weekend the kids requested pancakes. While dear husband gathered the ingredients, I made the coffee. As I poked my head in the fridge for some half and half, my eyes landed on the last of the pumpkin purée. Eureka moment. “Hey, why don’t you throw this pumpkin in the batter?” Silence. Dead silence. I could hear crickets. Not one to give up I asked, “What do you think?” Long long pause. (Translation- don’t mess with my pancakes.) Finally a reply, “Let’s leave it up to B. Whatever she thinks.” I have to admit, at this point the deal was sealed because I knew exactly what B would say, “Pumpkin pancakes? Yum!”

The regular weekend pancakes were already top notch, but the addition of pumpkin, cider, and the classic spice combination of cinnamon, ginger, allspice, and cloves turned already stellar pancakes into something very special for fall and winter breakfasts (and dinners!).  Gently warmed maple syrup with butter added a touch of sweetness, while the toasted walnuts sprinkled on top provided a satisfying crunch to contrast with the fluffiness of the pancakes.

Needless to say, pumpkin pancakes have been officially added to the rotation at White House Red Door.

Have you ever had that moment of spontaneity in the kitchen? A eureka moment that led to something delicious?

Pumpkin Pancakes with Maple Syrup and Toasted Walnuts

Pumpkin Pancakes

  • Servings: 15-20 pancakes
  • Print

Ingredients:
2 cups all purpose flour
3 Tablespoons sugar
2 teaspoons baking powder
1 teaspoon cinnamon
1 teaspoon ground ginger
½ teaspoon salt
¼ teaspoon allspice
¼ teaspoon ground cloves
3 eggs
1 cup milk
1 cup apple cider
1 cup pumpkin purée
¾ teaspoon pure vanilla extract
3 Tablespoons unsalted butter, melted

For serving:
warm maple syrup with butter
toasted walnuts or pecans

Instructions:
Preheat griddle to 350°-375°.

Mix dry ingredients. In a separate container, whisk eggs, then add vanilla, cider, and milk stirring well.

Add the wet ingredients to the dry and whisk until just combined.

Stir in pumpkin, then add melted butter.

When griddle is ready, spoon 1/3 cup batter onto the griddle for each pancake. Cook until the top of each pancake is dotted with bubbles and some have popped open. Carefully flip and cook until the other side is golden brown. Serve immediately with maple syrup and toasted walnuts. Though best enjoyed right away, the pancakes can also be kept warm in a 200° oven until ready to serve.

Pumpkin pancakes dry ingredients whisked together.
Whisk the dry ingredients together.
3 eggs ready for whisking.
Whisk the eggs together.
Whisking vanilla into eggs.
Whisk vanilla into eggs.
Whisk cider and milk into egg/vanilla mixture.
Pumpkin Pancakes- gently combine liquid and dry ingredients
Add the liquid ingredients to the dry ingredients and gently combine.
Stir the pumpkin purée into the batter.
Stir the pumpkin purée to the batter.
Stir melted butter into the batter.
Pancakes on the griddle are dotted with popped and unpopped bubbles.
When the tops of the pancakes are dotted with popped and unpopped bubbles, it is time to flip.

Flipped pancakes on the griddle.

Pumpkin pancakes served with warm maple syrup and toasted walnuts.
Serve with warm maple syrup and toasted walnuts.


Roasted Pumpkin Purée

Sugar PumpkinBeing part of a CSA has so many benefits… supporting and connecting with local farmers while picking up my weekly share under a tent in a field is far more interesting than maneuvering the aisles of the grocery store, and enjoying veggies that were literally just picked earlier that day, they don’t get any fresher and more delicious! Because the nature of a CSA promotes a “you get what you get, and you don’t get upset” mentality, another benefit is that I’m challenged to finds ways to use vegetables that I normally would pass by, as well as the ones that I don’t care for (I’m talking to you zucchini).

Each fall, sugar or pie pumpkin make appearances in our CSA pick up. At first I was intimidated, my hands on experience with pumpkin was limited to a once a year carving for Halloween, followed by roasting the seeds. The only other pumpkin I had ever used in the kitchen came from a can. But stretched to do something with this new addition to the weekly pick up, I found myself roasting pumpkins. It couldn’t be any easier. Lately, more and more sugar and pie pumpkins are showing up at the grocery store, so I can’t be the only one using them. And while definitely not necessary because canned pumpkin is so good (though it may not be all “pumpkin”), roasting your own pumpkin is fun to try.

***Important note- Do NOT use jack-o-lantern pumpkins, they are far too watery! Instead, look for small sugar or pie pumpkins, usually in the 3-6lb range.***

Pumpkin Purée

Roasted Pumpkin Purée

  • Servings: approximately 3 cups
  • Print

Ingredients:
1 sugar or pie pumpkin, 3-6lbs

Instructions:
Preheat oven to 375°. Line a baking sheet with parchment or foil.

Remove stem and cut pumpkin in half. Scoop out seeds (save and roast later) and using a spoon, scrape out stringy pulp. Cut each half in half, so that you have 4 quarters.

Transfer pumpkin quarters to lined baking sheet. Roast until fork tender, about 45 minutes.

When cool enough to handle, use a spoon to scoop out the flesh and purée in a food processor or simply mash it.

Use in any recipe that calls for canned pumpkin or pumpkin purée. This purée also freezes well.

Sugar pumpkin halved and seeded.
Using a large chef’s knife, cut the pumpkin in half and scoop out the seeds. Remember to save the seeds for roasting.
Scrape away any stringy pulp and discard. Place the pumpkin pieces on a parchment lined sheet pan.
Roasted pumpkin quarters on sheet pan.
Pumpkin is done when it is easily pierced with a fork.
Roasted pumpkin being scooped out.
When cool enough to handle, scoop out the flesh.
Pumpkin Purée
Either purée in a food processor or mash. Use as you would in any recipe calling for canned pumpkin or pumpkin purée.

Mulling Spices

Mulling spices- orange peel, cinnamon sticks, star anise, whole cloves and cardamon

A jar of homemade mulling spices.

Happy National Mulled Cider Day!

Leaves are changing; mornings are crisp as temperatures start dipping closer to freezing; in the market, the last few berries are being pushed out by apples. Walking around the neighborhood, even playing in the yard, is noisier these days. The slightest breeze triggers a barrage of falling acorns, rapid fire pop-pop-pops as they bounce off branches and leaves on their way down. The other night I came home to the smell of woodsmoke- not from a backyard grill, but drifting from a neighbor’s chimney, the first fire of the season. The sights, sounds, and aromas triggered something in me, almost a reflex to everything my senses were taking in.  Heading into the kitchen, opening up the spice drawer, instinctually I knew what I was looking for- a little of this and a little of that to complement the growing signs of fall.

IMG_7410

Even the colors of mulling spices remind us of autumn, orange, green, varying shades of brown. The fragrance is warm, comforting, and exotic all at the same time.  In no time, apple cider was gently simmering on the stove while an infuser filled with cinnamon, cardamon, star anise, whole cloves, and orange peel bobbed along in time.  The scent filled the room, naturally welcoming everyone in the house to gather- no easy feat these days with two teens and a tween in our midst.

Pre-mixed mulling spices can be found in just about any shop these days- from high end kitchen stores to your local grocery.  But don’t be tempted to buy the pre-made blend.  You probably have everything you need to make your own at home. You will have control, adding a little bit more of this, or a little less of that according to your taste.  Homemade mulling spices also make terrific gifts.  Save your old glass spice jars, remove the label, give them a good scrubbing, and fill with your custom blend.  Add an infuser and you’ve got a gift that keeps on giving!

IMG_7417

Below is my general blend, but it is just a guideline- for example, if I’d had allspice berries I would have thrown those in as well.  Please play around (and let me know what you discover).

Mulling Spices

  • Servings: enough for one 1.5oz spice jar
  • Print

Ingredients:
3 sticks cinnamon, broken into small pieces
peel from 1 orange, sliced, dried and broken into small pieces
5 star anise
10-12 cardamon pods
1 teaspoon whole cloves

Instructions:
In a small bowl combine the spices. Transfer to spice jar or similar container. Will keep indefinitely.

Lasagna Roll Ups

Lasagna Roll Up with basil

Wednesday night is pasta night at White House Red Door; at the very least, that means 52 nights of pasta a year and, to be honest, I’m sure we exceed that, easily. The wonderful thing is that there are so many shapes, sizes, styles, and sauces that we could quickly go through a year without any repeats. Actually, having written that, I really should consider this a challenge. Note to self… New Year’s Resolution decided… a year’s worth of pasta.

Most Wednesday nights I use dry pasta, pairing with some seasonal veggie and sauce. Occasionally meat makes an appearance, but only in a supporting role. Favorites include:

  • orechiette + kale + Italian sausage
  • spaghetti carbonara
  • baked orzo + shrimp + tomatoes + feta
  • penne + tuna + tomatoes + capers
  • tortellini + sautéed zucchini + pesto

Fresh pasta is a tremendous treat; a group effort saved for a quiet day when we can dedicate ourselves to the task. The rewards are well worth the effort and seem to lend themselves to cold, snowy days.

  • homemade butternut squash ravioli + sage + brown butter
  • homemade tagliatelle + bolognese
  • homemade lasagna noodles + béchamel + bolognese + parmesan

Rainbow ChardOne dish that turns up almost monthly is Lasagna Roll Ups. The perfect preset portions, incredible variety in terms of filling, and ease in getting this on the table make it one of my pasta night “go to” stand outs. The basic formula of ricotta, parmesan, salt and pepper remains constant, even standing alone if needed. However, when you have leftover or fresh veggies staring at you every time you open the fridge, throw them in the filling. Just about anything works- squash, zucchini, greens, peppers, mushrooms, onions are just a start.

This recipe is one to play with according to your taste. The quantities of sauce and cheese below are just guidelines. Love your lasagna gooey, saucy and cheesy? Done. Just add more sauce and cheese.   Hate greens? No problem. Swap the greens for another vegetable you like. Missing the meat? Brown some sausage, ground beef, or add leftover chicken. It will be delicious. Trust yourself!

PS- If you have any roll ups left, they make excellent additions to a lunch box. Simply warm up in the microwave and immediately transfer to a thermos.

Lasagna Roll Up with basil

Lasagna Roll Ups

  • Servings: 6-8
  • Print

Ingredients:
1 box lasagna noodles (15-18 noodles)
1 32oz jar of your favorite marinara sauce, 1 ½ cups reserved
2 cups ricotta
½ cup freshly grated parmesan, plus more for sprinkling
1 ½ cups shredded mozzarella, ½ cup reserved
pinch of freshly grated nutmeg
1 bunch greens… spinach, kale, swiss chard or combination
salt and pepper to taste

Instructions:
Preheat oven to 350°. Prepare casserole dish by covering bottom with thin layer of marinara sauce.

Bring large pot of salted water to a boil. Cook lasagna noodles, 6 at a time, until flexible. When flexible, remove noodles with tongs and place on a cookie sheet lined with a clean dish towel. Top with another clean dish towel, and repeat with next batch of 6 noodles. Repeat until all the noodles are cooked.

Make the filling:
Saute chopped greens in 1 tablespoon of extra virgin olive oil. Remove from pan and finely chop. Set aside.

Combine ricotta, parmesan, and nutmeg. Stir in finely chopped greens. Season to taste with salt and pepper.

Assembly:
Spread ricotta filling lengthwise down noodle (approximately 2 tablespoons per noodle). Drizzle 1-2 tablespoons marinara sauce over ricotta and top with 1-2 tablespoons shredded mozzarella.

Tightly roll up noodle jelly roll style and place seam side down in prepared casserole. (Depending on the casserole dish I use, my noodles usually end up being in 3×5 rows. It is important for the rolls to fit snugly against one another so that they don’t unfurl.) Repeat with remaining noodles.

Pour reserved 1 ½ cups of marinara over roll ups. Top with reserved ½ cup of shredded mozzarella. Sprinkle with freshly grated parmesan.

Bake until heated through and bubbly, 30 minutes or so.

Chopped kale on cutting board.
Chopped kale, but use whatever greens you have… swiss chard and spinach work beautifully.
Ricotta filling mixed with chopped greens.
Mix chopped greens with ricotta, parmesan, a few gratings of nutmeg, and salt and pepper to taste.
Lasagna roll up ingredients are out and ready for assembly, casserole dish, lasagne noodles, mozzarella cheese, parmesan cheese, filling, marinara sauce and salt.
All the ingredients are prepped and ready for assembly.
Lasagna noodles spread with ricotta filling.
Spread ricotta filling along the length of each noodle.
Lasagna noodle with ricotta filling and drizzled with marinara sauce.
Drizzle your favorite marinara sauce over the ricotta filling.
Lasagna noodles rolled up jelly roll style.
Tightly roll up the noodle jelly roll style.
Lasagna roll ups fit snugly in the casserole dish.
The roll ups should fit snugly in the casserole dish so that they don’t unfurl during baking.
Lasagna roll ups topped with sauce, mozzarella and parmesan cheeses.
Top with sauce, mozzarella and parmesan cheeses. Bake at 350° until heated through and bubbly.

Focaccia BLT

Focaccia BLT

Tomatoes on the vineWith Labor Day behind us and the kids back in school, summer has come to an end. Well, not officially. We still have a couple of more weeks before fall takes over the calendar and thankfully, Mother Nature is not hastening the transition. The temperatures are still steamy and, more importantly, the tomatoes are still coming in. Loads of them!

There is no comparison to fresh local Tomatoes on the vine in the gardensummer tomatoes and what is available the rest of the year. In winter, I’ve been fooled too many times by perfectly round, ruby red, “vine ripened” tomatoes for sale at the grocery store. They are tempting and they look gorgeous, a sight for sore eyes especially in the dead of winter, but inevitably I get them home, onto the cutting board, and slice into a mealy mess. Nothing but disappointment. It just means that as soon as the real tomatoes start coming in during the summer, I enjoy them any and every way I can: raw, baked, roasted, simmered, and grilled, in all sorts of salads, soups, sauces, pies, or straight off the vine, warm from the sun, with a sprinkle of salt. And don’t forget sandwiches.

An easy dinner this time of year is the classic BLT. Perfect for those nights when after school activities and homework seem to be all consuming- dinner needs to be quick, filling, maybe even portable. This BLT comes with a few twists and is always a hit, focaccia instead of sandwich bread, avocado replaces the mayo, and the bacon gets baked in the oven (hassle free bacon- no splatters!).

Deconstructed BLT with avocado
The makings of a beautiful BLT…

Bacon cooked in the oven is the way to go… whether for BLTs or Sunday morning breakfast.  This method is hands free which means no standing at the stove patiently turning the bacon over and over while hot grease splatters and blisters your hands (and stovetop).

Raw bacon slices on a foiled lined sheet pan.

Simply line a rimmed baking sheet with foil and place a metal cooling rack in the center. Preheat the oven to 400°. Place the bacon on the metal rack in one layer. Bake for 15-20 minutes, but start checking after 10 minutes. Some people like their bacon fatty, while others want a nice crunch.

Cooked bacon on foiled lined sheet pan.
The bacon is done and clean up is a breeze.

This focaccia is well worth the time… if not for a BLT, then to be enjoyed another way.  The recipe yields quite a bit, perfect for making once and freezing half to be pulled out in a pinch for appetizers, sandwiches, soups, or just enjoyed on its own.  For lunch I toasted leftover focaccia, spread the halves with pesto, and topped with sliced tomato. Heaven.

Focaccia

Focaccia

  • Servings: 16
  • Print

*recipe adapted from Marcella Hazen

Ingredients:
For the dough
2 ¼ teaspoons active dry yeast
2 cups lukewarm water
6 ½ cups unbleached flour
2 Tablespoons extra virgin olive oil
1 Tablespoon
salt

For baking the focaccia
Heavy duty rectangular metal baking pan, about 18”x14”
Extra virgin olive oil for smearing the pan
A baking stone (optional)
A mixture of ¼ cup extra virgin olive, 2 Tablespoons water and 1 teaspoon salt
A pastry brush

Instructions:
Dissolve the yeast by stirring it into ½ cup lukewarm water, and let sit for about 10 minutes.

Combine the yeast mixture and 1 cup of flour in a bowl, mixing them thoroughly. Add 2 tablespoons olive oil, 1 tablespoon salt, ¾ cup water and half the remaining flour. Mix thoroughly until the dough feels soft, but compact, and no longer sticks to the hands. Put in the remaining flour and ¾ cup water, and mix thoroughly again. When putting in flour and water for the last time, hold back some of both and add only as much of either as you need to make the dough manageable, soft, but not too sticky.

Take dough out of the bowl, and slap it down very hard against the work counter several times, until it is stretched out to a lengthwise. Reach for the far end of the dough, fold it a short distance toward you, push it away with the heel of your palm, flexing your wrist, fold it, and push it away again, gradually rolling it up and bringing it close to you. Rotate the dough a one-quarter turn, pick it up and slap it down hard, repeating the entire previous operation. Give it another one-quarter in the same direction and repeat the procedure for about 10 minutes. Pat the kneaded dough into a round shape.

First rise- Smear the middle of the baking sheet with about 2 tablespoons olive oil, put the kneaded, rounded dough on it, cover with a damp cloth, and leave it to rise for about 1 ½ hours.

Second rise- After 1 ½ hours, stretch out the dough in the baking pan, spreading it toward the edges so that it covers the entire pan. Cover with a damp towel and let the dough rise for 45 minutes.

Preheat the oven to 450°. If using a baking stone, put the stone in the oven and preheat for at least 30 minutes before you are ready to bake.

After the second rise, keeping the fingers of your hand stiff, poke the dough all over, making many little hollows with your fingertips. Beat the mixture of oil, water and salt with a small whisk or a fork for a few minutes until you have obtained a fairly homogeneous emulsion. Use a pastry brush to spread the mixture all the way out to the edges of the pan. The liquid will pool in the hollows made by your fingertips.

Place the pan on the middle rack of the preheated oven. Check the focaccia after 15 minutes. If it is cooking faster on one side, rotate the pan accordingly. Bake for another 7-8 minutes until golden brown all over. Lift the focaccia out of the pan using spatulas and set on a wire rack to cool.

The focaccia is best enjoyed the day you make it, but can also be frozen and reheated in a hot over for 10 minutes.

Focaccia dough stretched out to fill a sheet pan.
After the first rise, stretch the dough out to the sides, completely filling the pan.
Focaccia dough after the second rise.
After the second rise…
Dimpled focaccia dough
Dimple the dough using your fingertips.
Brushing the dough with olive oil
Using a pastry brush, gently brush the dough with a mixture of extra virgin olive oil, water, and salt. The oil will puddle in the dimples.
Focaccia squares on a cutting board.
Cut the focaccia into sandwich sized servings, then slice again horizontally through the middle to form top and bottom crusts.