Mulling Spices

Mulling spices- orange peel, cinnamon sticks, star anise, whole cloves and cardamon

A jar of homemade mulling spices.

Happy National Mulled Cider Day!

Leaves are changing; mornings are crisp as temperatures start dipping closer to freezing; in the market, the last few berries are being pushed out by apples. Walking around the neighborhood, even playing in the yard, is noisier these days. The slightest breeze triggers a barrage of falling acorns, rapid fire pop-pop-pops as they bounce off branches and leaves on their way down. The other night I came home to the smell of woodsmoke- not from a backyard grill, but drifting from a neighbor’s chimney, the first fire of the season. The sights, sounds, and aromas triggered something in me, almost a reflex to everything my senses were taking in.  Heading into the kitchen, opening up the spice drawer, instinctually I knew what I was looking for- a little of this and a little of that to complement the growing signs of fall.

IMG_7410

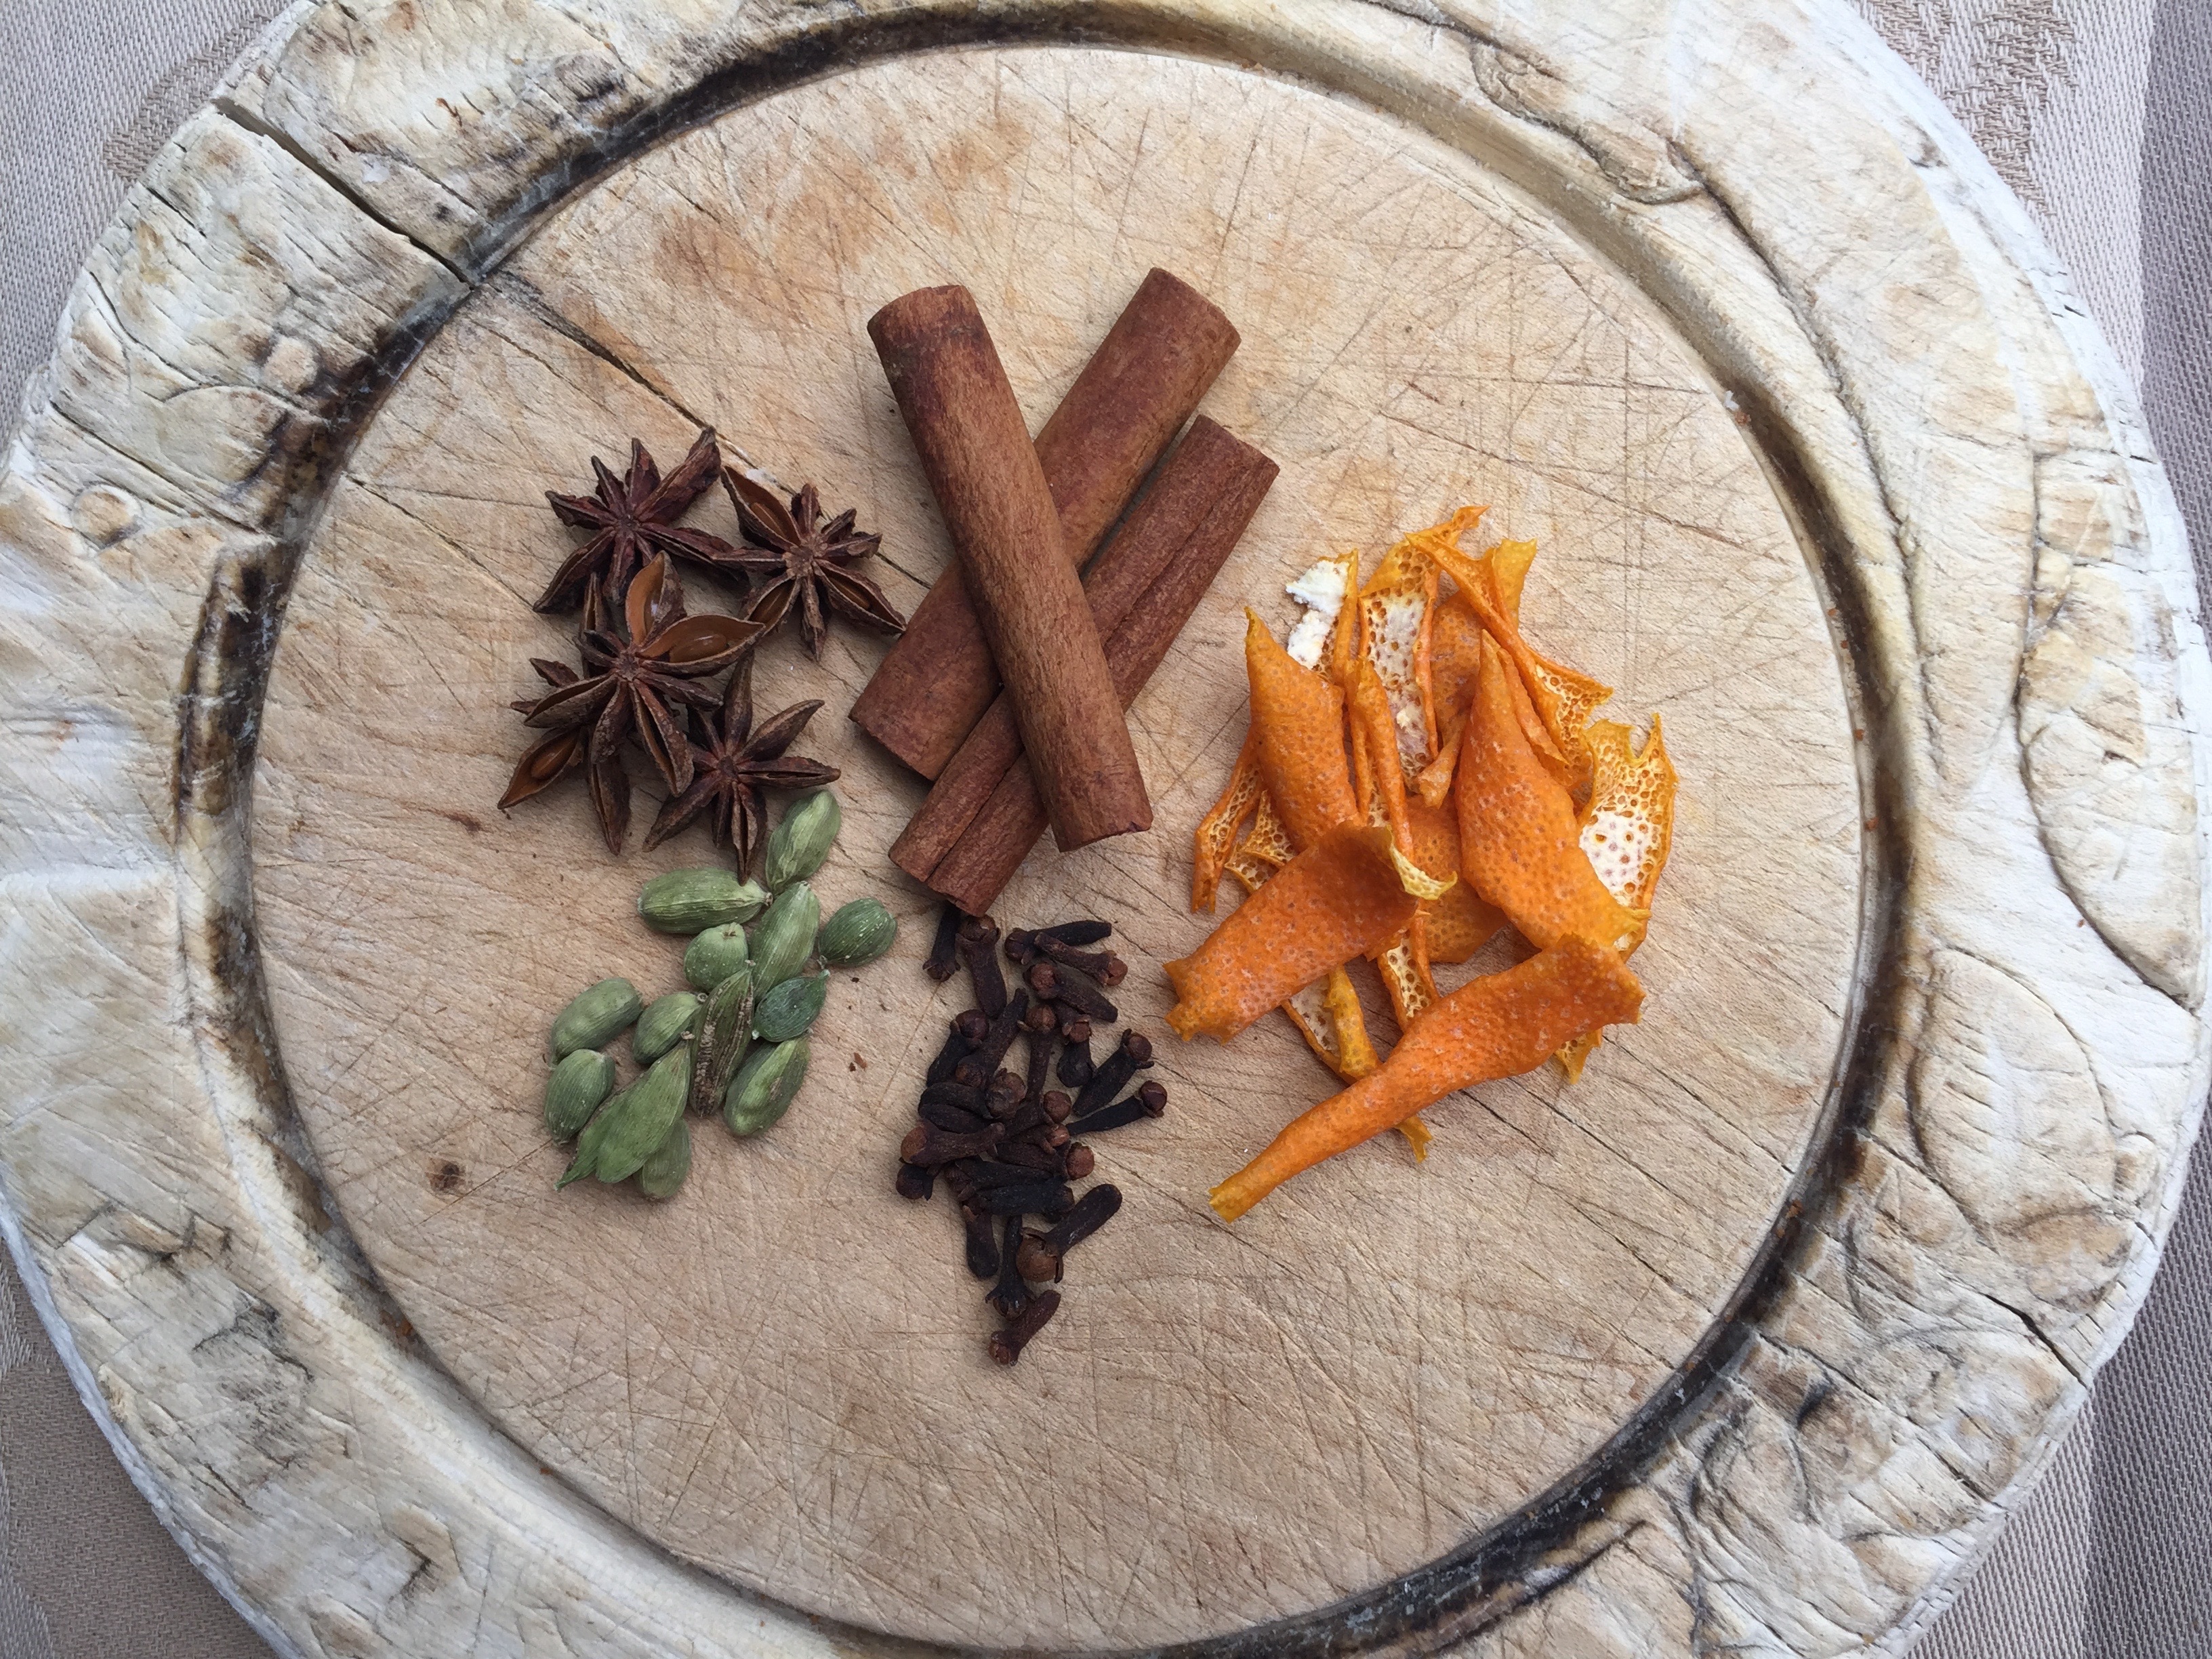
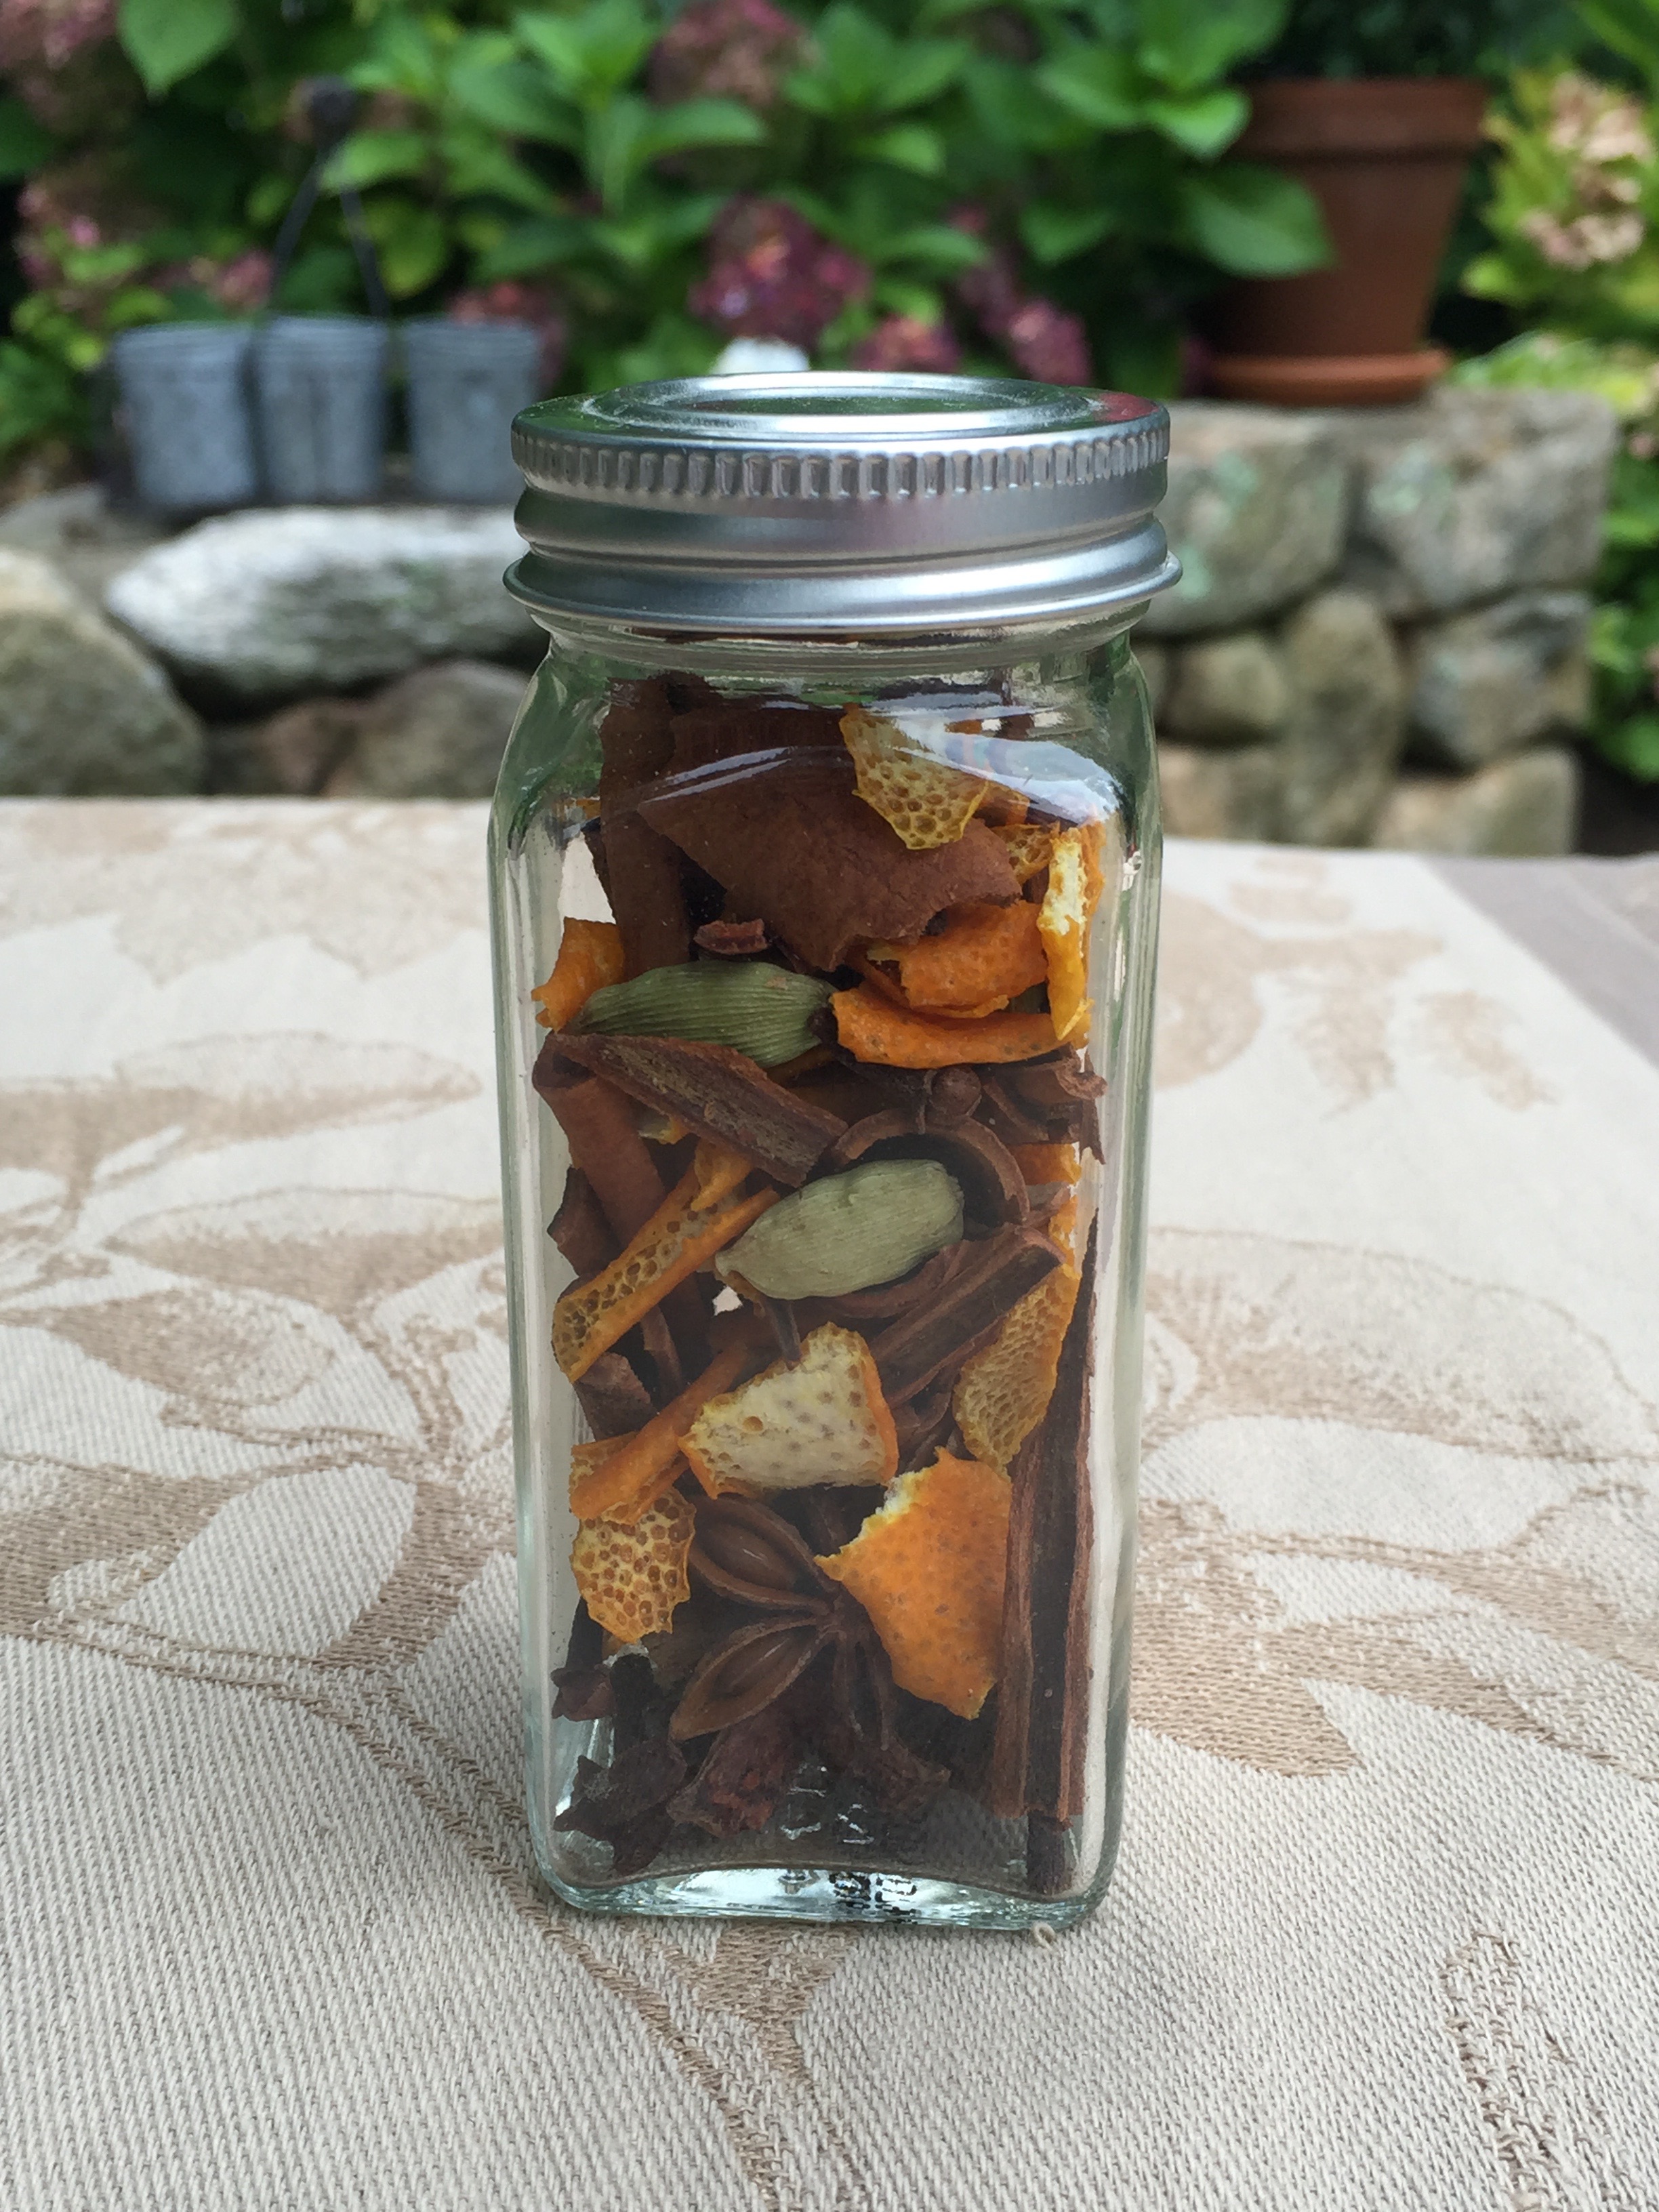
Even the colors of mulling spices remind us of autumn, orange, green, varying shades of brown. The fragrance is warm, comforting, and exotic all at the same time.  In no time, apple cider was gently simmering on the stove while an infuser filled with cinnamon, cardamon, star anise, whole cloves, and orange peel bobbed along in time.  The scent filled the room, naturally welcoming everyone in the house to gather- no easy feat these days with two teens and a tween in our midst.

Pre-mixed mulling spices can be found in just about any shop these days- from high end kitchen stores to your local grocery.  But don’t be tempted to buy the pre-made blend.  You probably have everything you need to make your own at home. You will have control, adding a little bit more of this, or a little less of that according to your taste.  Homemade mulling spices also make terrific gifts.  Save your old glass spice jars, remove the label, give them a good scrubbing, and fill with your custom blend.  Add an infuser and you’ve got a gift that keeps on giving!

IMG_7417

Below is my general blend, but it is just a guideline- for example, if I’d had allspice berries I would have thrown those in as well.  Please play around (and let me know what you discover).

Mulling Spices

  • Servings: enough for one 1.5oz spice jar
  • Print

Ingredients:
3 sticks cinnamon, broken into small pieces
peel from 1 orange, sliced, dried and broken into small pieces
5 star anise
10-12 cardamon pods
1 teaspoon whole cloves

Instructions:
In a small bowl combine the spices. Transfer to spice jar or similar container. Will keep indefinitely.

Lasagna Roll Ups

Lasagna Roll Up with basil

Wednesday night is pasta night at White House Red Door; at the very least, that means 52 nights of pasta a year and, to be honest, I’m sure we exceed that, easily. The wonderful thing is that there are so many shapes, sizes, styles, and sauces that we could quickly go through a year without any repeats. Actually, having written that, I really should consider this a challenge. Note to self… New Year’s Resolution decided… a year’s worth of pasta.

Most Wednesday nights I use dry pasta, pairing with some seasonal veggie and sauce. Occasionally meat makes an appearance, but only in a supporting role. Favorites include:

  • orechiette + kale + Italian sausage
  • spaghetti carbonara
  • baked orzo + shrimp + tomatoes + feta
  • penne + tuna + tomatoes + capers
  • tortellini + sautéed zucchini + pesto

Fresh pasta is a tremendous treat; a group effort saved for a quiet day when we can dedicate ourselves to the task. The rewards are well worth the effort and seem to lend themselves to cold, snowy days.

  • homemade butternut squash ravioli + sage + brown butter
  • homemade tagliatelle + bolognese
  • homemade lasagna noodles + béchamel + bolognese + parmesan

Rainbow ChardOne dish that turns up almost monthly is Lasagna Roll Ups. The perfect preset portions, incredible variety in terms of filling, and ease in getting this on the table make it one of my pasta night “go to” stand outs. The basic formula of ricotta, parmesan, salt and pepper remains constant, even standing alone if needed. However, when you have leftover or fresh veggies staring at you every time you open the fridge, throw them in the filling. Just about anything works- squash, zucchini, greens, peppers, mushrooms, onions are just a start.

This recipe is one to play with according to your taste. The quantities of sauce and cheese below are just guidelines. Love your lasagna gooey, saucy and cheesy? Done. Just add more sauce and cheese.   Hate greens? No problem. Swap the greens for another vegetable you like. Missing the meat? Brown some sausage, ground beef, or add leftover chicken. It will be delicious. Trust yourself!

PS- If you have any roll ups left, they make excellent additions to a lunch box. Simply warm up in the microwave and immediately transfer to a thermos.

Lasagna Roll Up with basil

Lasagna Roll Ups

  • Servings: 6-8
  • Print

Ingredients:
1 box lasagna noodles (15-18 noodles)
1 32oz jar of your favorite marinara sauce, 1 ½ cups reserved
2 cups ricotta
½ cup freshly grated parmesan, plus more for sprinkling
1 ½ cups shredded mozzarella, ½ cup reserved
pinch of freshly grated nutmeg
1 bunch greens… spinach, kale, swiss chard or combination
salt and pepper to taste

Instructions:
Preheat oven to 350°. Prepare casserole dish by covering bottom with thin layer of marinara sauce.

Bring large pot of salted water to a boil. Cook lasagna noodles, 6 at a time, until flexible. When flexible, remove noodles with tongs and place on a cookie sheet lined with a clean dish towel. Top with another clean dish towel, and repeat with next batch of 6 noodles. Repeat until all the noodles are cooked.

Make the filling:
Saute chopped greens in 1 tablespoon of extra virgin olive oil. Remove from pan and finely chop. Set aside.

Combine ricotta, parmesan, and nutmeg. Stir in finely chopped greens. Season to taste with salt and pepper.

Assembly:
Spread ricotta filling lengthwise down noodle (approximately 2 tablespoons per noodle). Drizzle 1-2 tablespoons marinara sauce over ricotta and top with 1-2 tablespoons shredded mozzarella.

Tightly roll up noodle jelly roll style and place seam side down in prepared casserole. (Depending on the casserole dish I use, my noodles usually end up being in 3×5 rows. It is important for the rolls to fit snugly against one another so that they don’t unfurl.) Repeat with remaining noodles.

Pour reserved 1 ½ cups of marinara over roll ups. Top with reserved ½ cup of shredded mozzarella. Sprinkle with freshly grated parmesan.

Bake until heated through and bubbly, 30 minutes or so.

Chopped kale on cutting board.
Chopped kale, but use whatever greens you have… swiss chard and spinach work beautifully.
Ricotta filling mixed with chopped greens.
Mix chopped greens with ricotta, parmesan, a few gratings of nutmeg, and salt and pepper to taste.
Lasagna roll up ingredients are out and ready for assembly, casserole dish, lasagne noodles, mozzarella cheese, parmesan cheese, filling, marinara sauce and salt.
All the ingredients are prepped and ready for assembly.
Lasagna noodles spread with ricotta filling.
Spread ricotta filling along the length of each noodle.
Lasagna noodle with ricotta filling and drizzled with marinara sauce.
Drizzle your favorite marinara sauce over the ricotta filling.
Lasagna noodles rolled up jelly roll style.
Tightly roll up the noodle jelly roll style.
Lasagna roll ups fit snugly in the casserole dish.
The roll ups should fit snugly in the casserole dish so that they don’t unfurl during baking.
Lasagna roll ups topped with sauce, mozzarella and parmesan cheeses.
Top with sauce, mozzarella and parmesan cheeses. Bake at 350° until heated through and bubbly.

Focaccia BLT

Focaccia BLT

Tomatoes on the vineWith Labor Day behind us and the kids back in school, summer has come to an end. Well, not officially. We still have a couple of more weeks before fall takes over the calendar and thankfully, Mother Nature is not hastening the transition. The temperatures are still steamy and, more importantly, the tomatoes are still coming in. Loads of them!

There is no comparison to fresh local Tomatoes on the vine in the gardensummer tomatoes and what is available the rest of the year. In winter, I’ve been fooled too many times by perfectly round, ruby red, “vine ripened” tomatoes for sale at the grocery store. They are tempting and they look gorgeous, a sight for sore eyes especially in the dead of winter, but inevitably I get them home, onto the cutting board, and slice into a mealy mess. Nothing but disappointment. It just means that as soon as the real tomatoes start coming in during the summer, I enjoy them any and every way I can: raw, baked, roasted, simmered, and grilled, in all sorts of salads, soups, sauces, pies, or straight off the vine, warm from the sun, with a sprinkle of salt. And don’t forget sandwiches.

An easy dinner this time of year is the classic BLT. Perfect for those nights when after school activities and homework seem to be all consuming- dinner needs to be quick, filling, maybe even portable. This BLT comes with a few twists and is always a hit, focaccia instead of sandwich bread, avocado replaces the mayo, and the bacon gets baked in the oven (hassle free bacon- no splatters!).

Deconstructed BLT with avocado
The makings of a beautiful BLT…

Bacon cooked in the oven is the way to go… whether for BLTs or Sunday morning breakfast.  This method is hands free which means no standing at the stove patiently turning the bacon over and over while hot grease splatters and blisters your hands (and stovetop).

Raw bacon slices on a foiled lined sheet pan.

Simply line a rimmed baking sheet with foil and place a metal cooling rack in the center. Preheat the oven to 400°. Place the bacon on the metal rack in one layer. Bake for 15-20 minutes, but start checking after 10 minutes. Some people like their bacon fatty, while others want a nice crunch.

Cooked bacon on foiled lined sheet pan.
The bacon is done and clean up is a breeze.

This focaccia is well worth the time… if not for a BLT, then to be enjoyed another way.  The recipe yields quite a bit, perfect for making once and freezing half to be pulled out in a pinch for appetizers, sandwiches, soups, or just enjoyed on its own.  For lunch I toasted leftover focaccia, spread the halves with pesto, and topped with sliced tomato. Heaven.

Focaccia

Focaccia

  • Servings: 16
  • Print

*recipe adapted from Marcella Hazen

Ingredients:
For the dough
2 ¼ teaspoons active dry yeast
2 cups lukewarm water
6 ½ cups unbleached flour
2 Tablespoons extra virgin olive oil
1 Tablespoon
salt

For baking the focaccia
Heavy duty rectangular metal baking pan, about 18”x14”
Extra virgin olive oil for smearing the pan
A baking stone (optional)
A mixture of ¼ cup extra virgin olive, 2 Tablespoons water and 1 teaspoon salt
A pastry brush

Instructions:
Dissolve the yeast by stirring it into ½ cup lukewarm water, and let sit for about 10 minutes.

Combine the yeast mixture and 1 cup of flour in a bowl, mixing them thoroughly. Add 2 tablespoons olive oil, 1 tablespoon salt, ¾ cup water and half the remaining flour. Mix thoroughly until the dough feels soft, but compact, and no longer sticks to the hands. Put in the remaining flour and ¾ cup water, and mix thoroughly again. When putting in flour and water for the last time, hold back some of both and add only as much of either as you need to make the dough manageable, soft, but not too sticky.

Take dough out of the bowl, and slap it down very hard against the work counter several times, until it is stretched out to a lengthwise. Reach for the far end of the dough, fold it a short distance toward you, push it away with the heel of your palm, flexing your wrist, fold it, and push it away again, gradually rolling it up and bringing it close to you. Rotate the dough a one-quarter turn, pick it up and slap it down hard, repeating the entire previous operation. Give it another one-quarter in the same direction and repeat the procedure for about 10 minutes. Pat the kneaded dough into a round shape.

First rise- Smear the middle of the baking sheet with about 2 tablespoons olive oil, put the kneaded, rounded dough on it, cover with a damp cloth, and leave it to rise for about 1 ½ hours.

Second rise- After 1 ½ hours, stretch out the dough in the baking pan, spreading it toward the edges so that it covers the entire pan. Cover with a damp towel and let the dough rise for 45 minutes.

Preheat the oven to 450°. If using a baking stone, put the stone in the oven and preheat for at least 30 minutes before you are ready to bake.

After the second rise, keeping the fingers of your hand stiff, poke the dough all over, making many little hollows with your fingertips. Beat the mixture of oil, water and salt with a small whisk or a fork for a few minutes until you have obtained a fairly homogeneous emulsion. Use a pastry brush to spread the mixture all the way out to the edges of the pan. The liquid will pool in the hollows made by your fingertips.

Place the pan on the middle rack of the preheated oven. Check the focaccia after 15 minutes. If it is cooking faster on one side, rotate the pan accordingly. Bake for another 7-8 minutes until golden brown all over. Lift the focaccia out of the pan using spatulas and set on a wire rack to cool.

The focaccia is best enjoyed the day you make it, but can also be frozen and reheated in a hot over for 10 minutes.

Focaccia dough stretched out to fill a sheet pan.
After the first rise, stretch the dough out to the sides, completely filling the pan.
Focaccia dough after the second rise.
After the second rise…
Dimpled focaccia dough
Dimple the dough using your fingertips.
Brushing the dough with olive oil
Using a pastry brush, gently brush the dough with a mixture of extra virgin olive oil, water, and salt. The oil will puddle in the dimples.
Focaccia squares on a cutting board.
Cut the focaccia into sandwich sized servings, then slice again horizontally through the middle to form top and bottom crusts.

Pesto

Pesto

You know how each summer there is THE song of the summer, the one that puts smiles on faces, gets toes tapping, and windows rolled down while everyone sings along? Well, this summer I have THE herb of the summer growing in my garden… basil. The three or four small plants that went into the ground in late spring have grown into a mighty basil forest, extraordinarily tall and lush. We cannot keep up with it; despite our best efforts, that is an enormous amount of caprese salad to eat!

Herb garden with basil, chives, oregano, thyme, and rosemary
This basil is out of control.

As the days grow shorter, I am only too aware of the cool weather that is sure to follow. Feeling a bit like the ant preparing for winter in Aesop’s The Grasshopper and the Ant, I’ve gone on a pesto making binge; not only preserving basil’s quintessential summer flavor at its best, but capturing a sunny moment in time. These green gems, pulled from the depths of the freezer, will bring warm memories to cold snowy nights sometime in the (not too distant) future.

Pesto is from the Italian word pestare which means to pound or crush. The English word for pestle shares the same Latin root. Traditionally, pesto is made by hand with a mortar and pestle, but in the quantities I’m dealing with the food processor is helping. No shame in that.

fresh basil

Some of the pesto is for enjoying now, but the majority is getting scooped into mini muffin tins, frozen, then transferred into storage containers for the freezer. The mini pesto “muffins” are just the right size to add to dishes all winter long.

And pesto isn’t just for pasta… here are some others ways to savor it.
• Potatoes- pesto and potatoes are a wonderful pair. Gently stir a spoonful of pesto into freshly boiled potatoes or mix a spoonful into mashed potatoes.
• Marinara Sauce- add pesto to your regular marinara sauce
• Dip- mix pesto into greek yogurt, crème fraiche, or sour cream for a dip
• Pizza- use pesto instead of pizza sauce on your next homemade pizza
• Sandwiches- spread pesto on your favorite crusty sandwich bread, top with sliced chicken and roasted red peppers

Those are just some of my suggestions.  I’d love to hear from you… what are your favorite ways to use pesto?

Pesto

Pesto

  • Servings: makes approximately 1 cup
  • Print

*recipe adapted from Marcella Hazen

Ingredients:
For the food processor-
2 cups tightly packed fresh basil leaves
1/3 cup extra virgin olive oil
3 Tablespoons lightly toasted pine nuts
2 garlic cloves, chopped fine
salt

For completion by hand-
½ cup freshly grated parmesan cheese
2 Tablespoons freshly grated romano cheese

Instructions:
Briefly rinse basil under cold water and pat dry.

Place basil, olive oil, pine nuts, chopped garlic, and a pinch of salt into the bowl of a food processor. Process to a uniform creamy consistency.

Transfer to a bowl, and mix in the two grated cheeses by hand.

The pesto can be frozen in pre-portioned amounts to be pulled from the freezer whenever you want a taste of summer.

Basil, extra virgin olive oil, and salt are placed in a food processor.
Place the basil, extra virgin olive oil, pine nuts, garlic, and salt into a food processor and blend.
Basil, extra virgin olive oil. pine nuts and salt have been blended to a creamy consistency.
Blend the basil, extra virgin olive oil,  pine nuts, garlic, and salt to a creamy consistency.
Parmesan and romano cheeses are added to the basil mixture.
Transfer the basil mixture to a bowl. Add the parmesan and romano cheeses.
Mixing the parmesan and romano cheeses into the pesto by hand.
Mix the parmesan and romano cheeses by hand.
The parmesan and romano cheeses have been thoroughly incorporated.
Pesto fills a mini muffin tin
Using a mini muffin tin, small portions of pesto are ready for the freezer. After freezing, transfer them to a container for long term freezer storage.
Pre-portioned amounts of frozen pesto
Wax paper separates layers of frozen pesto “muffins” for long term storage in the freezer.