Patricia Wells is a journalist, cookbook author, teacher, and four-time James Beard Award winner. For over 3 decades, she and her husband Walter have divided their time between Paris and Provence. Every year, Patricia holds several weeklong classes at her Provence farmhouse. She also offers a few classes in her Paris cooking studio, located on the Left Bank in the St. Germain des Pres neighborhood. My friend Joanne and I attended the April 11th-15th “Cooking in Paris” class, along with five other women. Our classmates (and new friends!) spanned the US, literally from East Coast to West Coast, with a stop in Chicago, as well as Panama in Central America. In what seemed like just moments, it was clear we all shared a passion for food, wine, and the traditions and cultures that influence them.
Patricia’s James Beard Award medals… #goals
Patricia was the most gracious host, welcoming us into her kitchen and life with a warm smile and open arms. She was an intuitive teacher, sensing just when to model technique or offer hands-on support. As with all good teachers, she carefully balanced direct instruction with the joy of watching her students work independently with success.
Friday’s lunch: Patricia holding the biggest rib-eye I have ever seen!
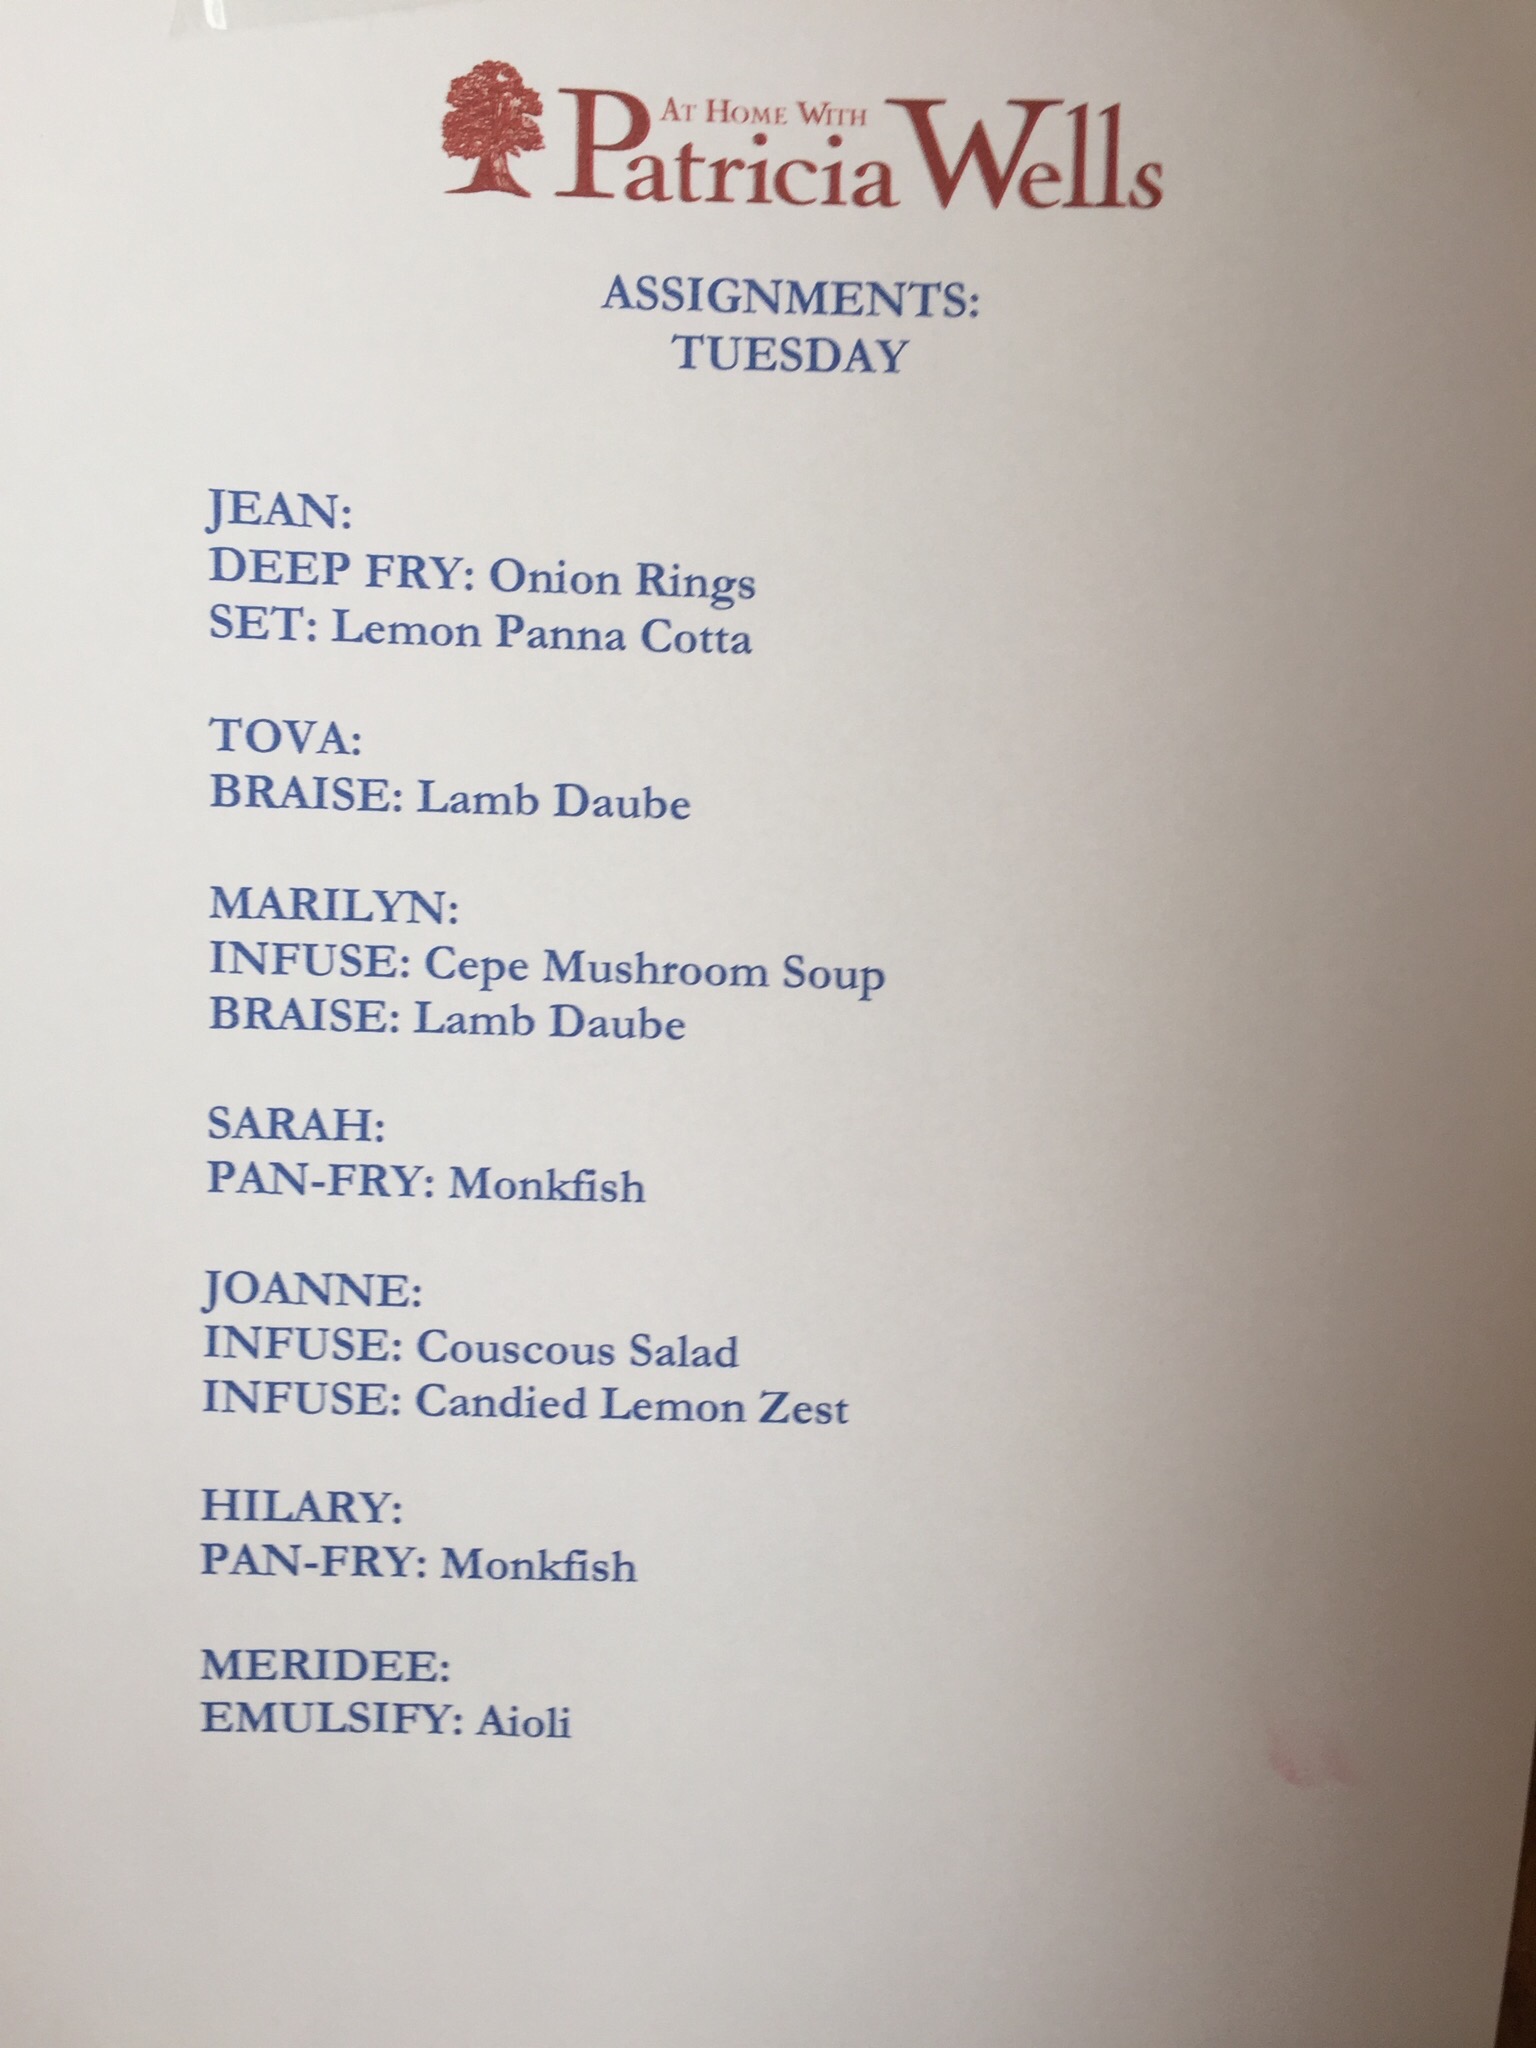
The class ran Monday-Friday, from about 10am-3pm. While not formally identified, I would say the overarching theme of the food we prepared was fresh, seasonal, and very manageable for cooks of all skill levels. The recipes were family friendly and perfect for entertaining, as many were make ahead. Each day focused on a different cooking technique. For example, Monday’s objective was cooking with water- braising, poaching, and blanching. While Tuesday found us cooking with oil in a variety of ways- deep frying, pan frying, and emulsifying.
Monday’s lessonTuesday’s assignments- before this, I had never made homemade onion rings OR panna cotta. Will definitely be making both again!
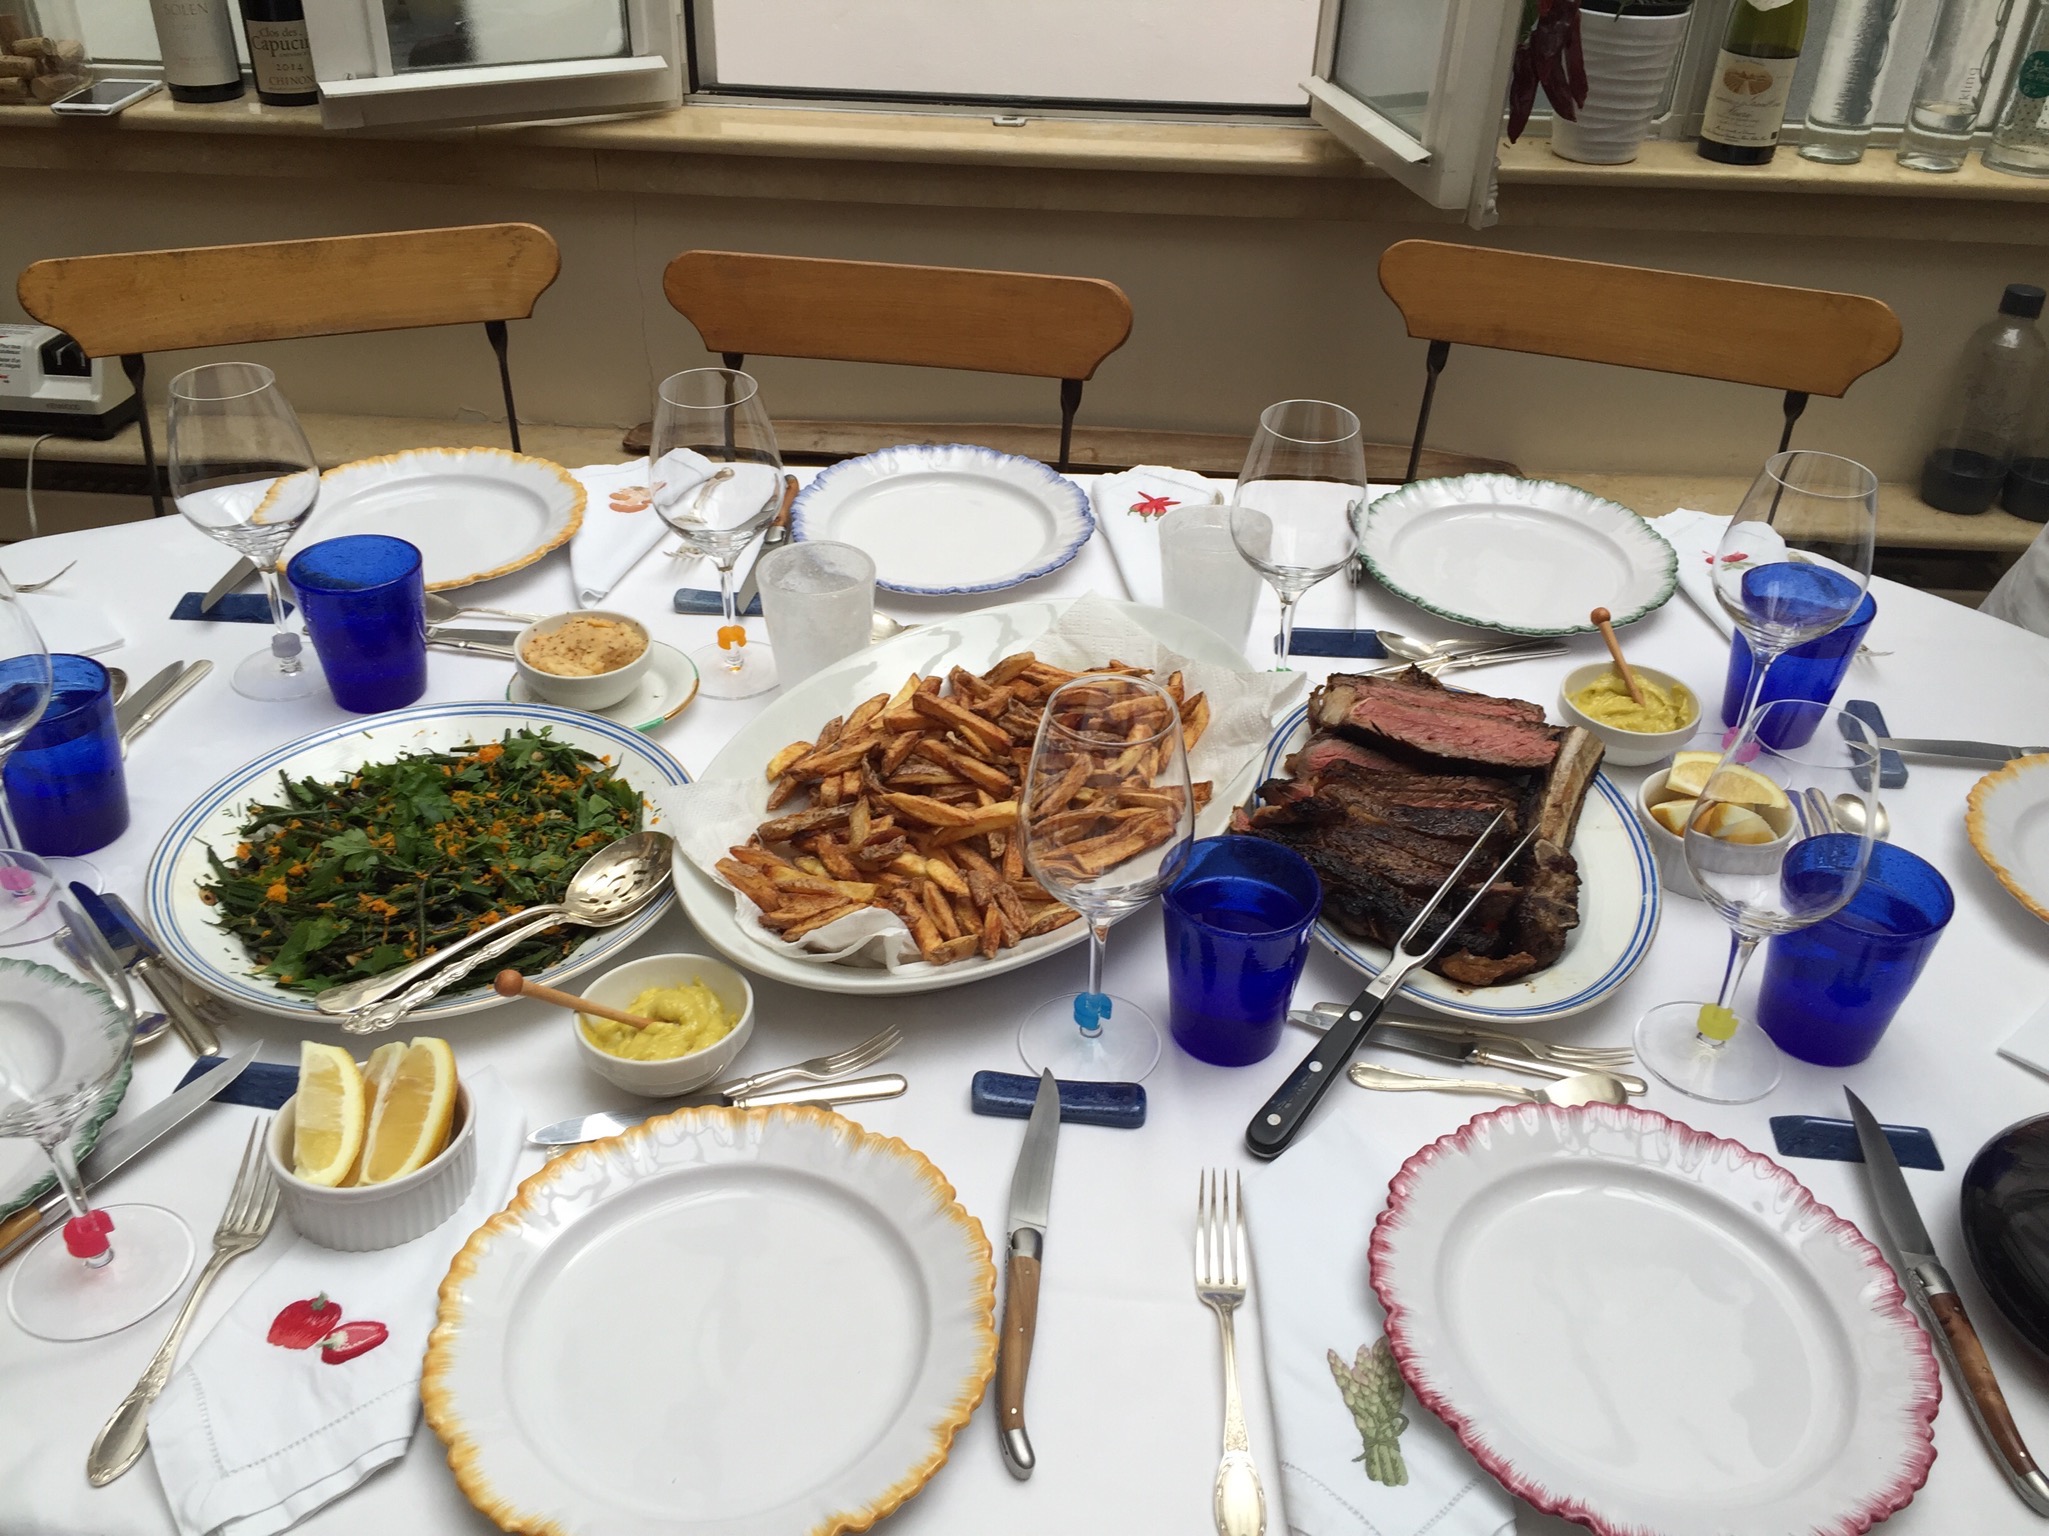
Upon arrival each morning, we found our assignments for the day, along with each student’s station complete with mise en place. Immediately, we donned our aprons and set to work as Patricia circulated among us. We were such a collaborative group; if one finished their task, offers of help were made to those still working. Chores were shared, dishes were washed, dried, and put away and the table set for lunch. Lunch was the BEST part of the day as we sat down to enjoy the fruits of our labor, while the conversation flowed.
Hard at work…Beautifully set table with Friday’s feast… rib-eyes, steak frites, and seared green beans.
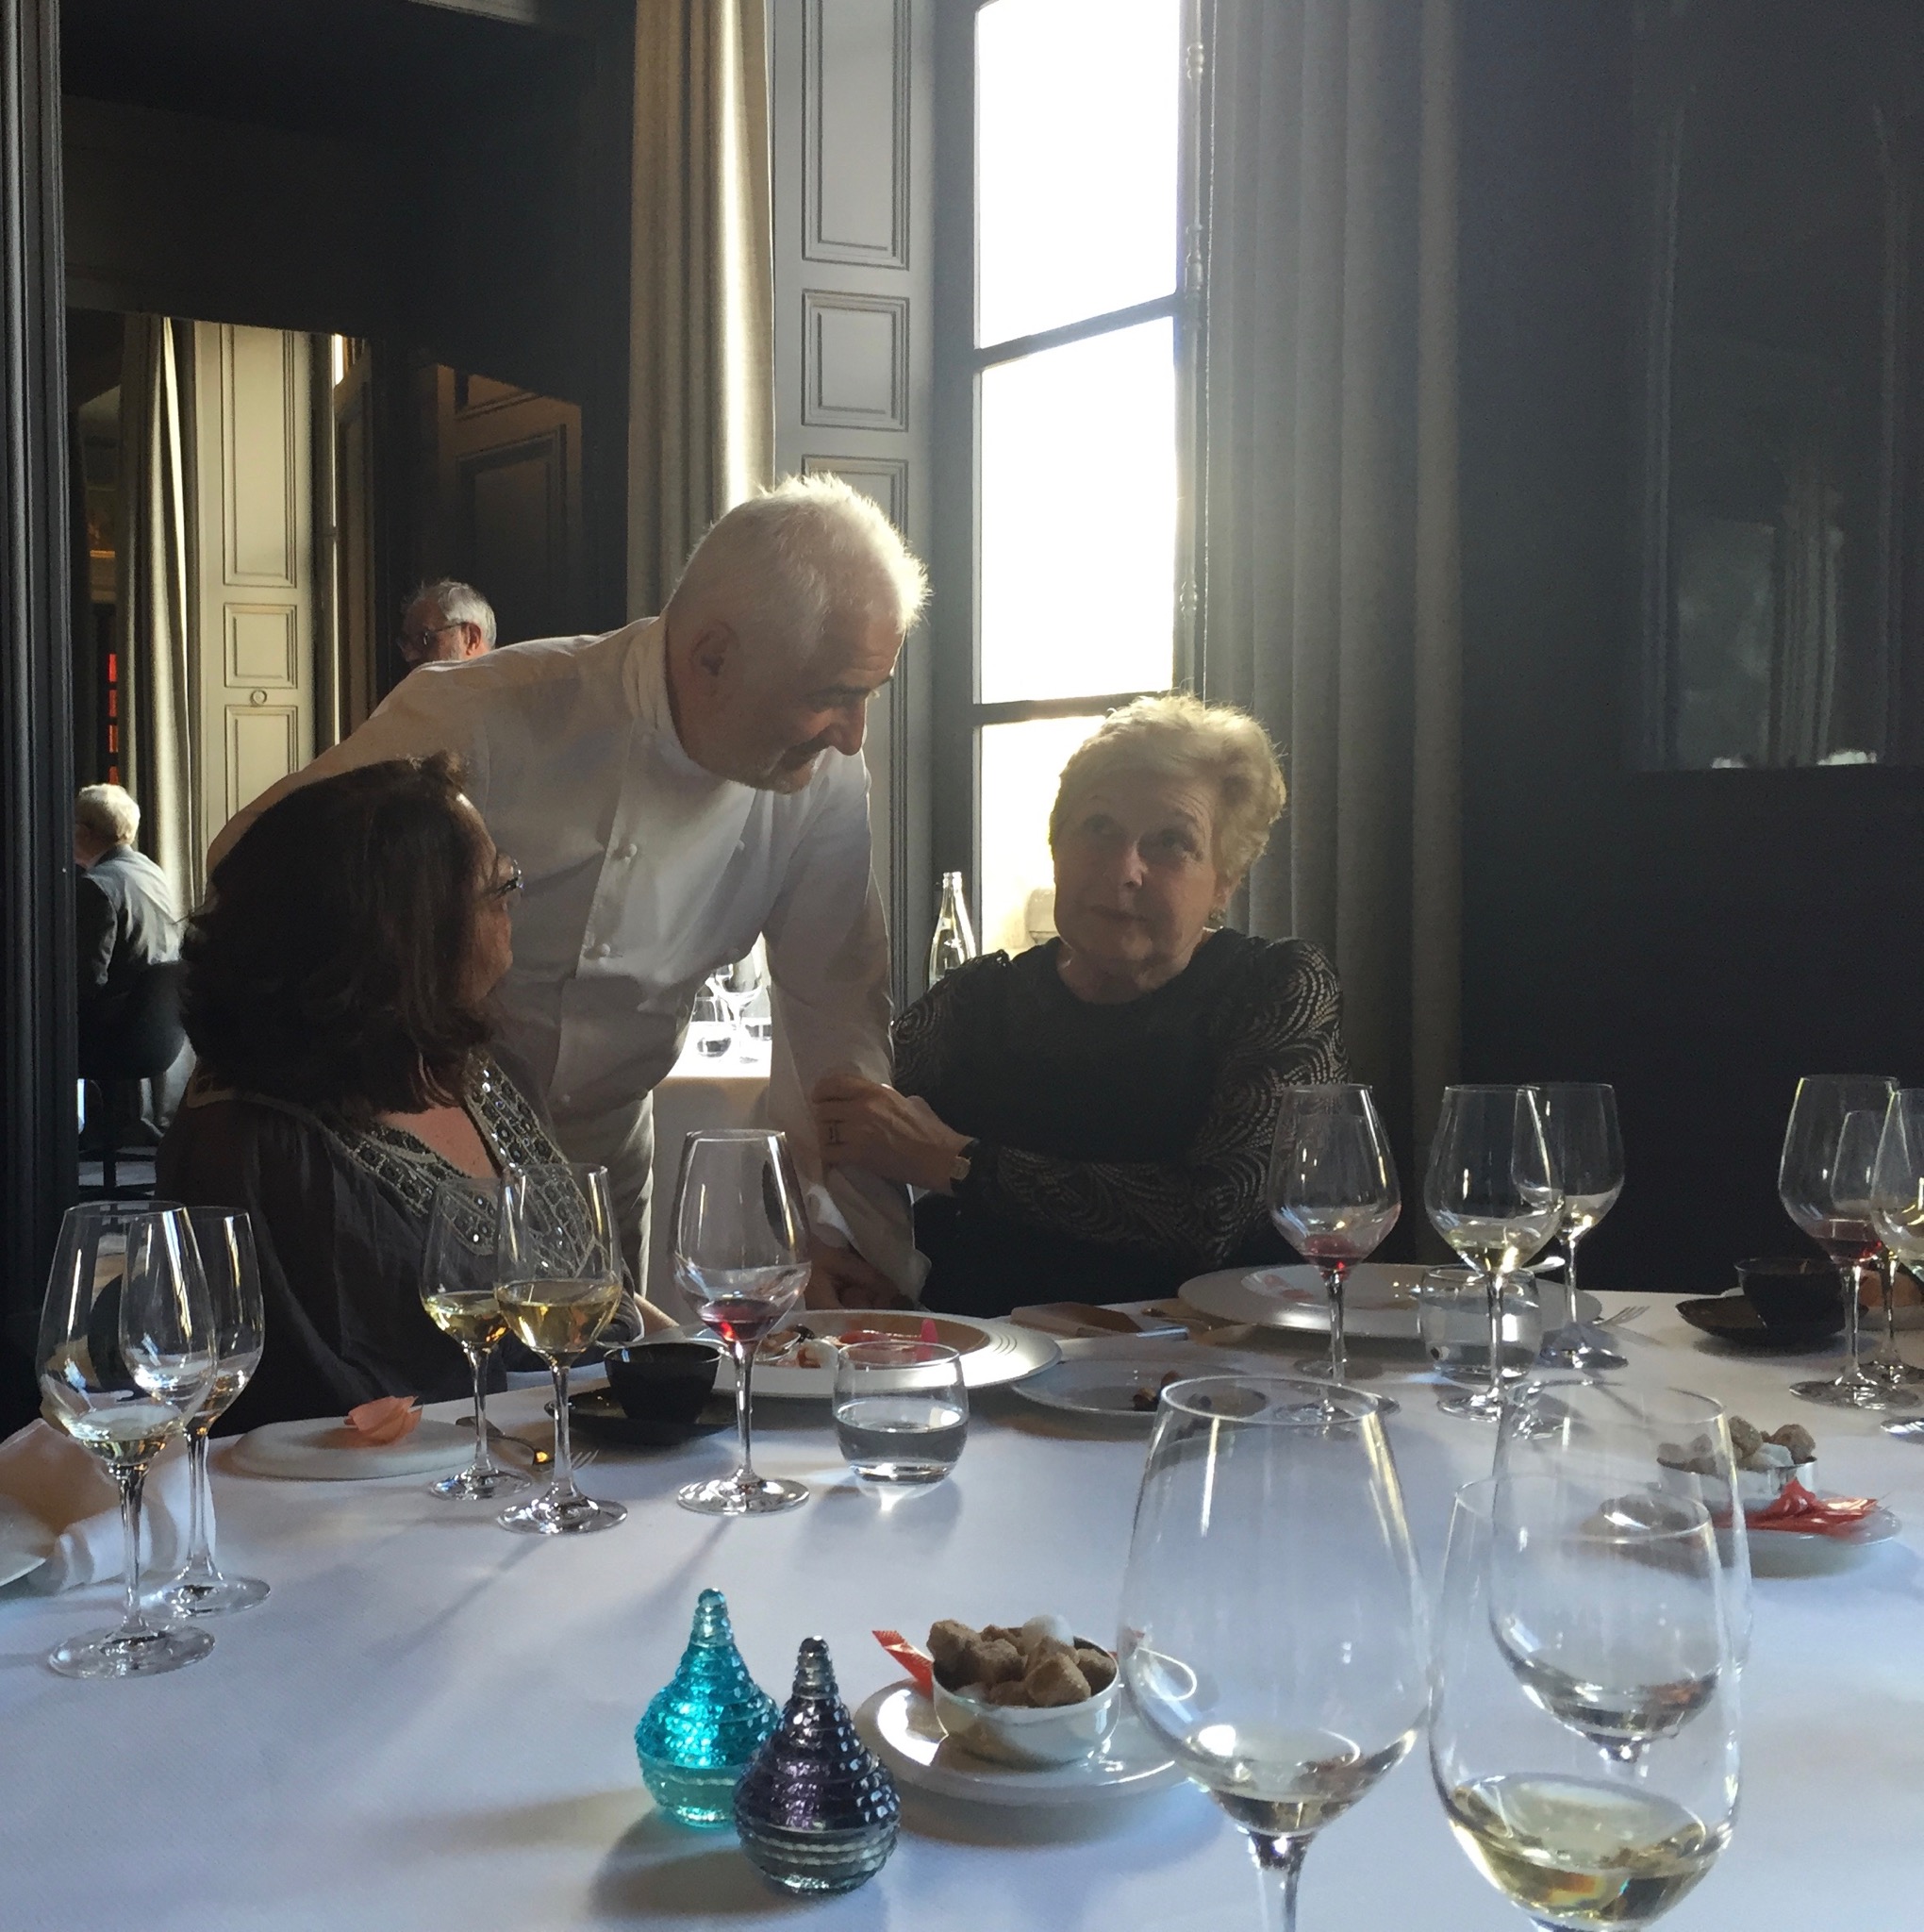
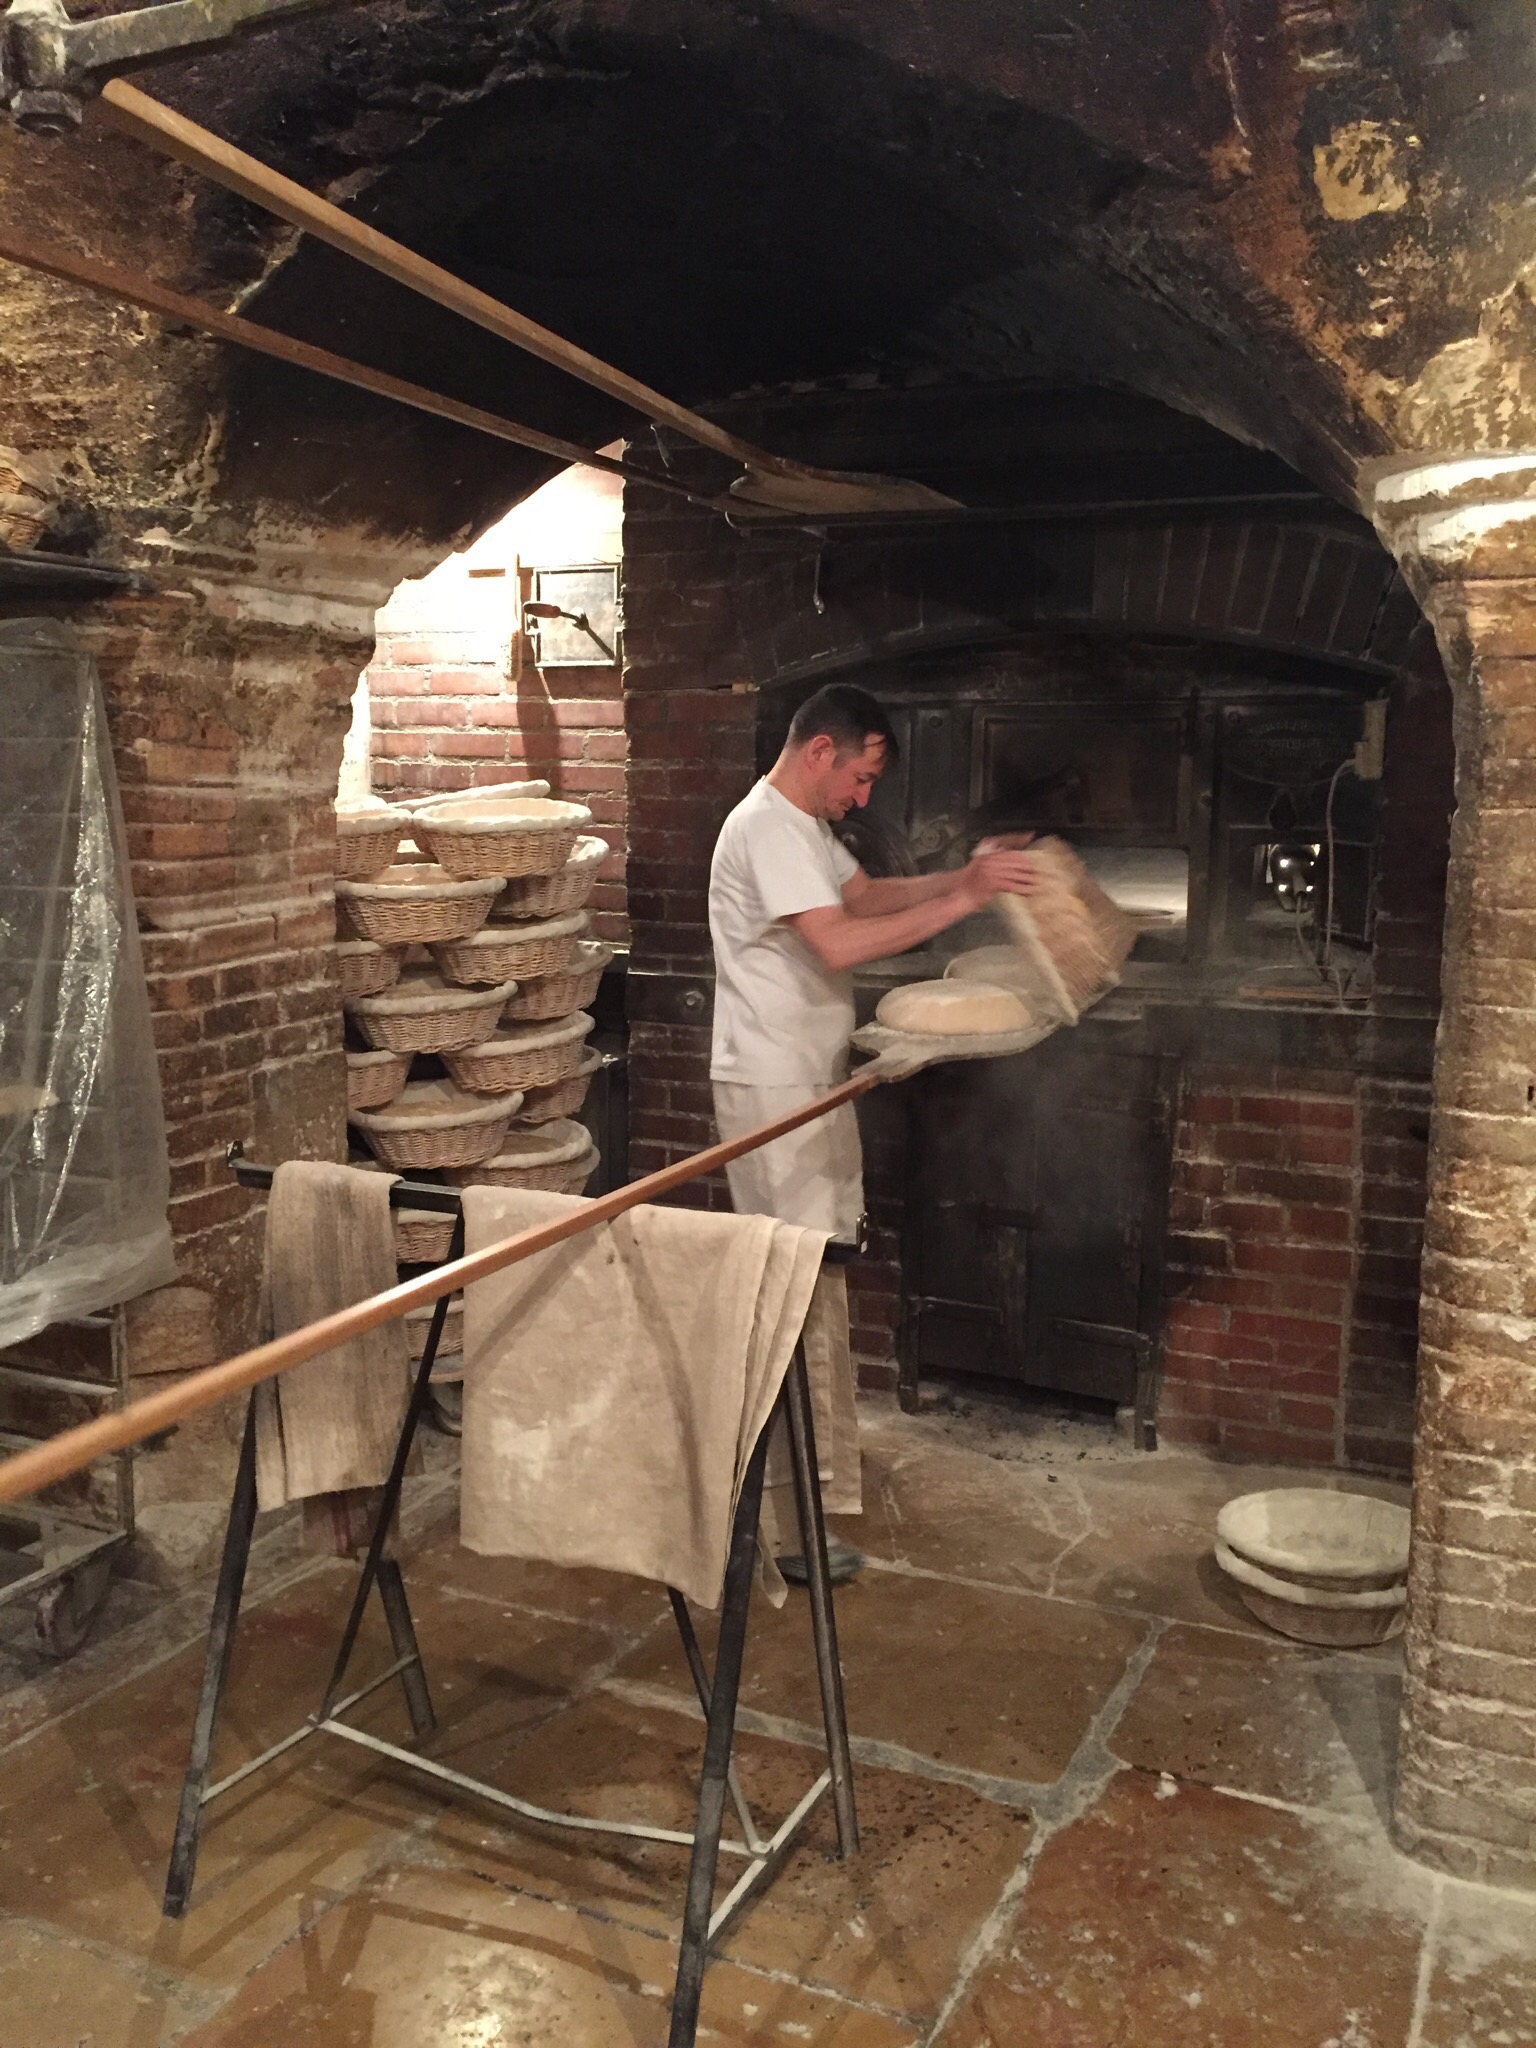
But it wasn’t all “work” and no play! We took field trips… on Wednesday we strolled through the President Wilson Market followed by an unbelievable lunch at Restaurant Guy Savoy; on Thursday we headed to Poilâne, going deep underground to see one of their bakers in action as he worked the wood fired oven, and then it was off to a late morning wine tasting at the charming La Dernière Goutte.
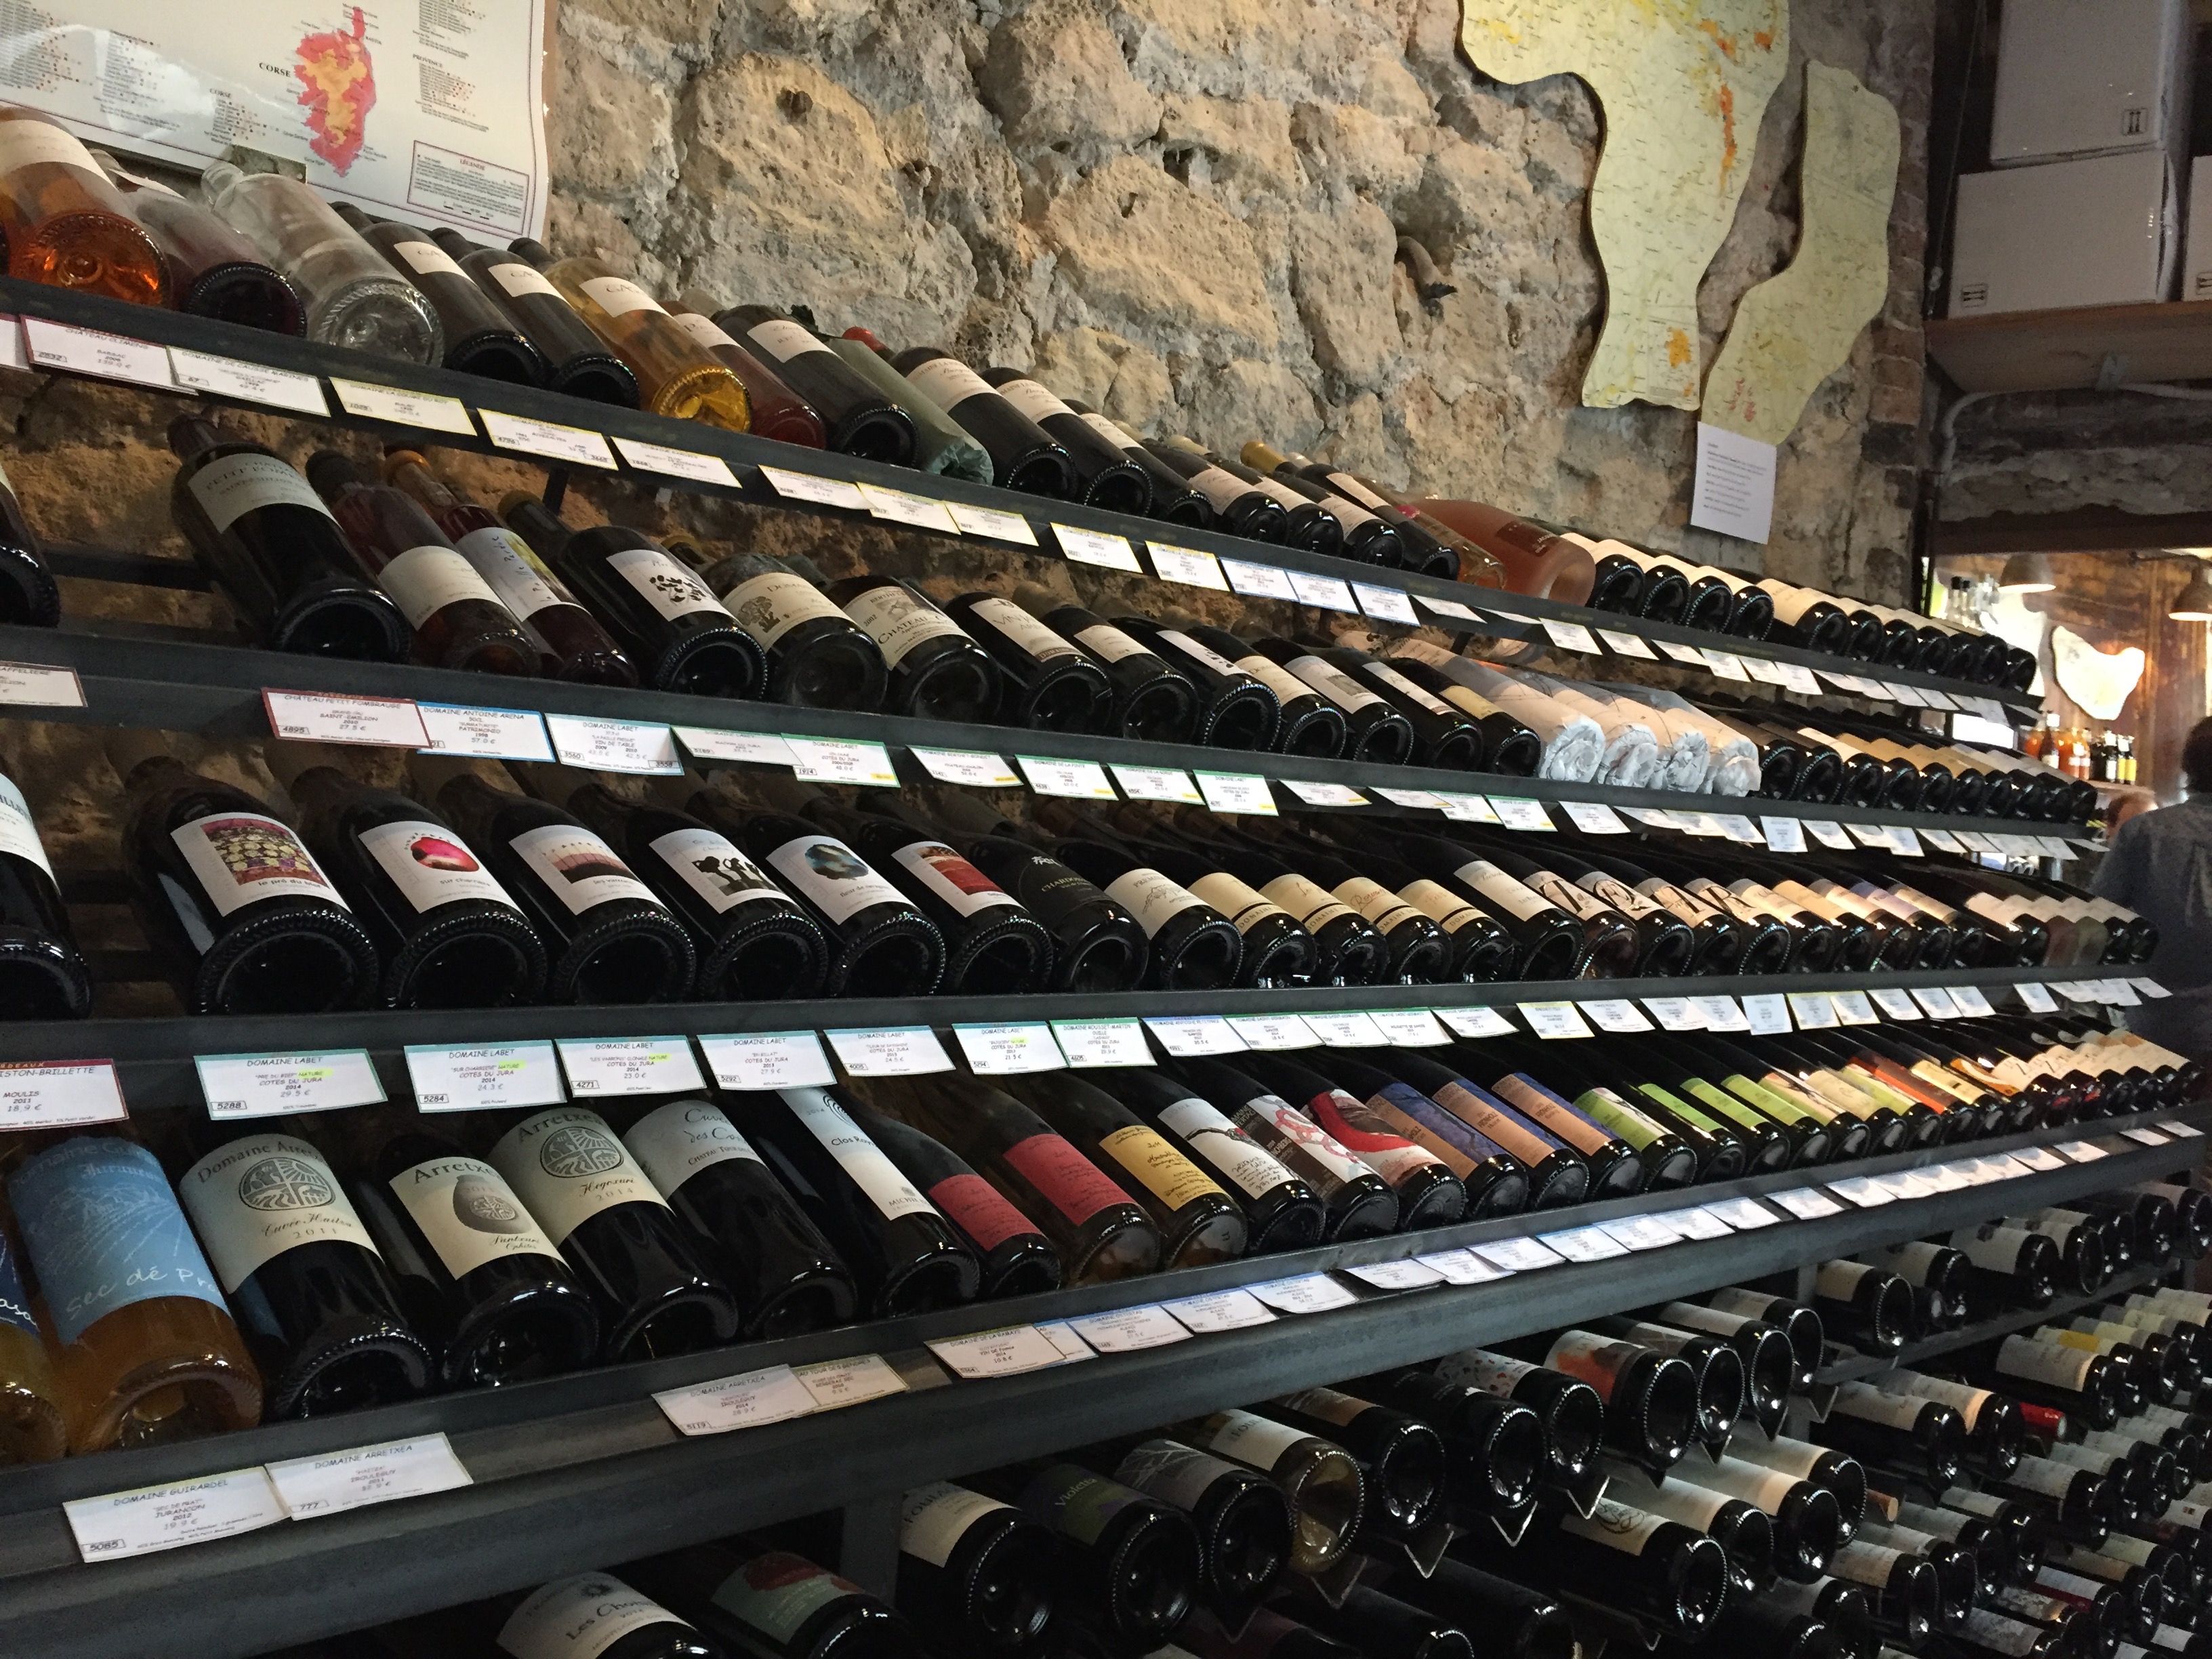
Incredible variety of mushrooms…and seafood at the President Wilson MarketMichelin starred chef Guy Savoy enjoying a moment with Patricia Wells and my classmate, Sarah, during our lunch at his restaurant.A visit to the renowned Poilâne…Dough has finished rising and is ready for the wood fired oven.During his shift, each baker bakes two batches of 75 loaves a piece in the wood fired oven.Display of freshly baked bread… the famous rounds are made with a sourdough starter that has been in continuous use since the 1930s.La Dernière Goutte is a gem of a wine shop run by Cuban-American, Juan Sanchez. The focus is mostly on organic and biodynamic wines.Wine tasting room at La Dernière Goutte.Wine tasting notes…
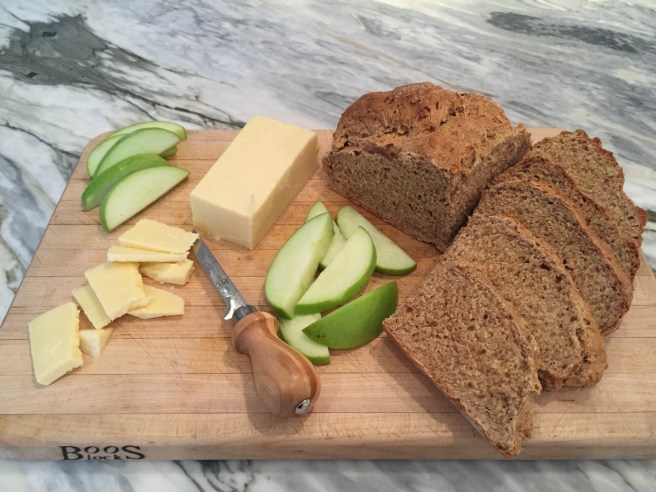
The smell of freshly baked bread, still warm, cooling on in the kitchen should be bottled and sold. Nothing is more comforting and evocative of nostalgia. This bread is no exception. There are many variations of Irish Soda Bread– some with raisins, seeds, or both; some have butter, sugar, or even an egg to make them a little richer; some with white flour, or some with whole wheat. They all share some sort of flour, salt, baking soda, and buttermilk. This brown soda bread, made with whole-wheat flour, is the most basic version.
Throughout Ireland, brown soda bread is offered with meals- and it is incredible! I make it here at home, and though delicious, nothing compares to the bread I’ve had in Ireland. It must be the flour- the brown soda bread in Ireland is coarser and nuttier than what I’ve been able to make in my own kitchen. I am seriously considering importing a bag of whole wheat flour, just so I can experiment!
Though not an exact replica (how could it be?), this dense, chewy and hearty bread comes together quickly and is well worth making. In less than an hour, you will be enjoying a warm slice of bread, slathered in butter, with a touch of jam. It is ideal for serving alongside your favorite soup or getting you through the late afternoon slump with a cup of tea. Add it to your cheese board with cheddar and apples. It is also delicious with smoked salmon.
Ingredients:
4 cups whole wheat flour
4 cups all-purpose flour
3 rounded teaspoons of salt
2 rounded teaspoons of baking soda
3½-3¾ cups of buttermilk
Instructions:
Preheat the oven to 450°F.
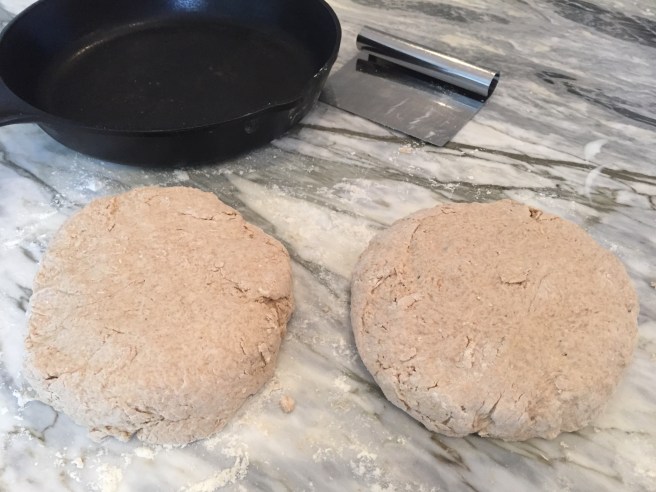
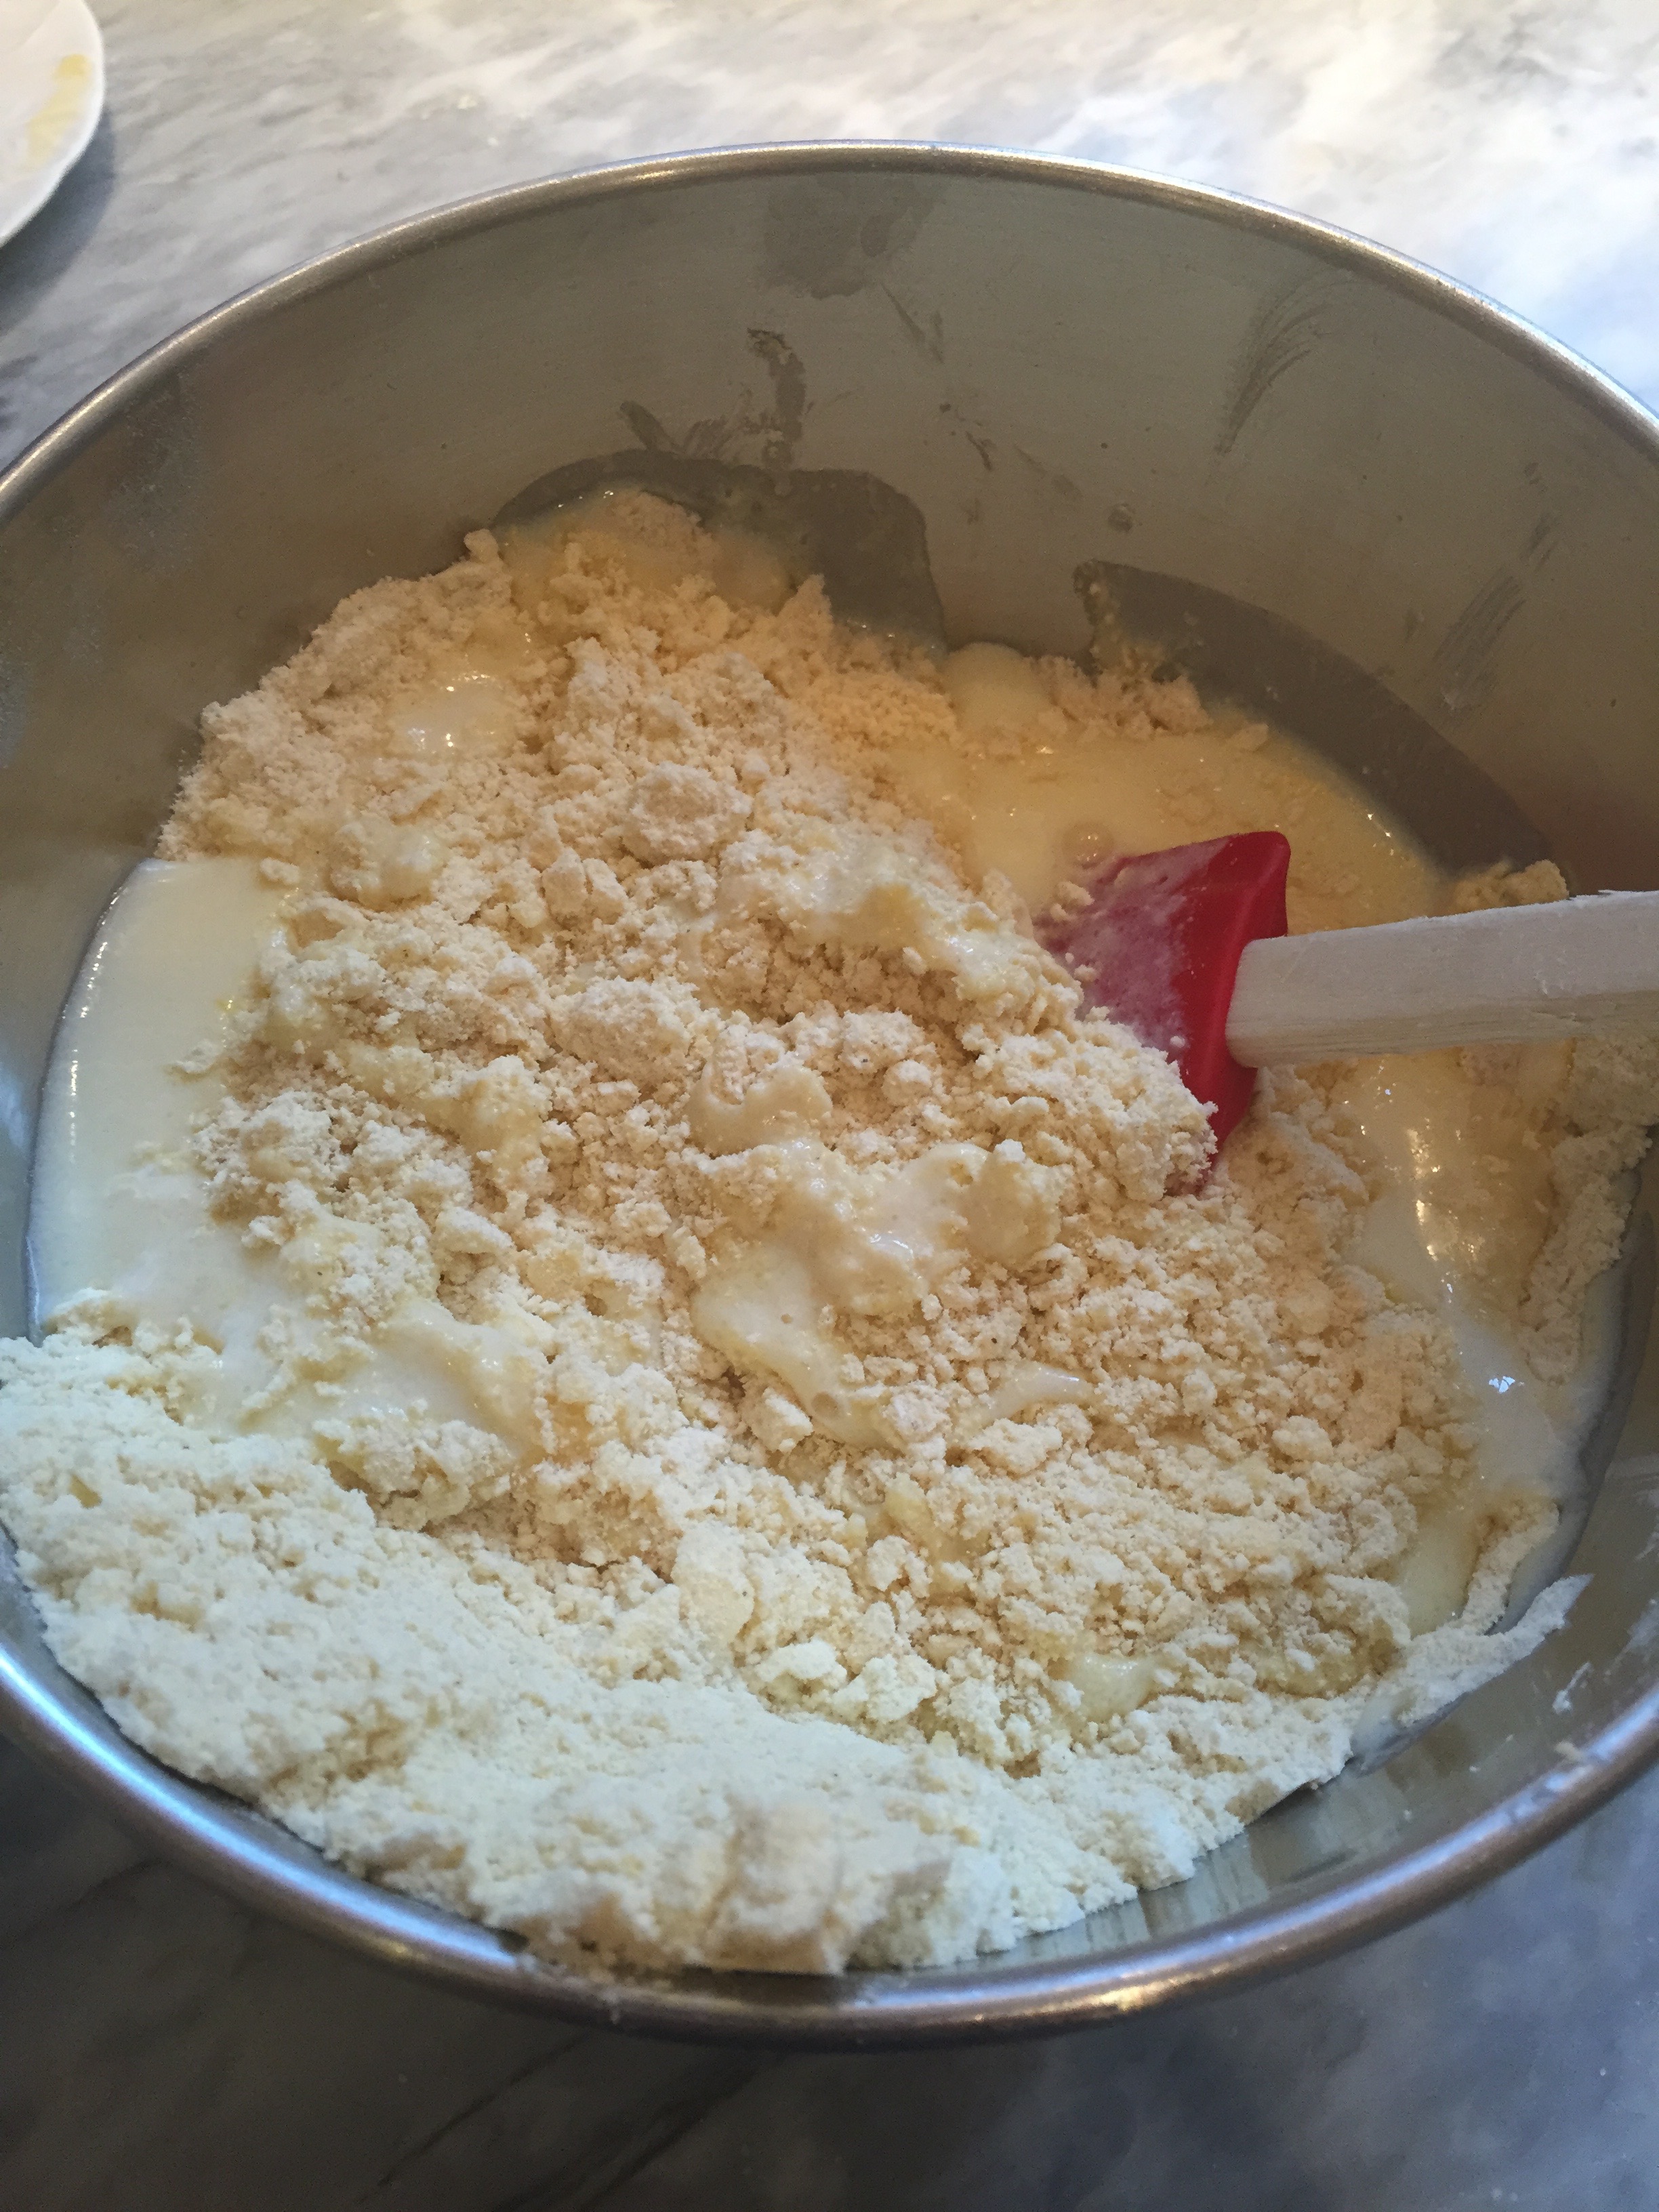
Mix the dry ingredients together. Make a well in the center and add most of the buttermilk all in one go. Working from the center, mix with a wooden spoon and add more buttermilk if necessary. The dough should be soft, but not sticky. Turn out onto a floured surface and divide dough in half. Knead each half lightly, just enough to shape it into a round loaf. Flatten each loaf to about 2 inches deep. Put into a cast iron skillet or lined baking sheet. Mark with a deep cross and bake in the hot oven for 15 minutes, then reduce the heat to 400°F for about 20-25 minutes more, or until bottom of the bread sounds hollow when tapped.
Remove from cast iron skillet or baking sheet and let cool on a wire rack.
Ingredients for Brown Soda Bread- whole wheat flour, all-purpose flour, salt, baking soda, and buttermilkMix the dry ingredients together.Make a well in the center of your dry ingredients.Carefully pour almost the entire amount of buttermilk into the well.Use a wooden spoon to combine the buttermilk and dry ingredients.When dough is soft, but not sticky, turn it out onto a lightly floured surface. Cut the dough in half.Knead dough just enough to form 2 round loaves about 2 inches deep.
Put each loaf in a cast iron skillet or lined cookie sheet. Cut deep cross in each.
Cut deep cross in each.
Bake soda bread at 450°F for 15 minutes, then turn temperature down to 400° and bake for an additional 20-25 minutes…
or until bread sounds hollow when tapped on the bottom.
As some of you may know, my mom’s parents were from Ireland. Nanny was a wonderful home cook, bringing her Irish food traditions from Belfast to Brooklyn where her Italian, German, and Jewish neighbors influenced her cooking in America.
But Nanny wasn’t the only one to bring Irish food traditions, my grandfather ruled the kitchen on weekend mornings. According to my mom, Saturday mornings would be met with plenty of hot tea, eggs, bacon (or ham or sausages), potato farls, and soda bread. My grandfather would fry bacon, set it aside, then in the same pan, immediately fry the eggs in the bacon fat. From there, in went slices of plain soda bread, fried quickly on both sides until lightly brown. Can you imagine? Heaven!!! Unfortunately, my grandfather died before I was born, but I still grew up enjoying his Irish Soda Bread, first made by my mother, and now my dad.
My father has tweaked the recipe over the years, as I’m sure my grandfather had tweaked his own recipe. My guess is that if you ask 10 different people how they make Irish soda bread you will get 10 different recipes. What is generally accepted throughout is a combination of flour, salt, baking soda, and buttermilk. The baking soda and buttermilk give this quick bread its rise. Another common practice is cutting a cross deep on top. Tradition states that the cross is to let the devil out and ward off evil. Practically speaking, it also helps the heat penetrate the center of the loaf as well as providing the guidelines to break the bread up beautifully when served. My mom recalls my grandfather usually making plain soda bread, and only occasionally making a sweeter version with raisins. This makes sense as years ago the addition of sugar, dried fruits, or eggs would have been a treat and only done on special occasions.
The recipe below is my version of my dad’s recipe, slightly sweet and full of raisins. This loaf is perfect for breakfast, snacking, in lunch boxes, and definitely with a cup of tea or two. I do make other soda breads, a hearty Brown Soda Bread (made with whole wheat flour) and plain White Soda Bread that is unsweetened and wonderful with soups and stews- or fried eggs and bacon. Those recipes will show up here, but first I’d like to introduce this lovely raisin studded Irish Soda Bread.
Ingredients:
4 cups all-purpose flour
2 Tablespoons unsalted butter
2 Tablespoons sugar
1 teaspoon salt
1 teaspoon baking soda
1 cup raisins or currants (my dad loads his with raisins and uses up to 2 cups)
1¼ -1¾ cups buttermilk
Instructions:
Preheat oven to 450°F.
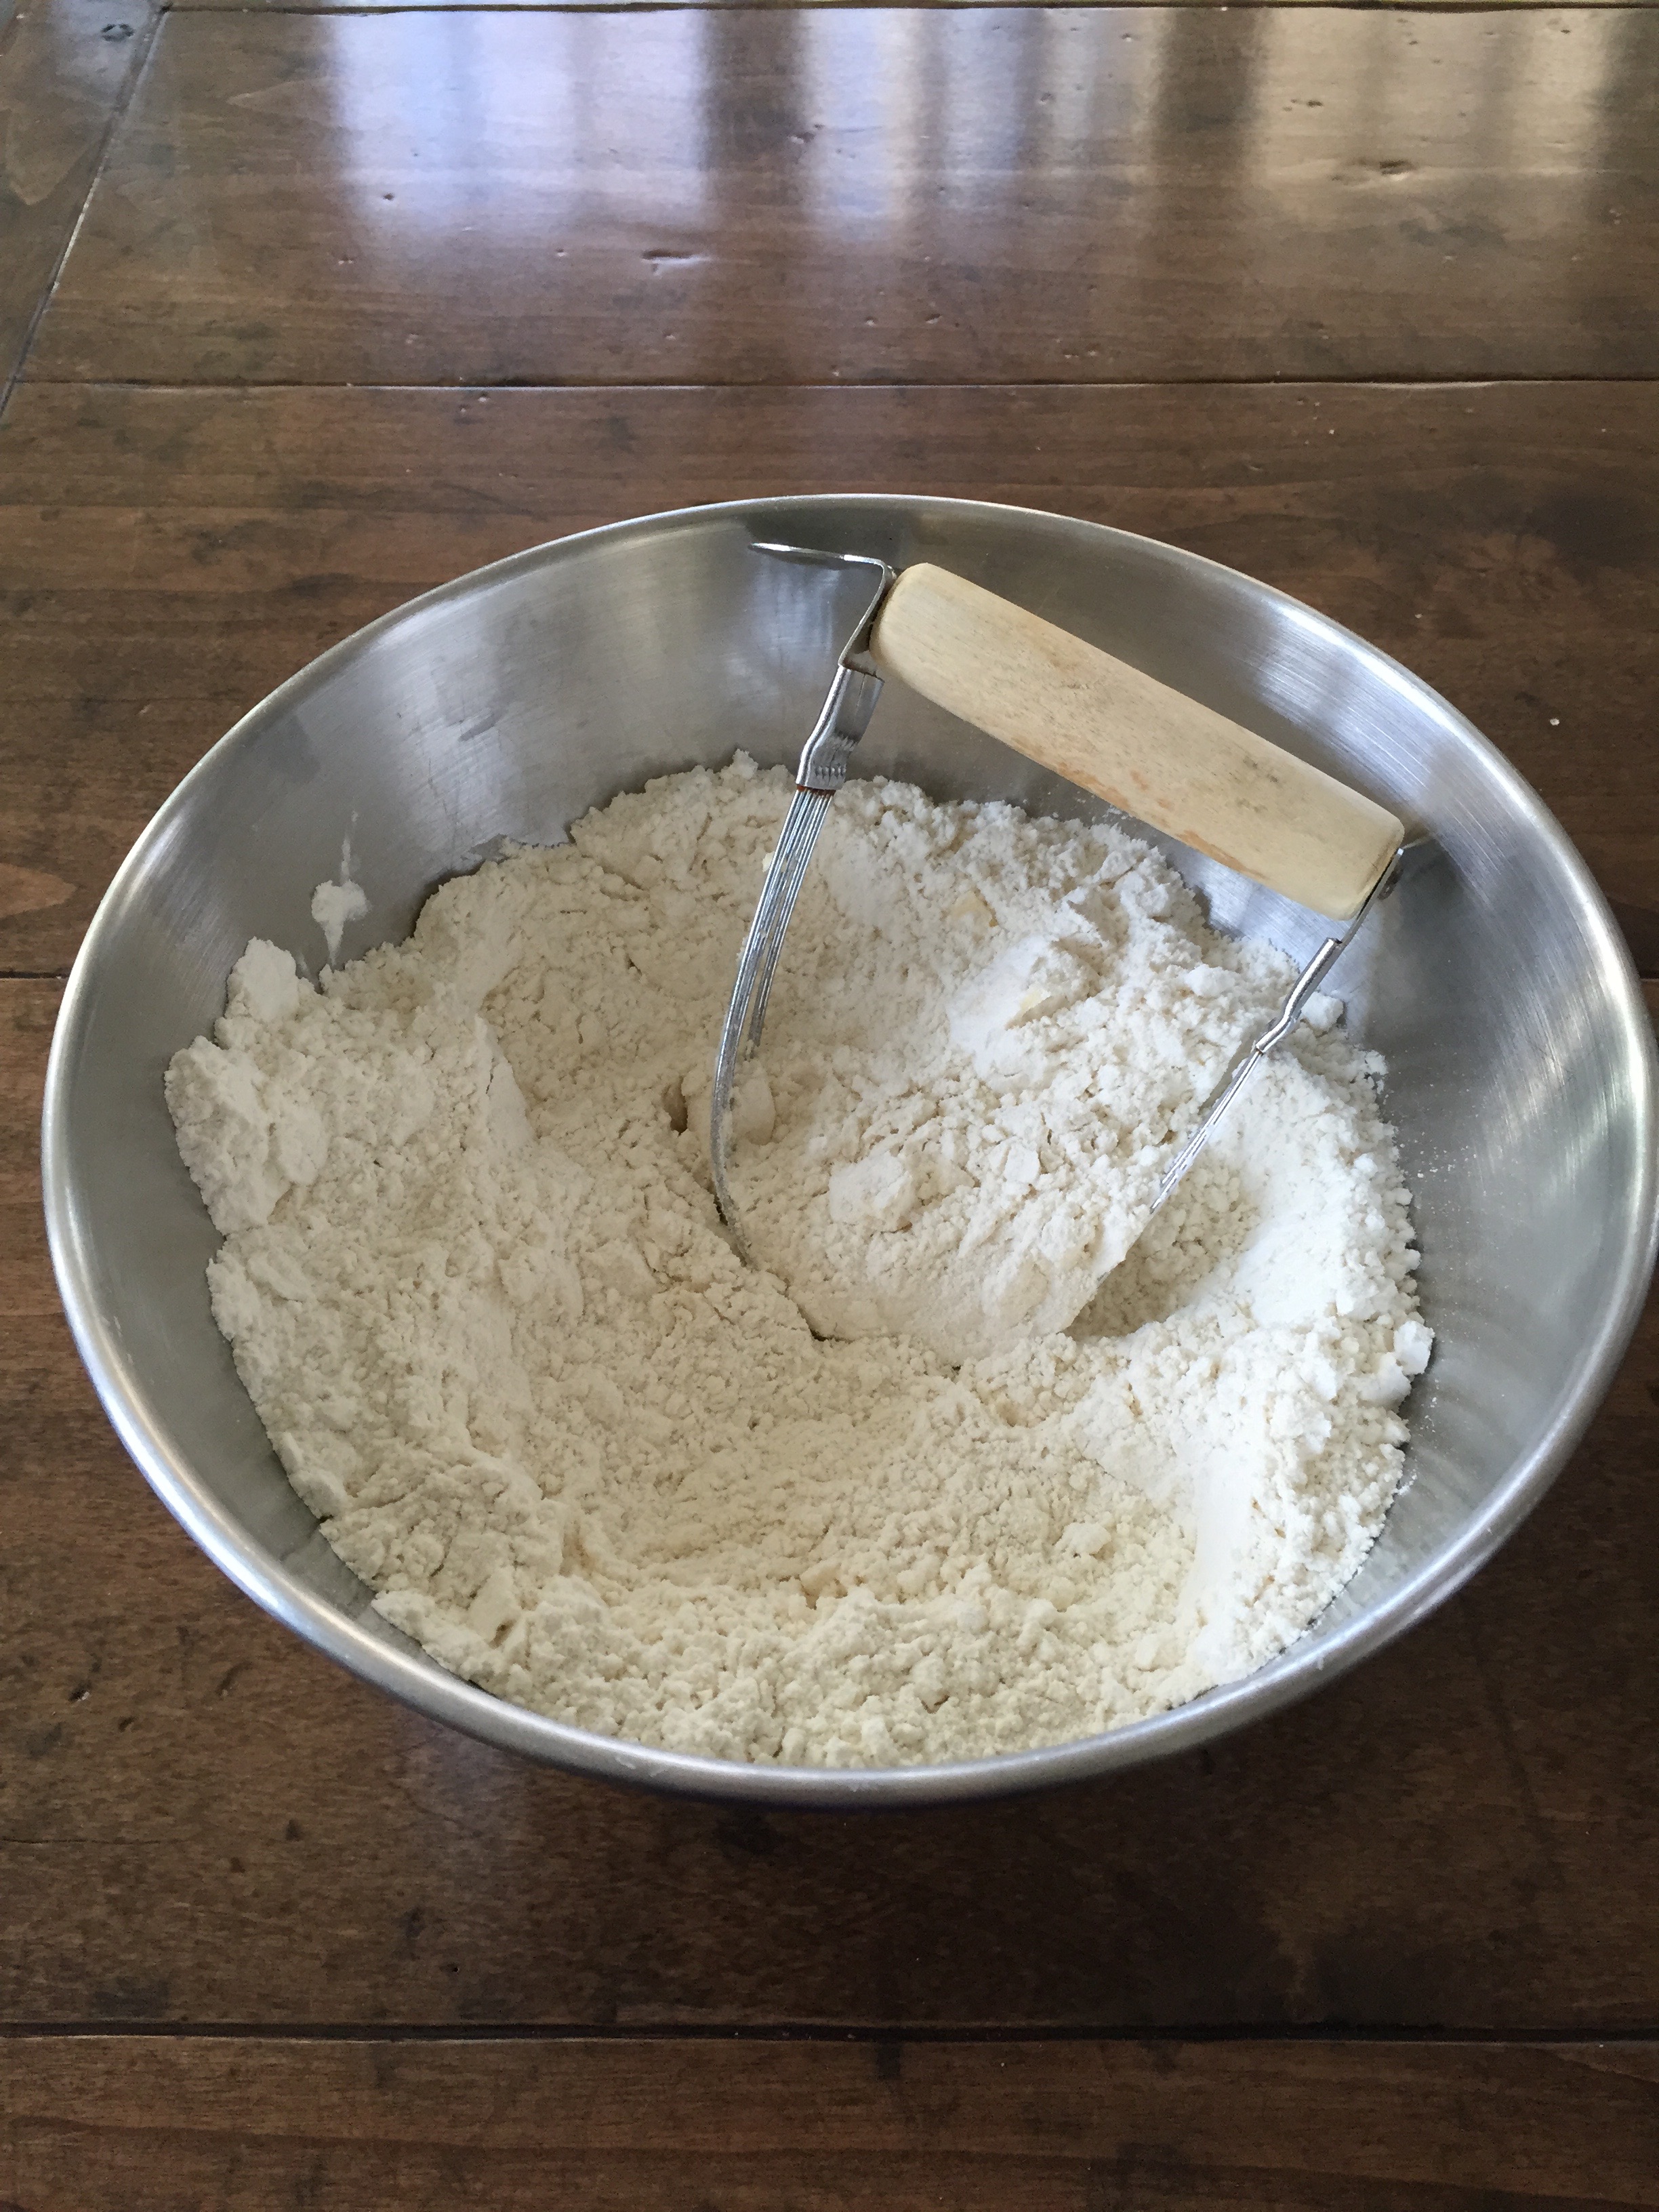
In a large bowl use a pastry blender to cut butter into flour.
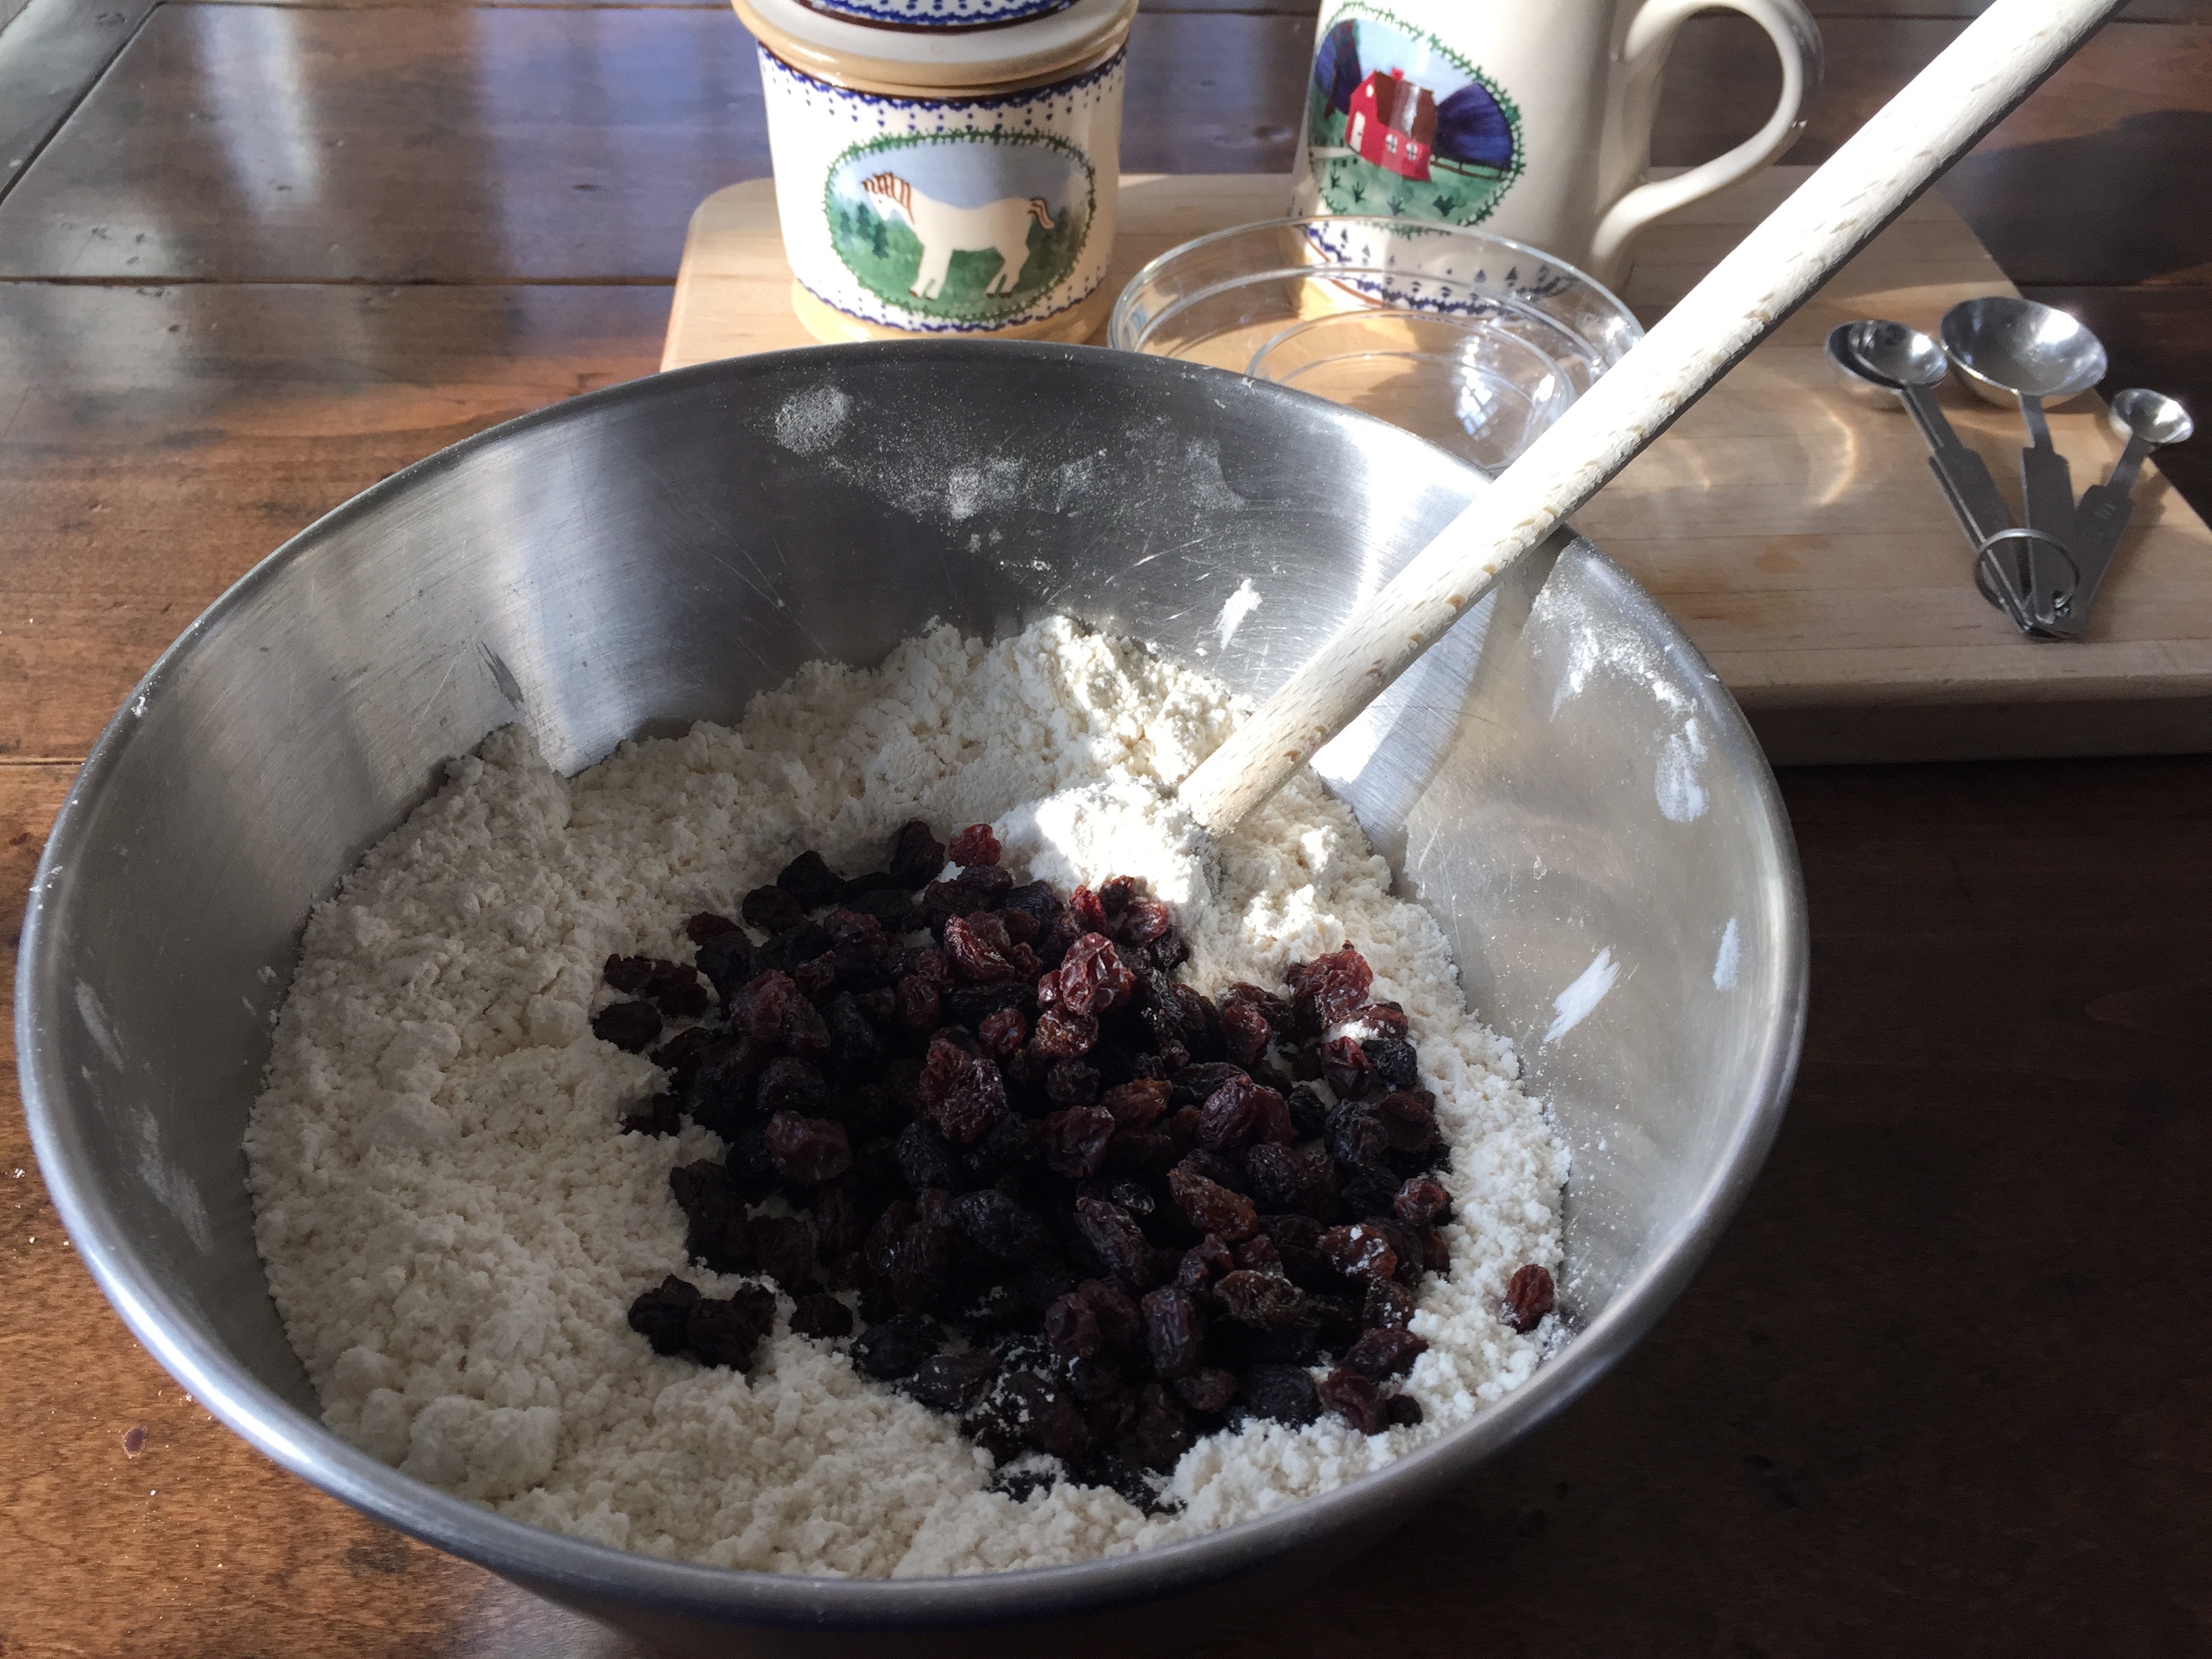
Using a wooden spoon, stir in sugar, salt, and baking soda. Add the raisins or currants and mix well.
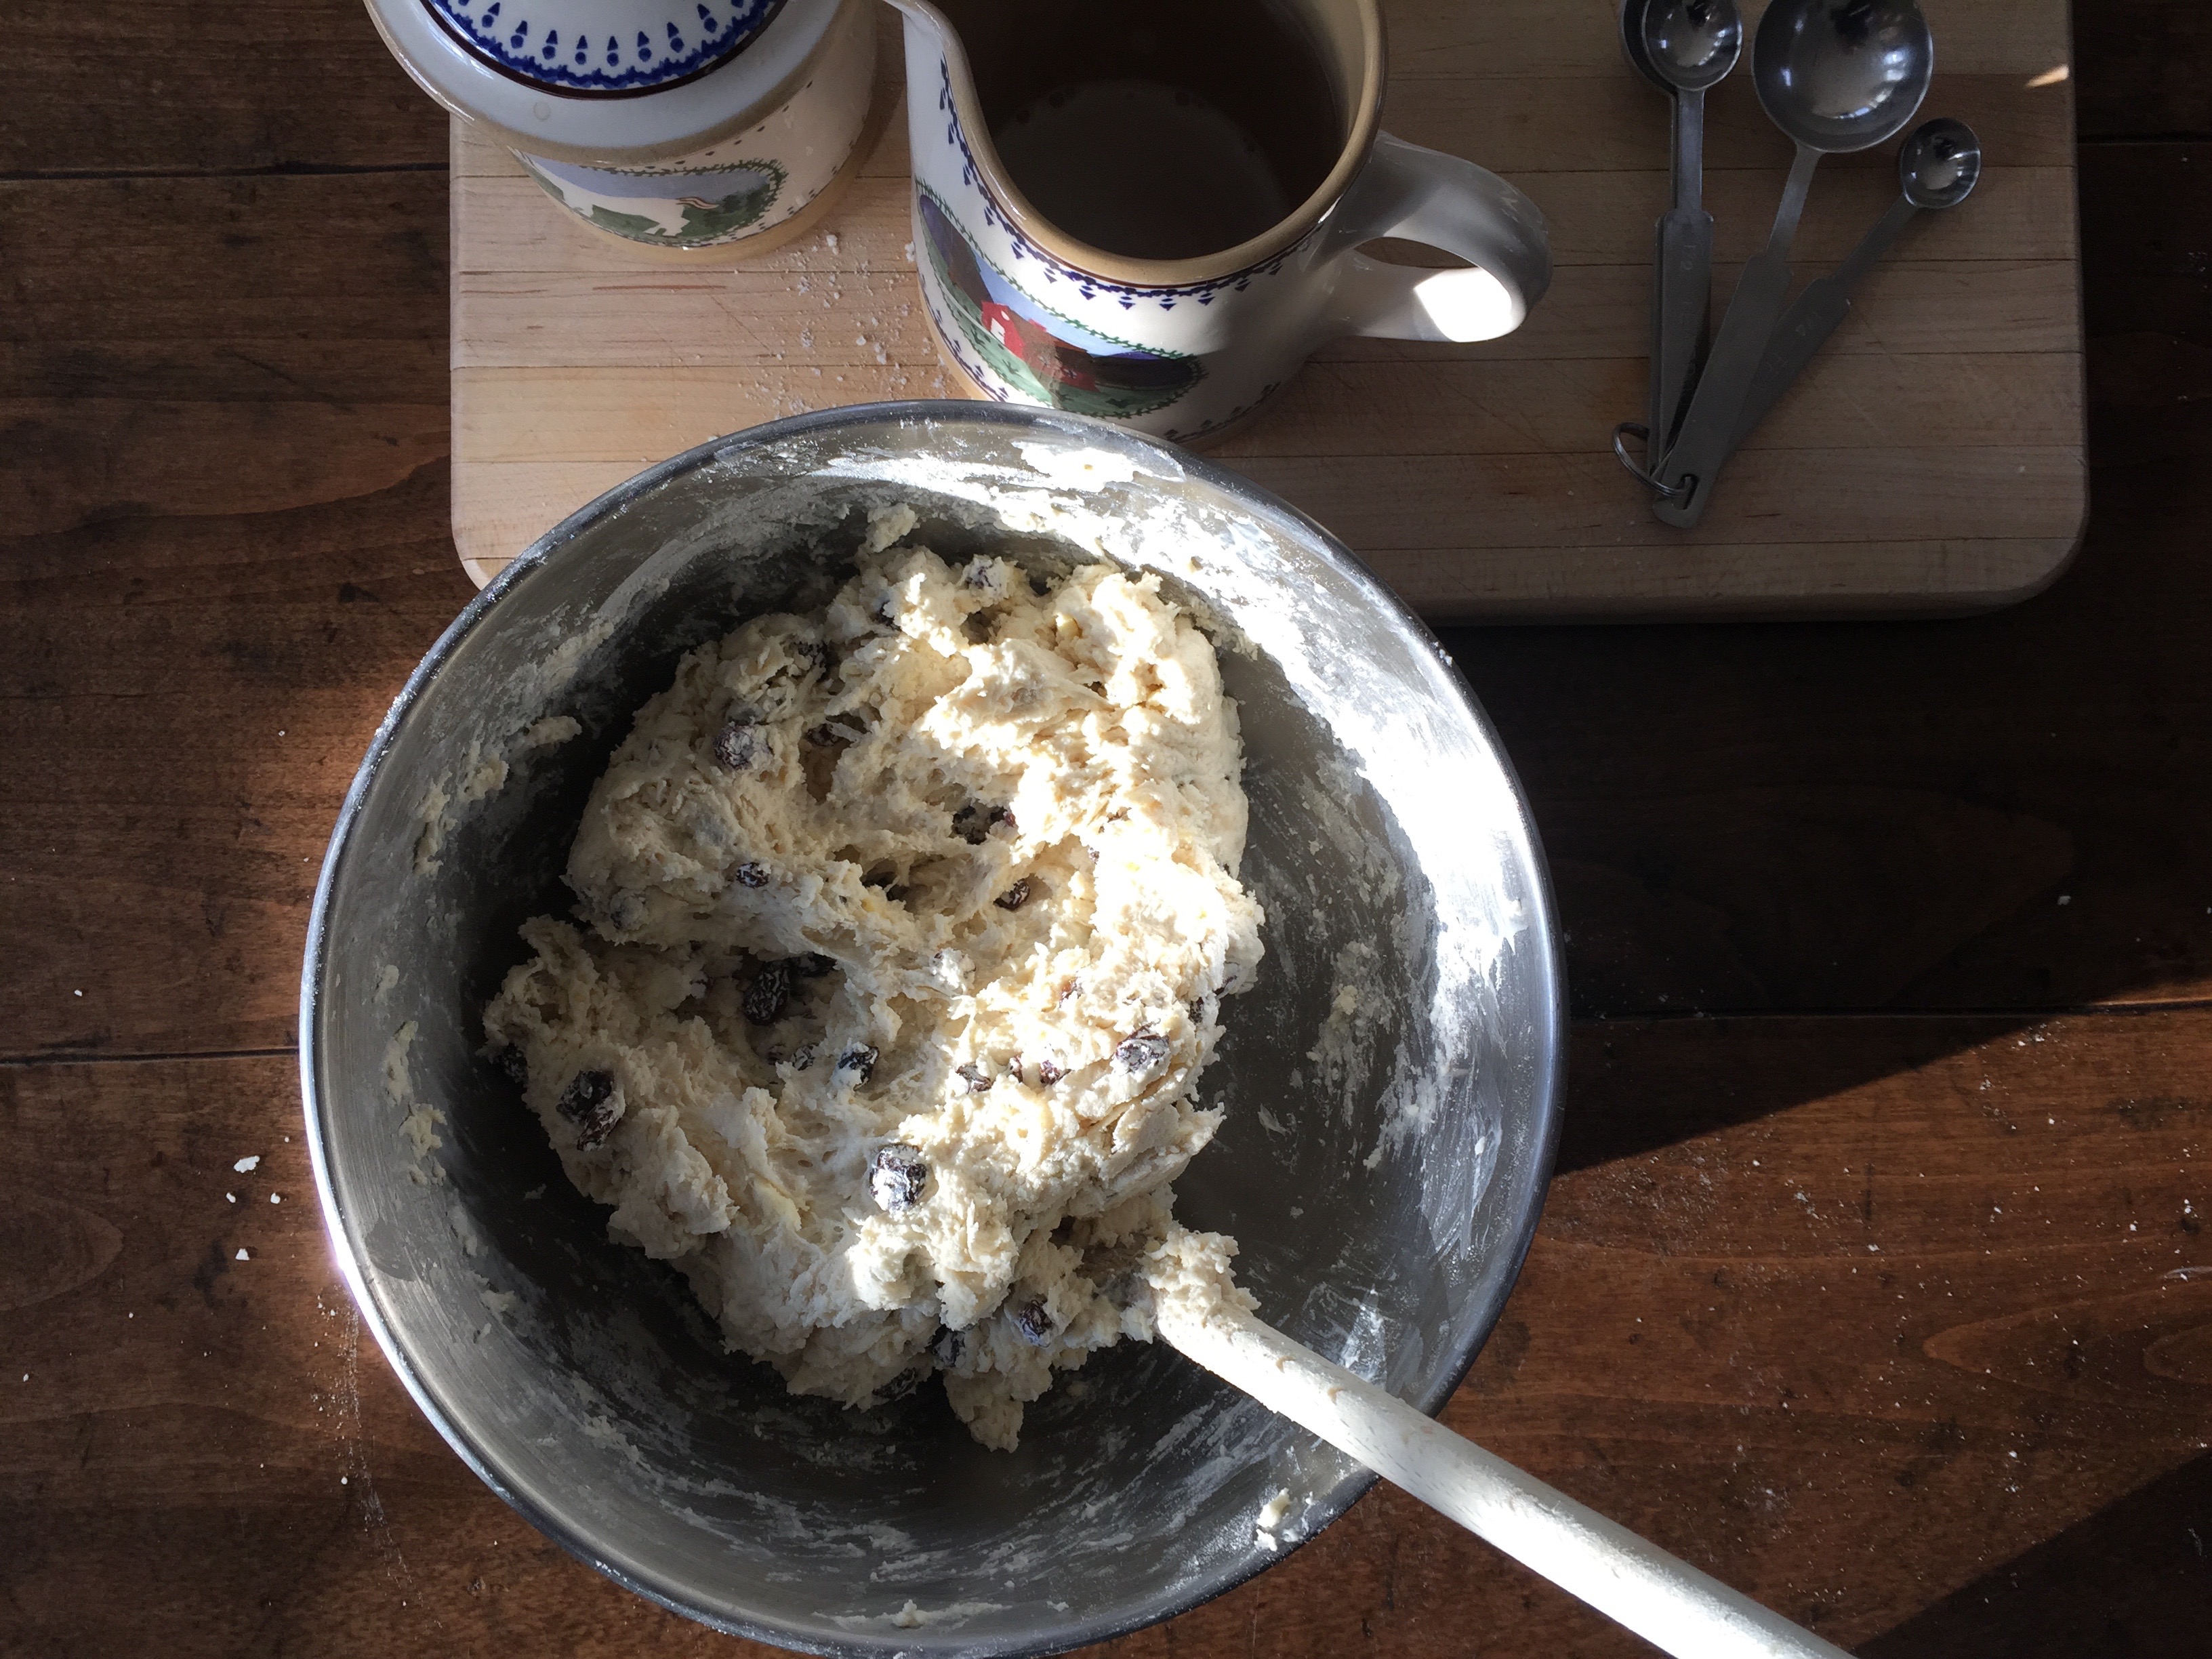
Pour in 1¼ cups buttermilk and mix, adding more milk if necessary. The dough should be soft, slightly sticky, but not too wet. Turn dough out onto a floured surface and knead it just enough to completely bring it together. Shape into a round about 1½ -inches deep. Transfer to cast iron skillet or lined baking sheet. Using a sharp knife or bench scraper cut a cross on it, deep- but not completely through.
Bake for 15 minutes, then turn the oven down to 400°F and continue baking for an additional 30 minutes. The bread is done when it is golden brown and sounds hollow when tapped on the bottom.
Allow to cool slightly before enjoying!
This is all you need for Irish Soda Bread: flour, unsalted butter, sugar, salt, baking soda, raisins, and buttermilk.Using a pastry blender, cut butter into flour.Add sugar, salt, and baking soda to flour/butter mixture. Still well to combine.Add raisins to dry ingredients.Pour buttermilk into dry ingredients and mix well.The flour mixture is coming together to form a soft, but not too sticky dough.The dough is soft, not too sticky or wet.
Turn out the dough onto a lightly floured surface. Knead it just enough to clean it up and bring it together- no more than a few seconds.
The lightly kneaded dough is patted into a round about 1 1/2-inches deep.
Transfer dough to a cast iron skillet or sheet pan. Using a sharp knife or bench scraper, cut a deep cross into the dough- almost completely through, but not all the way. Bake in a 450°F oven for 15 minutes, then lower temperature to 400°F and bake for another 30 minutes.Out of the oven! The bread is done when golden brown and the bottom sounds hollow when rapped with your knuckles.
Quick post today. It’s a busy time of year for everybody… school concerts, Nutcracker performances, decorating the house and tree, sending cards, shopping for gifts, and events every weekend. It’s incredibly easy to become overwhelmed and miss the magic and beauty that is Christmas… the twinkling lights, carols being sung, and the warm spicy scent of pine. When I do feel like I’m becoming engulfed in the frenzy, I escape to the kitchen, put on some Christmas music and start baking… nothing elaborate though, believe me! You will not find homemade gingerbread houses or meticulously cut out and decorated cookies worthy of the front cover of a magazine. I’m more of drop or roll cookie maker (think gingersnaps or Mexican Wedding Cakes) and quick bread baker. Being in the kitchen is like therapy for me, and if I tried to make photo shoot worthy decorated Christmas cookies, I would royal ice and silver dragee my way straight into real therapy!
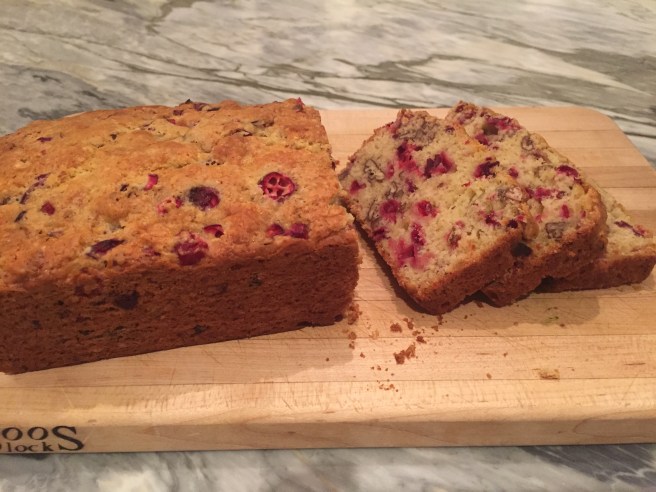
This Cranberry Nut Bread is quick, coming together in about 15 minutes, then off to the oven for an hour. Golden brown crust, slightly tart, and studded with cranberry jewels and sweet pecans, the bread is perfect for breakfast, late afternoon snack, or even dessert. It’s also ideal to share with family and friends over a cup of tea, enjoying each other’s company and the season for even just a quiet moment or two.
*recipe adapted from Kathleen’s Bake Shop Cookbook
Ingredients:
2 cups all-purpose flour
¾ cup granulated sugar
1 ½ teaspoons baking powder
1 teaspoon salt
½ teaspoon baking soda
3 Tablespoons unsalted butter
¾ cup orange juice (fresh or bottled)
1 egg, lightly beaten
1 Tablespoon freshly grated orange zest
1 ½ cups coarsely chopped cranberries
¾ cup chopped pecans
Instructions:
Preheat oven to 350°F. Grease a 9x5x3-inch loaf pan.
In a large bowl, stir together flour, sugar, baking powder, salt, and baking soda. Cut butter into flour with a pastry blender. Stir in orange juice, lightly beat egg, and zest. Fold in cranberries and nuts. Scrape into prepared loaf pan.
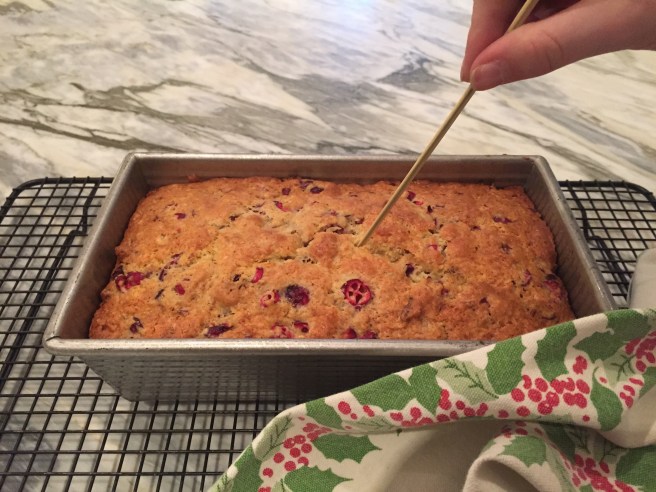
Bake for 50-60 minutes, or until a cake tester inserted into the center comes out clean.
Using a pastry blender, cut the butter into the dry ingredientsChop the cranberries by hand or in a food processor.Roughly chop the pecans.Zest the orange so that you have 1 Tablespoon set aside, then juice the oranges to yield 3/4 of a cup. I need three navel oranges to get the right amount of juice.Add juice, lightly beaten egg and zest to dry ingredients and mix.Using a wooden spoon, combine the wet and dry ingredients.Fold in the cranberries and pecans.
Scrape the batter into a greased loaf pan and bake at 350°F for 50-60 minutes.Bake until a cake tester- or bamboo skewer in this case- inserted in the center comes out clean.
Fall and winter suppers beg for chili. Hearty, warming, and versatile, chili is a one pot wonder perfect for brisk nights that begin to get dark as early as 4:30pm, casual get togethers with friends and family to watch a game in front of a roaring fire, or coming in from the cold after time spent raking leaves or shoveling snow. Of all evenings, Halloween is the ideal night for chili, shoring up your stamina (as well as that of any goblins or ghouls spooking you) for a night of trick or treating. Whether you are out in the neighborhood or manning the candy bowl at home, a warm bowl of chili before or after a night of haunts will keep you going and be an excellent antidote to all the sugar consumed.
Depending on your preferences chili can suit a wide variety of eaters… vegetarians or vegans at your table? Skip the meat and add more vegetables or beans. Offer an interesting assortment of toppings and sides like cheeses, cornbread, tortilla chips, avocado, and sour cream (I use greek yogurt) and let your family and friends build a complete meal around your chili base. And, like most stews and soups, making chili ahead of time allows it to become even more delicious. Chili only gets tastier as it “ages.”
This recipe is my own. Most of the ingredients are typical, but there are a few surprises. Dijon mustard adds a wonderful brightness and tang; the chipotle peppers in adobe sauce add a subtle smokiness, while the cinnamon delivers a hint of sweet warmth. It is also very easy to play with this recipe. Please experiment to suit your taste. Love bell peppers? Add more. Need more spice? Add a chopped jalapeño. Can’t stand onions? Eliminate or reduce the amount. Don’t like beans in your chili (I’m talking to you, dear husband!), then don’t add them. Play with your food and have fun!
The buttermilk cornbread is adapted from Kathleen’s Bake Shop Cookbook. Kathleen King owned Kathleen’s Bake Shop in Southhampton, NY in the 80s and 90s. One summer, I was fortunate enough to visit the bakery and in addition to the cookies I bought (which were quickly consumed), I also purchased a copy of her cookbook, a lasting souvenir. It was a wise purchase. My copy of the small spiral bound book is splattered, tattered, and torn- all signs of an excellent cookbook. The book practically opens itself to certain recipes, like the Devil’s Food Cake I use for birthdays, in addition to the recipe that inspired this cornbread.
In Kathleen’s intro to the original recipe, which was for corn muffins, she explains how the recipe has changed since she first received it. Her baker altered the formula by adding half-and-half instead of milk; I’ve tweaked it again by using buttermilk, instead of half-and-half or milk. In any case, the choice is yours… buttermilk, half-and-half, and regular milk all work just fine. The buttermilk lends a wonderful tanginess that seems a natural counterpart to the sweetness of the bread; the half-and-half produces a really rich cornbread, while using regular milk leaves you with a lovely straightforward cornbread. Another occasional adjustment I make is to add frozen corn kernels to the batter, maybe a handful or two. The kernels contribute a wonderful texture to the cornbread and add pops of sweetness too.
What are your favorite sides and toppings for chili? Do you have a go to dinner for Halloween night?
Ingredients:
1lb ground beef or turkey
2 medium onions, coarsely chopped
2 bell peppers, coarsely chopped
3 cloves of garlic, finely chopped
1 Tablespoon of extra virgin olive oil
1 Tablespoon chili powder
1 chipotle chili in adobe sauce, finely chopped
1 ½ teaspoons Dijon mustard
1 teaspoon cumin
½ teaspoon coriander
¼ teaspoon cayenne
1/8 teaspoon cinnamon
1 28oz can of whole tomatoes, with juice
1 16 oz can kidney beans or black beans, rinsed and drained
salt and pepper to taste
Instructions:
In a large pot or dutch oven, heat olive over medium heat. Add onions and sauté until beginning to turn golden brown, approximately 5 minutes. Add bell peppers and sauté an additional 5 minutes. Add finely chopped garlic and cook for 30 seconds or until fragrant. Add ground meat, and cook over medium high heat, stirring often, until cooked through.
Reduce the heat to medium low and stir in chili powder, chipotle chili, mustard, cumin, coriander, cayenne, and cinnamon and cook for 30 seconds or so.
Add beans and tomatoes with juice, breaking up the tomatoes with a spoon. Stir well, and simmer for 15 minutes. Add salt and pepper to taste. Serve hot with accompaniments such as rice, tortilla chips, cornbread, shredded cheddar or Monterey jack, sour cream and chopped avocado.
*This is the perfect dish to make ahead. Like most soups and stew, the longer it sits the better it gets. Just reheat when needed.
Ingredients:
1 cup all-purpose flour
1 cup cornmeal or corn flour
½ cup granulated sugar
1 Tablespoon baking powder
½ teaspoon salt
½ cup unsalted butter, softened
1 cup buttermilk
1 egg, lightly beaten
Instructions:
Preheat oven to 400°F. Grease a 9×9 inch baking pan.
In a large bowl, stir together flour, cornmeal, sugar, baking powder, and salt. Using a pastry blender, cut in butter and mix until crumbly. If you don’t have a pastry blender, use two knives, a fork, or even your fingers.
In a separate bowl, mix buttermilk and egg. Fold liquid ingredients into flour mixture, folding just until combined. Transfer batter to prepared baking pan.
Bake for 25 minutes, or until a toothpick inserted in the center comes out clean.
Whisk dry ingredients together.Cut softened butter into flour mixture.Fold buttermilk and egg mixture into dry ingredients until just combined.Pour batter into prepared baking dish and bake at 400°F for 25 minutes or until cake tester inserted in center comes out clean.Enjoy!
Oktoberfest has officially passed… I actually just discovered that. For years I thought Oktoberfest was celebrated all month long, but a quick google search revealed that Munich has already moved on and begun planning Oktoberfest 2016.
Well, I’m not telling. Either way, it’s still October and my culinary wanderlust is craving soft pretzels, bratwurst, sauerkraut, and mustard to go with it all. Every fall, brats and sauerkraut enter the dinner rotation at White House Red Door. One year around this time, probably for Halloween, I made “witches fingers” with homemade pretzel dough. The fingers- or pretzels seemed a natural accompaniment to the brats, so I thought instead of a “finger” or traditionally shaped pretzel, why not a roll?
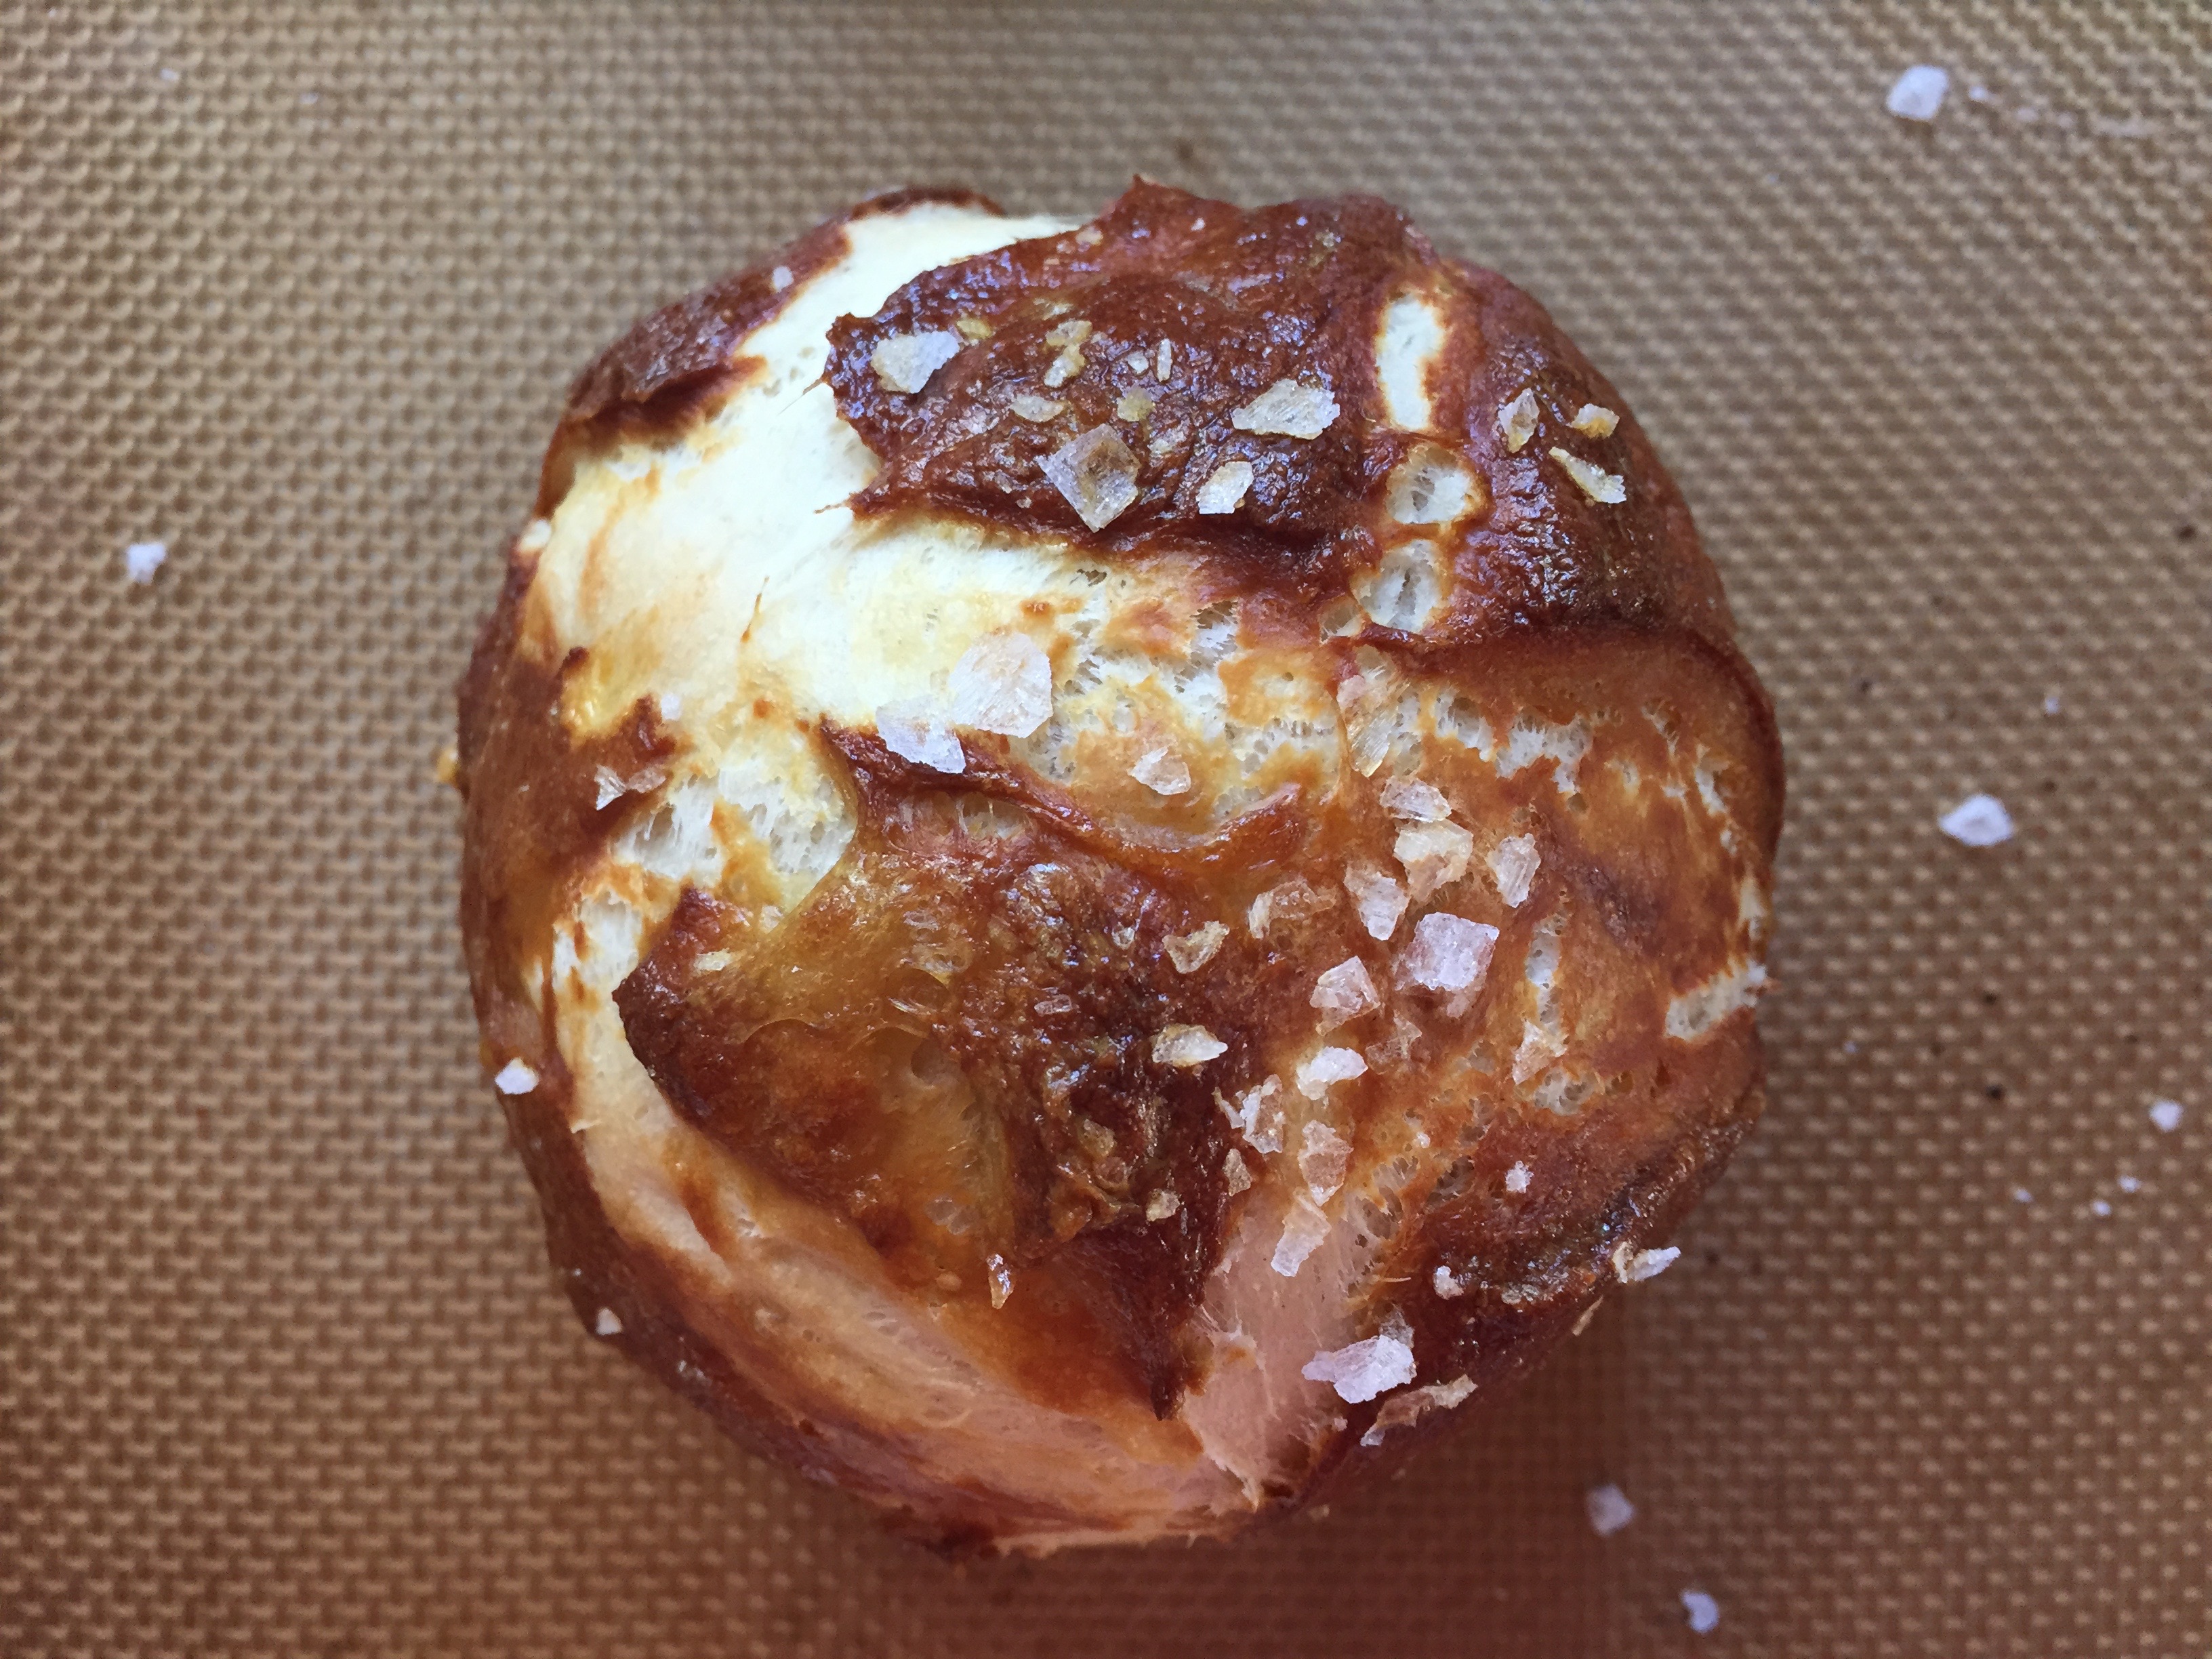
Have you ever had a pretzel rolls? They turn humble fillings into something special. From burgers to cold cuts to peanut butter and jelly (which my middle guy makes himself for lunch everyday), they all taste better on a pretzel rolls. They are terrific for a snack on their own or with some spicy brown mustard for dipping. White flakes of crunchy sea salt contrast beautifully with the deep golden brown chewy texture.
This recipe makes pretzel dough and while I’ve made rolls, the final form is entirely up to you. This same dough can easily be transformed into traditional pretzels, “witches fingers,” or even letters for the pre-school set. It’s entirely up to you. Remember, have fun and play with your food!
Ingredients:
1 ½ cups warm (110°-115° F) water
1 Tablespoon sugar
2 teaspoons kosher salt
1 package (2 ¼ teaspoons) active dry yeast
22 ounces all-purpose flour, approximately 4 ½ cups
2 ounces unsalted butter, melted
vegetable oil, for pan
10 cups water
2/3 cup baking soda
1 large egg yolk beaten with 1 Tablespoon water
coarse or flaked sea salt
Instructions:
Combine water, sugar, and salt in the bowl of a standing mixer fitted with a dough hook and sprinkle the yeast on top. Allow to sit for 5 minutes or until the mixture begins to foam.
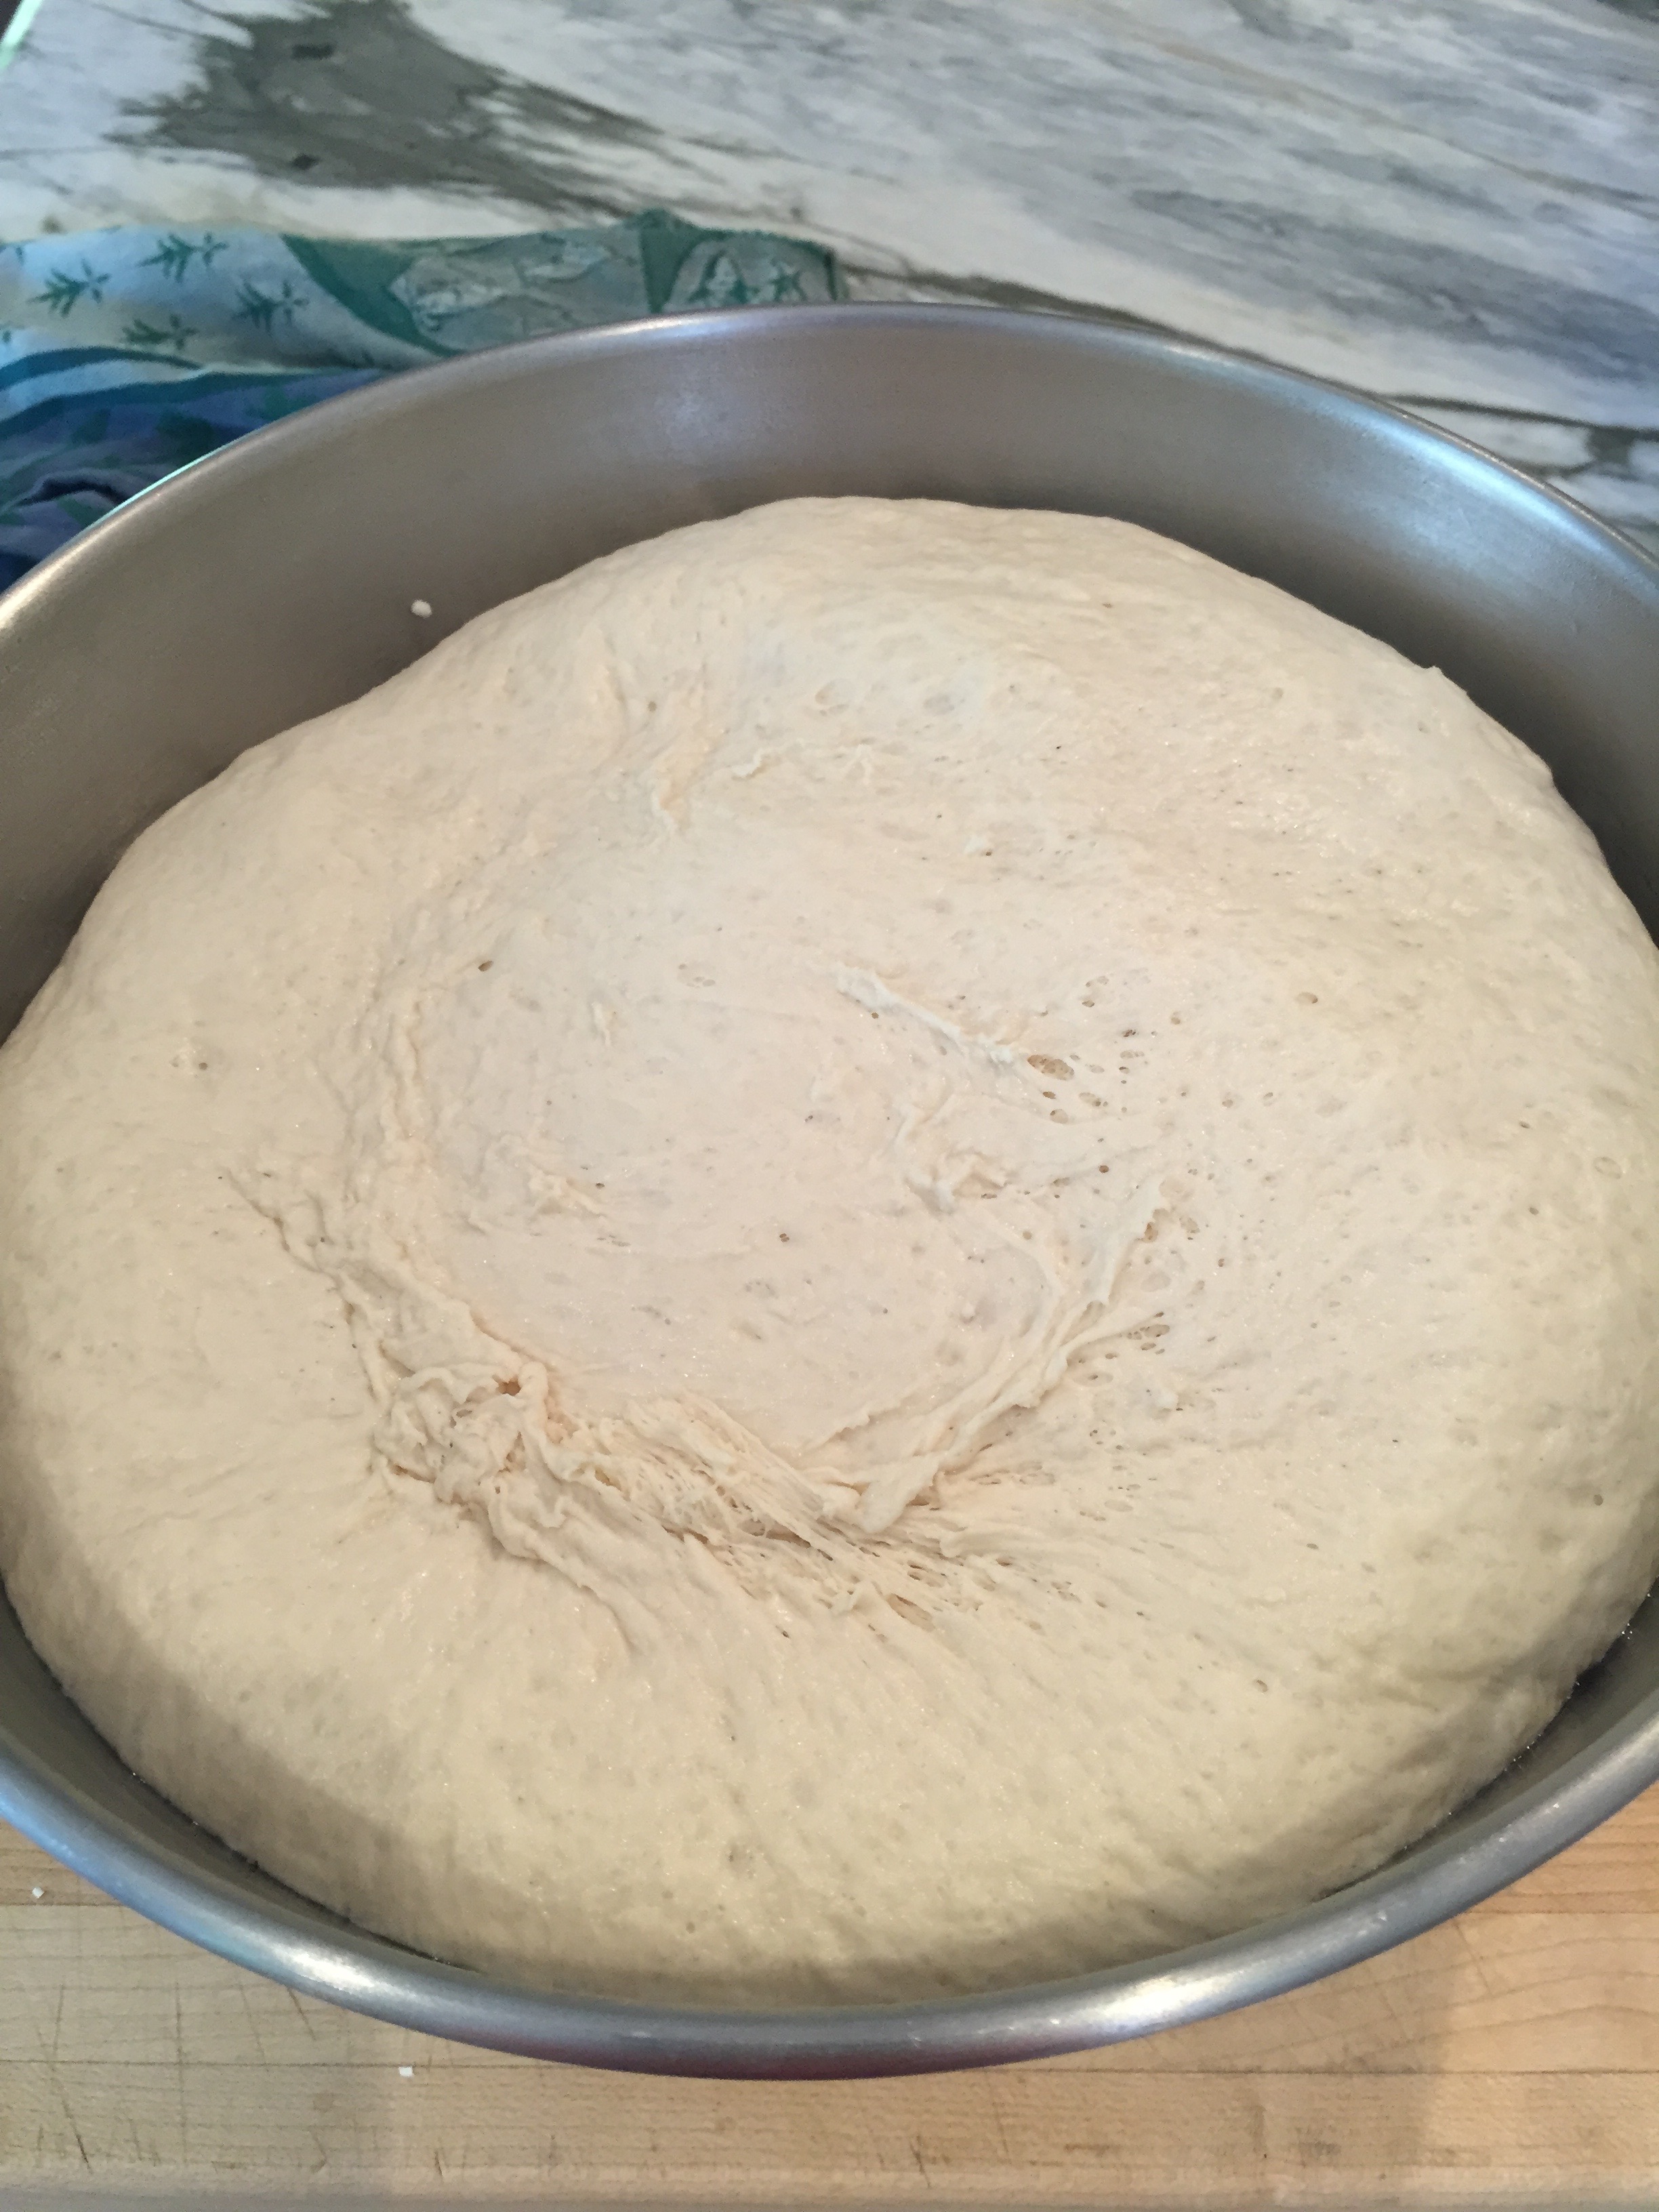
Add the flour and butter and, using the dough hook, mix on low speed until well combined. Change to medium speed and knead until the dough is smooth and pulls away from the side of the bowl, approximately 4-5 minutes. Remove the dough from the bowl, clean the bowl and oil it well with vegetable oil. Return the dough to the bowl, rolling it around so it is lightly coated in the oil used to grease the bowl. Cover with a slightly damp dish towel or plastic wrap and place in a warm spot for 50-55 minutes, or until the dough has doubled in size.
After the dough has risen, preheat the oven to 450°F. Line 2 half sheet pans with silicone mats, or parchment paper lightly brushed with vegetable oil. Set aside.
Bring 10 cups of water and the baking soda to a rolling boil in a large saucepan or stockpot.
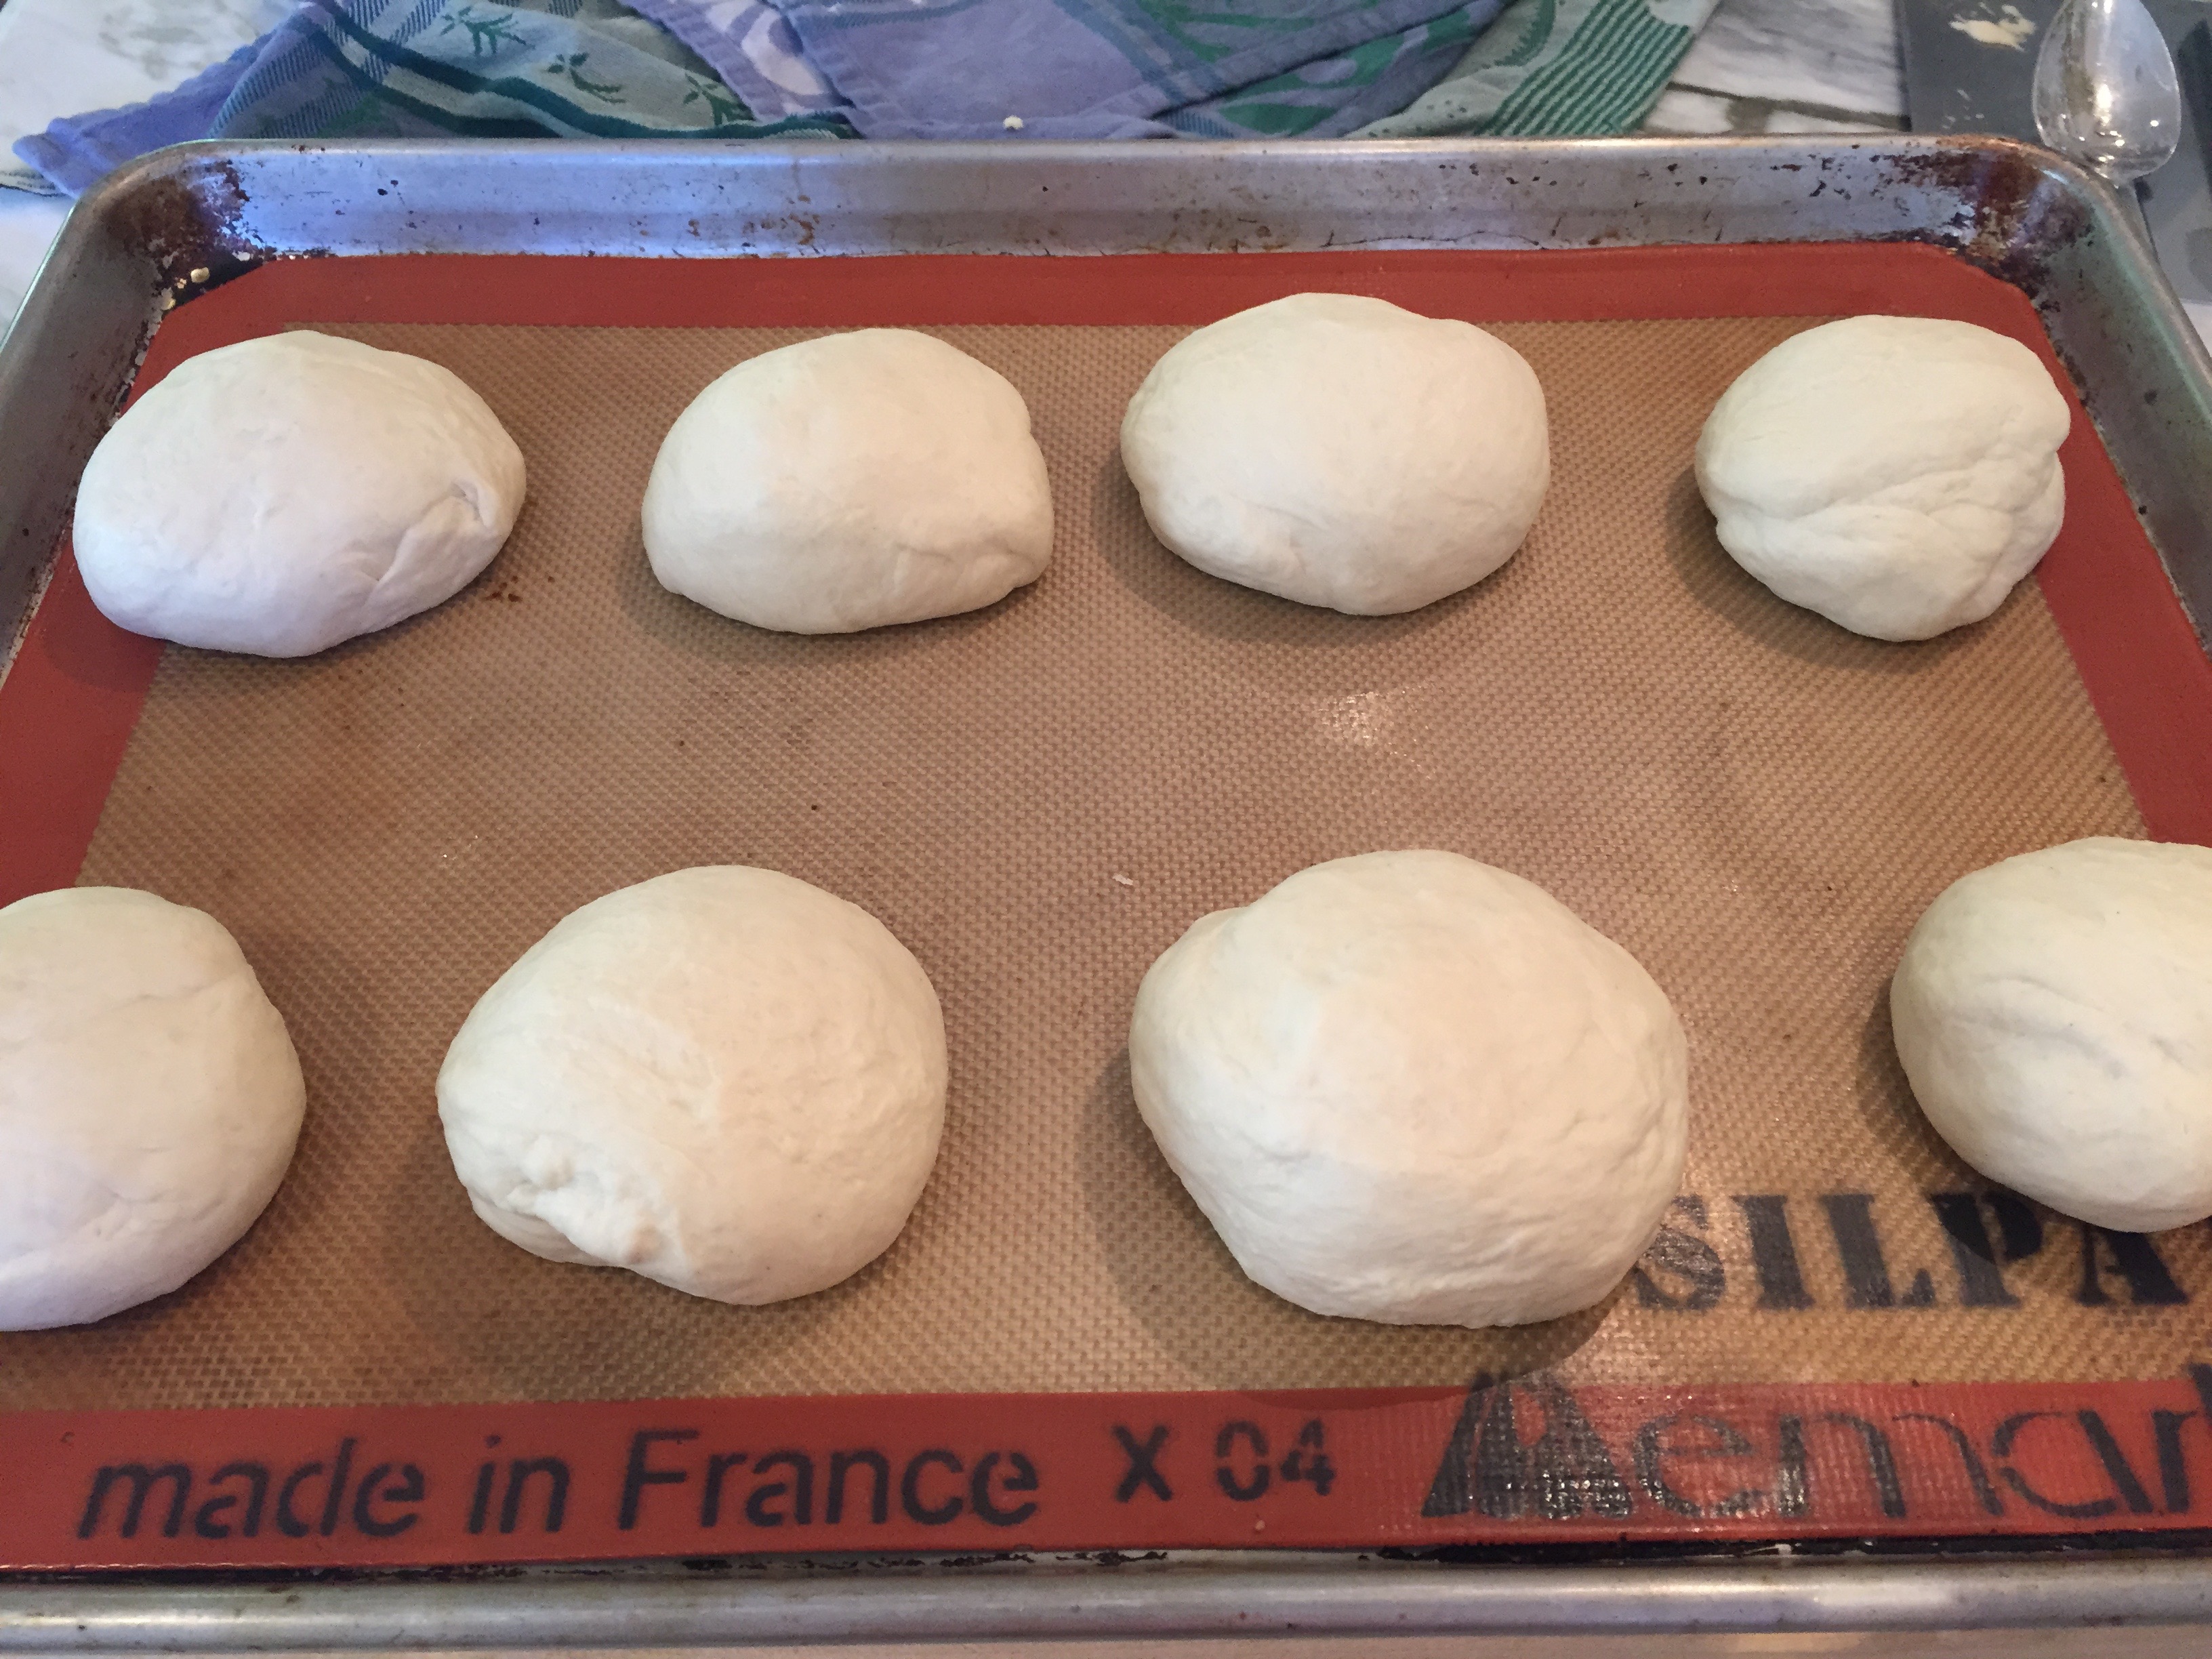
Turn the dough out onto a lightly oiled surface (I did not do this, just a regular wooden cutting board worked for me- not oiled). Divide the dough into 8-10 equal pieces. Form dough into balls- by rolling and shaping with your hands. Using a very sharp knife or pair of scissors cut an X in the top of each roll. Place each roll onto a lined sheet pan.
Place the pretzel rolls into the boiling water, one by one, for 60 seconds, flipping them at the 30 second mark. Remove them from the water using a slotted spoon or similar tool. Return to the half sheet pan, 4-5 rolls per pan. Repeat until remaining rolls are done.
Brush the top of each pretzel roll with the beaten egg yolk and water mixture and sprinkle with coarse or flaked sea salt. Bake one batch at a time until deep golden brown in color, approximately 15 minutes, or the bottom of the bun sounds hollow when rapped with your knuckles. Transfer to a cooling rack for at least 5 minutes before serving.
It’s alive! The yeast is working when it starts to foam.Add the flour and melted butter to yeast mixture.Using the dough hook attachment, knead the dough until it pulls away from the sides of the bowl.Put the dough into a well oiled bowl, turning to coat several times. Cover and place in a warm draft free spot until doubled in bulk.After 50-55 minutes the pretzel dough has doubled in bulk.Turn the dough out onto a cutting board or parchment paper.Divide the dough into 8-10 equal pieces.Roll and shape dough into rolls and place on silicone or parchment lined sheet pan.Using a sharp knife or pair of scissors, cut an ‘x’ on the top of each roll.One by one, use a slotted spoon or similar utensil to drop each roll into boiling water/baking soda mixture for 1 minute. Flip after 30 seconds so that top and bottom are evenly cooked. Transfer to lined sheet pan. Repeat process with each roll.Brush the rolls with egg wash and sprinkle with coarse or flaked sea salt. Bake 15 minutes in a 450°F oven or until deep golden brown.Rolls are done when they are a deep golden brown and sound hollow when rapped on the bottom with your knuckles. Allow to cool at least 5 minutes before digging in.