Fast and Crunchy Baked Cod with Horseradish, Garlic, and Breadcrumbs

Meatless Monday. What a terrific trend and one that we try to embrace at our  Crunchy Fish Sandwich house. For us it can mean “breakfast for dinner,” rice and beans, or fish. Mostly it means fish… a fillet sprinkled with salt and pepper, drizzled with olive oil, and tossed in the oven. Serve with veggies, a starch of some sort, and dinner is done. This was my Monday night formula- not bad, but the natives started getting restless, an eye roll here, a sigh there, “let me guess, salmon, again?” Clearly time for a change, but simplicity and speed rule on weeknights. Enter “Fast and Crunchy Baked Cod with Horseradish, Garlic, and Breadcrumbs” courtesy of one of my favorite resources, Cook’s Illustrated. This recipe is delicious, fast, has great flavor, and is adaptable. Though the original recipe calls for cod, I’ve found equal success with halibut and haddock; I haven’t tried grouper, but imagine that would work too. Follow the recipe and serve as is, but lately we’ve enjoyed a more casual take by serving the fillets as “Fish Sandwiches” on soft rolls with coleslaw on the side. Perfect as we head into warmer nights…

Do you do any favorite recipes for Meatless Monday?

Fast and Crunchy Baked Cod with Horseradish, Garlic, and Breadcrumbs

  • Servings: 4
  • Print

*from Cook’s Illustrated

Ingredients:
4 skinless cod fillets, 1 ¼ inches thick
salt and ground black pepper
1 cup fresh bread crumbs (panko will also work, as will crushed Ritz crackers)
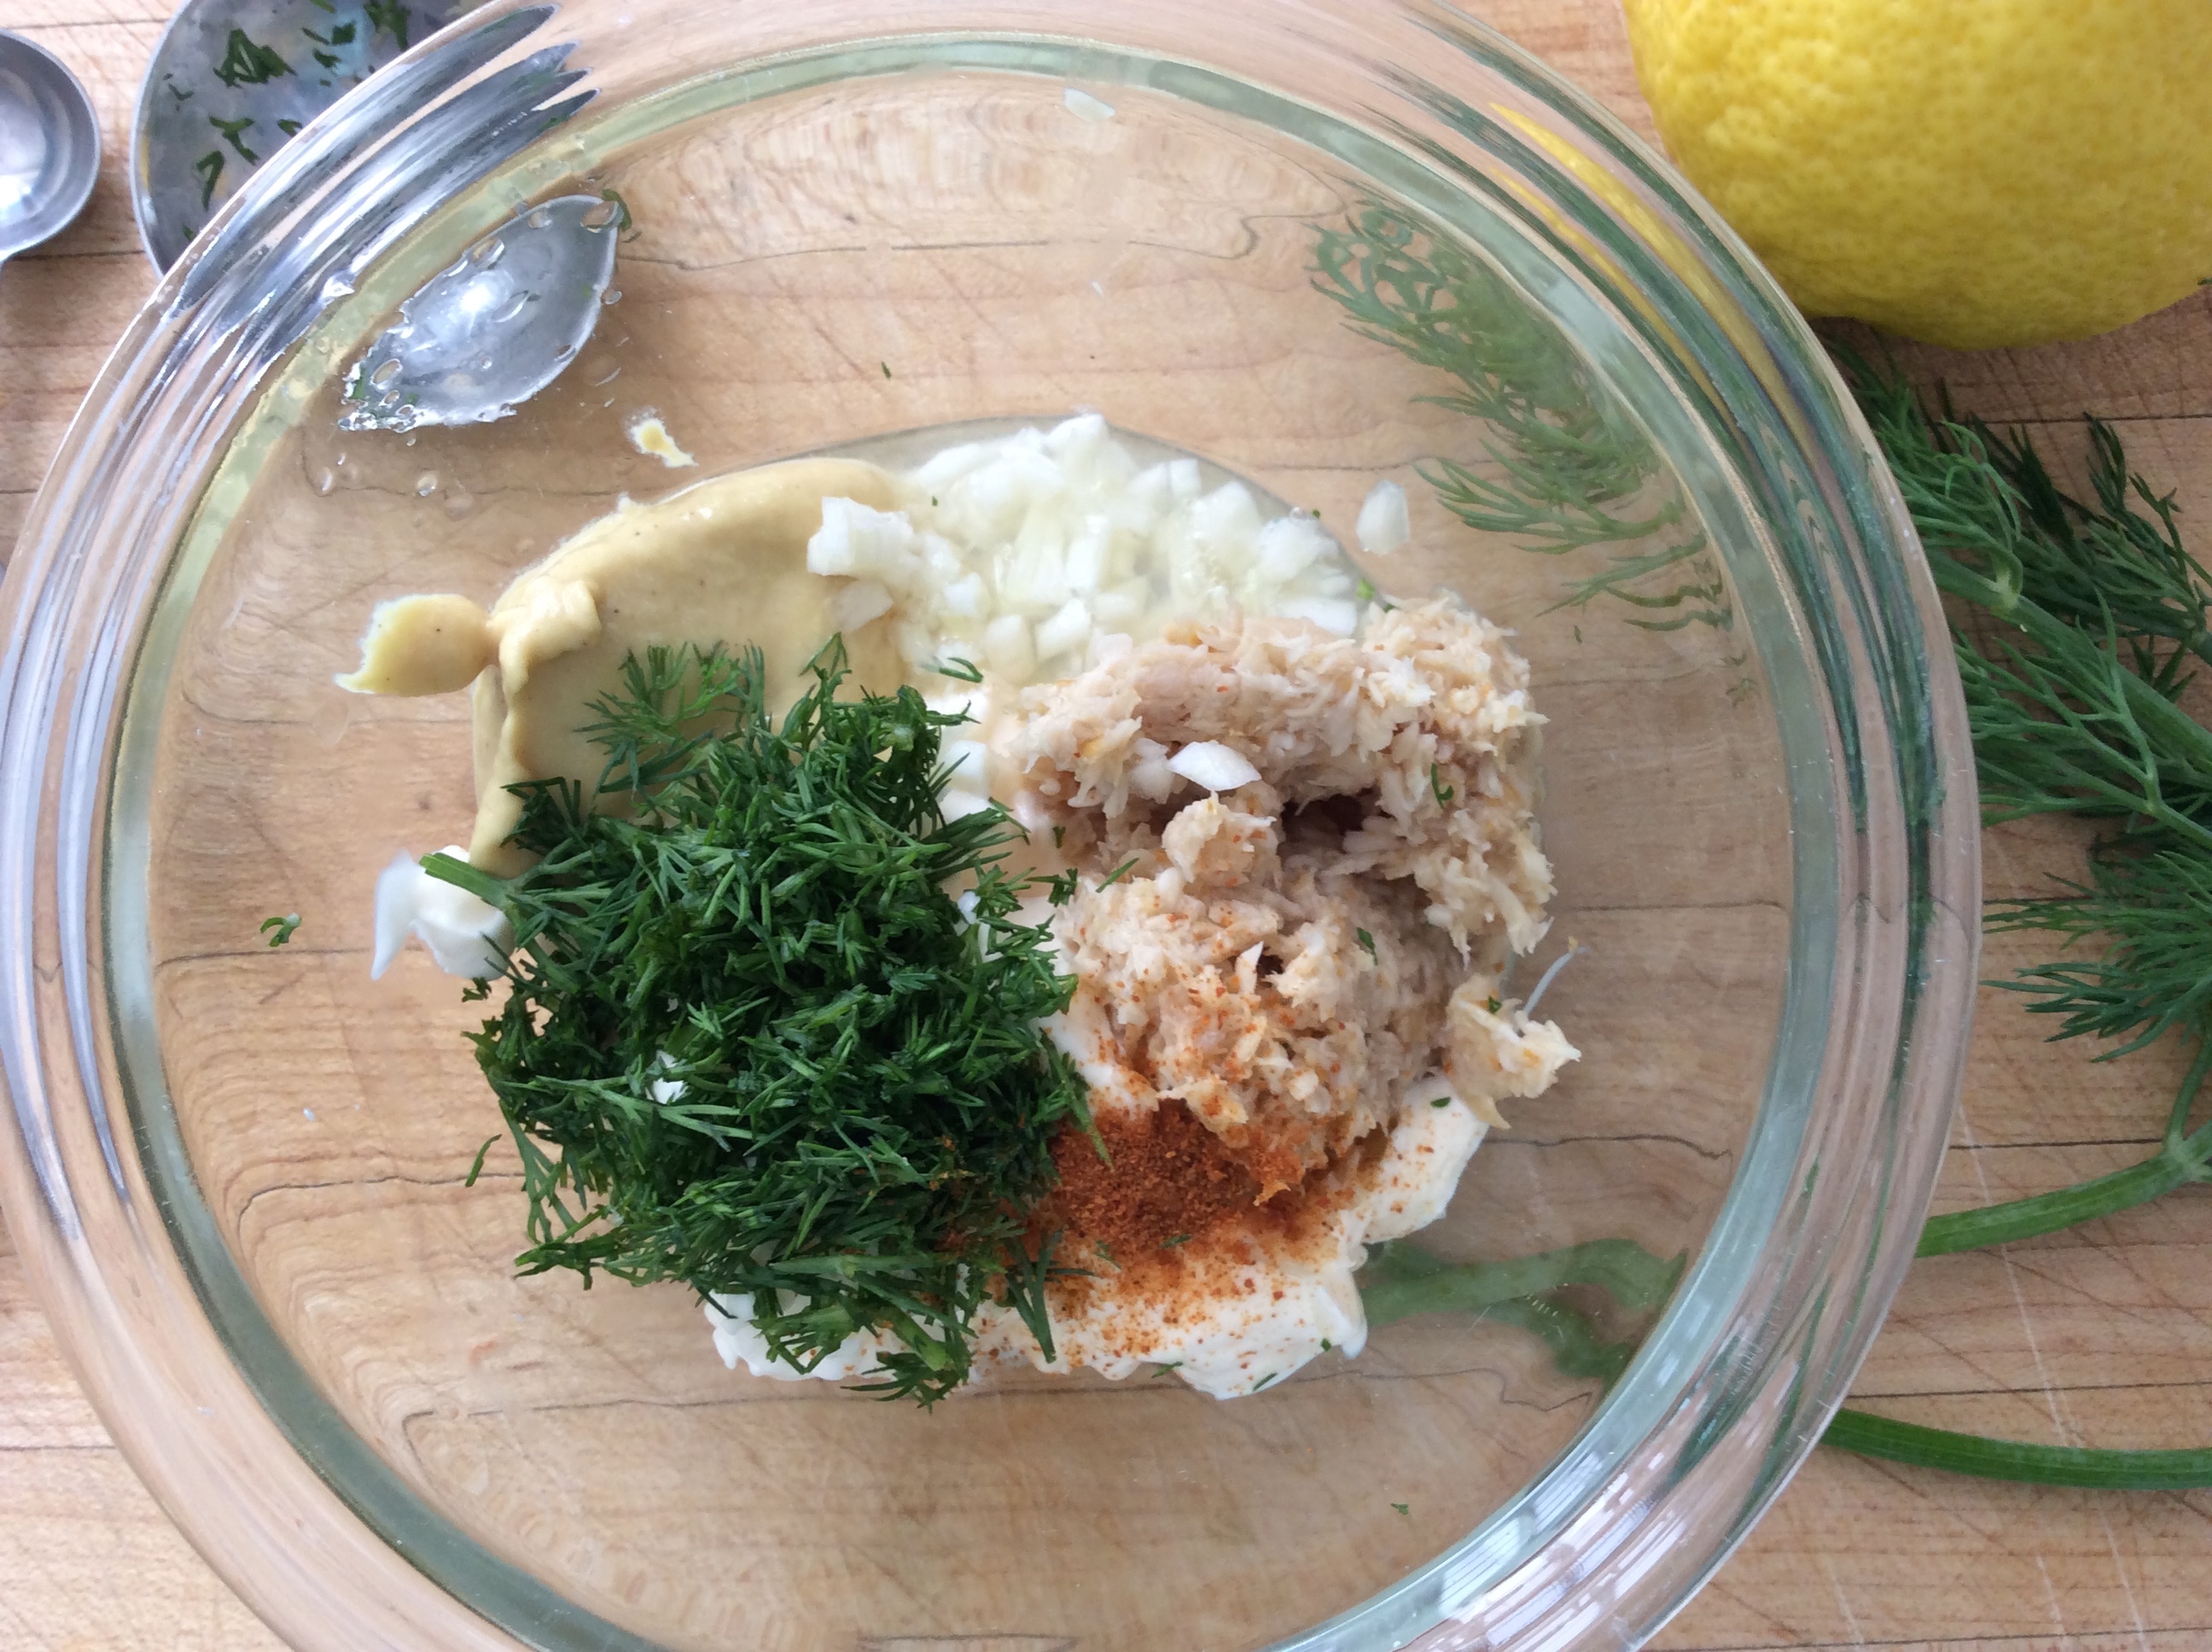
2 Tablespoons minced fresh dill or parsley
¼ cup mayonnaise
1 Tablespoon Dijon mustard
2 Tablespoons drained prepared horseradish
1 small garlic clove, minced
1 Tablespoon fresh lemon juice
pinch cayenne
lemon wedges, for serving

Instructions:
Preheat oven to 450 degrees. Grease a 13×9-inch baking dish or line with foil.

Pat cod dry with paper towels and season with salt and pepper. Lay cod in baking dish, spacing fillets about ½ inch apart.

Toss bread crumbs with 1 tablespoon of dill. In separate bowl, combine remaining tablespoon of dill, mayonnaise, mustard, horseradish, garlic, lemon juice, and cayenne. Spread mayonnaise mixture over top and sides of fish. Press breadcrumbs into mayonnaise, making sure they adhere.

Bake on center rack until crumbs are golden brown and all but the very center of fish has turned from translucent to opaque, about 15 minutes. Serve with lemon wedges.

Combine horseradish, mayonnaise, mustard, garlic, lemon, dill, and cayenne
Combine horseradish, mayonnaise, mustard, garlic, lemon, dill, and cayenne.
Dilled Breadcrumbs
Combine chopped dill and breadcrumbs.
Coat tops and sides of fish with mayonnaise mixture.  Top with breadcrumbs and press to be sure they adhere.
Coat tops and sides of fish with mayonnaise mixture. Top with breadcrumbs and press to be sure they adhere. Bake at 450 degrees for 15 minutes or so.
Fish is out of the oven!
Crunchy Fish Sandwich with  Cole Slaw
Crunchy Fish Sandwich with Cole Slaw

Strawberry Mascarpone Tart with Balsamic Glaze

IMG_5168I adore fruit desserts. I like cake, cookies, and bars of all types too, but if given the choice between a slice of fruit filled pie or a slice of chocolate cake- the pie is always going to win. However, as much as I’m smitten with fruit filled confections, I become panic stricken at the thought of making pie. Well, not the whole pie; it’s the crust that produces anxiety, specifically getting that crumbly mass of flour, fat, and ice cold water to come together in such a way that I can roll it out and successfully transfer it to a pie plate. And then, even if I do get the crust in the tin, there is the decorative crimping, braiding, and/or latticing business that has to be worked out! More than one pre-Thanksgiving prep day has resulted in me cursing the pastry gods, followed by a run to the store to buy a premade pie crust that I magically unfurl into the pie tin of my choice.

Homemade pie crust just stumps me. With plenty of practice, patience and loads of flour, shortening or butter and ice water I know I’ll figure it out. But for now, when the fruit at the market or farm stand is begging to be brought home, I rely on desserts that do not have a roll out, transfer to a pie plate component. Think cobblers, crostadas (free form crust) and tarts. Yes, tarts! With a tart, you just dump your crumbly dough in the pan and press it into place- no rolling or transferring required. And tarts are gorgeous. Pans with a removable bottom allow you to see their beautifully formed golden sides. You’ll look like a pastry pro!

This particular tart recipe also has the benefit of a no bake filling, a quick whisk of mascarpone cheese, powdered sugar, lemon juice, zest, vanilla and salt. Topping the tart are perfectly juicy strawberries, the result of a short and sweet mingle with granulated sugar. The tart is absolutely delicious left at that. However, a drizzle of balsamic glaze that has been enhanced with a bit of strawberry juice (product of the previously mentioned mingle) really pushes this dessert over the top.  If your eaters are slightly skeptical of mixing balsamic vinegar with their sweets, serve it in a pretty pitcher on the side. Encourage a try, just a drop or two. I promise they will be converted.

Enjoy!

Strawberry Mascarpone Tart with Balsamic Glaze


*adapted from Gourmet
April 2009IMG_5169

For Tart Shell:

1 ¼ cups all-purpose flour
3 Tbsp granulated sugar
rounded ¼ tsp salt
7 Tbsp unsalted butter, cut into ½” pieces
1 large egg yolk
½ tsp pure vanilla extract
½ tsp fresh lemon juice
1 tsp lemon zest
3 Tbsp cold water

For Filling:

1 ½ lb strawberries, trimmed and halved lengthwise
1/3 cup granulated sugar
½ cup balsamic vinegar
1 lb mascarpone (about 2 cups)
¼ cup powdered sugar
1 tsp fresh lemon juice
½ tsp lemon zest
¾ tsp pure vanilla extract

Equipment: 9-inch fluted tart pan with removable bottom; pie weights, dried beans or raw rice

Make tart shell:

Blend together flour, sugar, salt and butter in a bowl with a pastry blender (or pulse in a food processor) just until mixture resembles coarse meal with some roughly pea-sized butter lumps. Beat together yolk, vanilla, lemon juice, lemon zest and water with a fork, then drizzle over flour mixture and stir with fork (or pulse) until mixture begins to come together.

Knead with floured hands on a lightly floured surface until a dough forms, then gently knead 4 or 5 times. Press into a 5-inch disk. Place in center of tart pan and cover with plastic wrap. Using your fingers and bottom of a flat-bottomed measuring cup, spread and push dough to evenly cover bottom and side of pan. Prick bottom of tart shell all over with a fork and freeze until firm, at least 10 minutes. Preheat oven to 375° with rack in middle. Line tart shell with foil and fill with pie weights, dried beans or raw rice. Bake until side is set and edge is pale golden, about 20 minutes. Carefully remove foil and weights and continue to bake until shell is deep golden all over, about 20 minutes. Cool in pan, about 45 minutes.

Make Filling While Tart Shell Cools:

Stir together strawberries and granulated sugar in a bowl and let stand, stirring occasionally, 30 minutes. Strain in a sieve set over a small saucepan, reserving berries. Add balsamic vinegar to liquid in saucepan and boil until reduced to about ¼ cup, 10-15 minutes. Transfer to a small bowl to cool slightly.

Meanwhile, whisk together mascarpone, confectioners sugar, lemon juice, zest, vanilla, and a pinch of salt until stiff. Cover and keep chilled in refrigerator until ready to use.

Assemble Tart:

Spread mascarpone mixture evenly in cooled tart shell, then top with strawberries. Drizzle balsamic glaze all over tart. Alternatively, drizzle on individual slices as desired.

Here we go!

Using a pastry blender cut butter into the flour mixture.  You can also use a food processor for this step.
Using a pastry blender cut butter into the flour mixture. You can also use a food processor for this step.
The butter has been cut in, leaving the flour mixture crumbly with a few pea sized pieces of butter.
Whisk the egg yolk, lemon juice, zest, vanilla, and water together.
Using a fork, mix the egg yolk mixture into the flour.
Take a small handful of dough and squeeze. If it holds together, the dough is ready to form.
Ready to go!
Ready to go!
Place the dough on a lightly floured surface.
With lightly floured hands, knead the dough 4 or 5 times until it comes together.  Form into a 5 inch disk.
With lightly floured hands, knead the dough 4 or 5 times until it comes together.  Form into a 5 inch disk
Place the disk in tart pan.  Cover with wax paper or plastic wrap.
Place the disk in tart pan. Cover with wax paper or plastic wrap.
Using your fingers and the bottom of a flat bottomed measuring cup, press the dough evenly to cover bottom and sides of tart pan.
Using a fork, prick all over the bottom of the tart.
Using a fork, prick all over the bottom of the tart. Place in freezer to chill for at least 10 minutes.
After an hour in the freezer...
After an hour in the freezer…
Line frozen tart shell with foil and fill with pie weights, dried beans or raw rice.
Line frozen tart shell with foil and fill with pie weights, dried beans or raw rice. Bake in preheated oven for 20 minutes.
After 20 minutes, remove the foil and weights and continue to bake until golden- approximately 20 more minutes.
20 minutes later.  A little too brown, but it will be ok.  Lesson- keep an eye on the tart shell while it's baking!
20 minutes later. A little too brown, but it will be ok. Lesson- keep an eye on the tart shell while it’s baking!
Toss the strawberries and sugar together.  Leave for 30 minutes, stirring occasionally.
Toss the strawberries and sugar together. Leave for 30 minutes, stirring occasionally.
Whisk together mascarpone, powdered sugar, lemon juice, zest, and vanilla.
Whisk together mascarpone, powdered sugar, lemon juice, zest,  vanilla, and pinch of salt.
Using a sieve, strain the strawberries over a small saucepan to catch any juice they've released.
Using a sieve, strain the strawberries over a small saucepan to catch any juice they’ve released.
Add balsamic vinegar to strawberry liquid.  Boil until reduced in half (about 15 minutes).  Set aside to cool.
Add balsamic vinegar to strawberry liquid. Boil until reduced in half (about 15 minutes). Set aside to cool.
Tart shell has cooled for at least 30 minutes.  Ready to assemble
Tart shell has cooled for at least 30 minutes. Ready to assemble!
Spread mascarpone evenly across bottom of tart shell.
Place strawberries on top of filling.
Serve with balsamic glaze on the side.

Happy Cinco de Mayo!

May 5th is just around the corner… why not make something Mexican inspired for dinner?

According to history.com, “Cinco de Mayo—or the fifth of May—commemorates the Mexican army’s 1862 victory over France at the Battle of Puebla during the Franco-Mexican War (1861-1867). A relatively minor holiday in Mexico, in the United States Cinco de Mayo has evolved into a celebration of Mexican culture and heritage, particularly in areas with large Mexican-American populations. Cinco de Mayo traditions include parades, mariachi music performances and street festivals in cities and towns across Mexico and the United States.”

In our house, we use holidays from around the world to help us explore different cultures and cuisines… not armchair travel, more like kitchen chair travel. For example, in February you’ll find us making Longevity Noodles and Lion’s Head Meatballs to ring in the Chinese New Year; in March we’re off to Ireland to honor St. Patrick’s Day with Irish Stew and Soda Bread; with Fall comes Oktoberfest, and a variety of wurst, sauerkraut, and homemade pretzels. You don’t even need a holiday…. pick one night a month  and create a meal influenced by the traditional dishes of a particular state, region or country you’d like to “explore.”

For centuries people have been gathering around the table to break bread together, nurturing their bodies as well as their relationships with family and friends, old and new. Preparing and sharing a meal together, whether it’s a recipe that’s been in your family for generations, or a neighbor’s family, or a stranger’s family from the other side of the world is a beautiful way to connect with and appreciate other cultures. And who doesn’t like to eat!?!

Let’s get in the kitchen and go…

Flat Iron Steak with Grilled Cabbage and Scallions

Flat Iron Steak with Grilled Cabbage and Scallions
*adapted from Bon Appetit
February 2014

Ingredients

Steak:
2 garlic cloves, peeled
2 Tablespoons fresh lime juice
2 Tablespoons olive oil
2 Tablespoons finely chopped red onion
1 ½ Tablespoons hot smoked Spanish paprika
1 Tablespoon chopped cilantro
½ Tablespoon ground cumin
½ teaspoon salt
1 pound flat iron steak (you can also use skirt or flank steak), cut into 2 equal pieces

Vegetables:
½ medium head of cabbage, cut into 2 wedges, core intact
½ large white onion, halved lengthwise with some root end attached
½ bunch of scallions, trimmed
1 ½ Tablespoons olive oil
salt and freshly ground pepper
2 Tablespoons finely chopped red onion
1 Tablespoons lime juice
1 Tablespoon chopped fresh cilantro

For Serving:
warm corn and/or flour tortillas
guacamole
salsa

Preparation:

For steak:
Puree garlic, lime juice, oil, onion, paprika, cilantro, cumin, and salt in a blender until smooth. It will resemble a thick paste. Transfer steak to shallow casserole or baking dish. Top with marinade, spreading all over. Turn to coat other side of the steaks as well. Cover with foil or plastic wrap and chill for at least 4 hours.
*Can also be marinated 1 day ahead. Keep chilled.

For vegetables and assembly:
Prepare grill, griddle, or grill pan over medium high heat. Drizzle cabbage, white onion, and scallions with 1 Tablespoon olive oil; season with salt and pepper. Grill, turning occasionally, until vegetables are charred and softened, about 4 minutes for scallions, 10-12 minutes for cabbage and onion. Let vegetables cool slightly.

Core cabbage and cut into bite-size pieces along with scallions and onion. Toss chopped vegetables in a large bowl with red onion, lime juice, cilantro, and remaining ½ tablespoon oil; season with salt and pepper.

Remove steaks from marinade, scraping off excess; season with salt and pepper. Grill steak until medium rare, about 3 minutes per side. Transfer to a cutting board and let rest 5-10 minutes before slicing. Serve steak with vegetables, tortillas, guacamole, and salsa.

Here are the ingredients for marinade.
Gather ingredients for marinade.
After a whiz in the blender, you'll end up with a thick paste.
After a whiz in the blender, you’ll end up with a thick paste.
After cutting the flat iron into 2 pieces, place it a casserole or ziploc bag.  Coat with marinade.  Make sure to do both sides!
Cut the flat iron into 2 pieces, place it a casserole or ziploc bag. Coat with marinade. Make sure to do both sides!  I used a flat iron steak because that was what was available at my grocery store. Skirt steak was called for in the original recipe; flank steak would work just as well. Chicken or even shrimp would be delicious though be aware cooking times would change.
After coating both sides, cover casserole or seal bag and chill (you and the meat!) for at least 4 hours or overnight.
Time to gather the vegetables.
Veggies are prepped, drizzled with olive oil, and sprinkled with salt and pepper. Be sure cabbage sections have core intact and onion quarters have a little bit of root left to hold them together.
Onto a preheated griddle (or grill), set on medium high heat.
Flip them over to char other side.  Scallions are already done. Cabbage and onion will need some more time.  They should be tender, but still have some crunch.
Flip them over to char other side. Scallions are already done. Cabbage and onion will need some more time. They should be tender, but still have some crunch.
Perfect!  Ready to come off.
Perfect! Ready to come off.
Set aside the veggies to cool while you get ready to cook the steak.
Scrape excess marinade off the meat and discard.  Remember to do both sides.
Scrape excess marinade off the meat and discard. Remember to do both sides.
Season with salt and pepper and place under the broiler or over a grill set on medium high heat.  As you can see, I put mine under the broiler, it had just come out of the fridge, so took about 5 minutes per side for medium rare.
Season with salt and pepper and place under the broiler or over a grill set on medium high heat. As you can see, I put mine under the broiler; it had just come out of the fridge, so took about 5 minutes per side for medium rare.
While the meat is cooking, chop your veggies and place in a serving bowl. Toss with red onion, lime, cilantro, olive oil, salt and pepper.
Remove your meat from the oven or grill, let it rest for 5-10 minutes before slicing.  Remember to cut across the grain.
Remove your meat from the oven or grill, let it rest for 5-10 minutes before slicing, cutting across the grain.
Serve with warm tortillas, guacamole, and salsa.

Breakfast for Dinner

Breakfast for Dinner

My first post… where to start; what to make?!?! This is a first impression. “You only get one chance to make a good first impression.” Oh, the pressure!

Taking this idea of blog from a spark in my mind to an actual functioning website has been quite a learning curve… and I am definitely still learning. At first all I could think about was, “what I am going to make, eat, photograph, write about?” The possibilities are endless and even better, so delicious. Then reality struck… domain names, mapping your domain, blog themes, plug ins, code, pixels. All the behind the scenes that go into creating every single website you visit. And that doesn’t even begin to include the actual content. All of the technical aspects sidelined me for a while. I started to think, “I can’t make the site public, it’s not ready; it’s not perfect; it could be better. But I’ll never think it’s ready, or perfect or couldn’t be better. And that is life- you can’t wait for the perfect moment- because you may be waiting a long time. So here I go!

As I said, I’ve been thinking about this blog for a while. Imagining how it will look and feel, and what it will say about me in my kitchen. According to the calendar, it’s Spring, a season of new beginnings, perfect for my new venture. I’ll definitely make something spring inspired, and local. Scrap that, in the northeast, after this winter, we still have snow on the ground. Lots of winter squash and root vegetables to be had… I’ll do something hearty and warm.

Fast-forward to a Friday night, I didn’t plan to make this meal my first post, actually I didn’t plan to make this meal at all. We were going to have Baked Ziti with Meat Sauce. Just as I was about to put the dish in the oven, I remembered it was Friday, during Lent, which means no meat for us. Did I mention my son had a buddy over for dinner? And he needed to be home in 30 minutes? A brief moment of panic and then a quick regroup. I fell back on an old friend, tried and true… Breakfast for Dinner! We love Breakfast for Dinner in our house, but haven’t been down that road in a while. I did a lot of it when the kids were younger, but not lately. Breakfast for Dinner can mean eggs, pancakes, French toast- it’s fast and you probably have all the necessary ingredients on hand. So on this particular Friday night, I made the Puffy Pancake (also known as a Dutch Baby). Five humble ingredients, an ovenproof skillet and 20 minutes are all you need to bring a warm, delicious and dramatic dinner to the table. If you’re feeling ambitious serve with some fruit on the side… sautéed sliced apples in the cold weather months or fresh ripe berries when they’re in season make perfect accompaniments.  Maple syrup is optional, a dusting of powdered sugar or dollop of jam are just as sweet, and in my opinion even tastier!

IMG_4831

Puffy Pancake

  • Servings: 4
  • Print

~from the Joy of Cooking

Ingredients
½ cup milk
½ cup all purpose flour
¼ cup sugar
2 large eggs, at room temperature
4 tablespoons unsalted butter

Directions
Preheat oven to 425°

Whisk milk, flour, sugar and eggs together until smooth. Melt the butter in a 10” ovenproof skillet (cast iron is terrific). Tilt the pan so that the butter coats the sides. Pour the egg mixture into the skillet and cook, without stirring for 1 minute. Place the skillet in the oven and bake until the pancake is puffed and golden, 12-15 minutes. Dust with powdered sugar and serve immediately as the pancake loses it’s puff fairly quickly.

Five humble ingredients
Combine milk, eggs, flour and sugar
Whisk
Whisk
Melt butter in an ovenproof skillet
Swirling to coat sides of skillet
Pour in the batter and cook for one minute without stirring
Put in preheated oven
Voila! 12-15 minutes later, you have the Puffy Pancake. Sprinkle with powdered sugar and serve immediately as it's starts deflating quickly.
Voila! 12-15 minutes later, you have the Puffy Pancake. Sprinkle with powdered sugar and serve immediately as it starts deflating quickly.